HI WELCOME TO SIRIS
Showing posts with label angular. Show all posts

Angular cli generate component

Leave a Comment

In this video we will discuss generating components using Angular CLI.


You must have the npm packages installed to be able to generate components using Angular CLI. Otherwise when we try to generate components using the ng generate command we will get the following error.
node_modules appears empty, you may need to run 'npm install'


The following command creates a new Angular project with name "myProject" but it does not install the npm packages as we have used -si flag. The -si flag as we know skips installing the npm packages.
ng new myProject -si


At this point if we try to generate a new component using the following ng generate command, it reports an error - node_modules appears empty, you may need to run 'npm install'
ng generate component abc

We will have to first execute npm install command to install the required packages. Once this is done we will be able to generate components.

To generate a component use the following Angular CLI command
ng generate component ComponentName

OR the shortcut as shown below. In the following command the letter g stands for generate and the letter c stands for component
ng g c ComponentName

When we execute this command (ng g c abc) , several things happen
  • A folder with name abc is created
  • The component files (Component class, View template, CSS file and the spec file ) are created and placed inside the folder "abc"
  • The root module file (app.module.ts) is also updated with our new component i.e the required import statement to import the abc component from the component file is included and the component is also declared in the declarations array of the @NgModule() decorator
angular cli generate component example

Placing the generated component folder in a different folder : By default a separate folder is created for every new component that we generate, and the component files (.ts, .css, .html & .spec) are placed in this folder. This newly created folder is placed in the app folder by default. If you want the newly created folder to be placed in a different folder other than the app folder, simply include the folder name in the ng generate command as shown below.
angular cli generate component in folder

Notice now, the newly created "xyz" component folder is placed inside "abc" folder instead of the "app" folder
angular cli generate new component

Generating a new component without a folder : To create a component without a folder, use --flat option with the ng generate command
angular cli generate component without folder

Notice for the newly generated "pqr" component a separate folder is not created. The component files are placed in the "app" folder.
angular cli generate component command

Placing the flat component files in a different folder other than app : A flat component is a component that is created with --flat option. This component does not have it's own folder. By default the flat component files are placed in the "app" folder. If you want to place them in a different folder instead, specify the folder name along with the ng generate command.
angular cli flat component

Notice, the newly generated "jkl" component files are placed in "abc" folder instead of the "app" folder.
angular generate flat component.png

Using --dry-run flag with component generation : Just like how we can use the --dry-run flag with "ng new" command, we can also use it with ng generate command. The --dry-run flag reports the files and folders that will be generated, without actually generating them. Once you are happy with what it is going to generate, you can remove the --dry-run flag and execute the command.

For example, the following ng generate command reports that it creates an external template and stylesheet for the component. It also generates a spec file (unit test file). Notice we have run the command with -d flag, so it only reports the files it is going to generate, without actually generating them.
angular cli generate component dry run

If you want an inline template and styles instead of an external template and stylesheet, use -it flag for inline template and -is flag for inline styles. Along the same lines, if you do not want a spec file use --spec=false. Notice we are also using the -d flag.
angular generate flat component

To use sass instead of CSS with your component, use the --style=scss flag with ng generate command. If you want less use --style=less
angular cli generate component with scss

Angular CLI project structure - 2

Leave a Comment

we discussed all the files and folders in angular project except the "src" folder and it's contents. In this video we will discuss the "src" folder and it's contents.


File / FolderPurpose
src folderAs the name implies, this folder contains all our angular project source code. Components, templates, pipes, services, images, styles etc that our angular application needs are present in this folder. The rest of the files and folders that are present outside this folder, are there to support building our angular application
assetsAs the name implies, the assets folder contains the assets of your application like images and anything else to be copied when you build your application
environmentsThis folder contains the environment files. By default we have 2 environment files. environment.ts is for for development environment. Notice production property in this file is set to false. environment.prod.ts is for production. Notice in this file production property is set to true as expected. The build system defaults to the dev environment which uses `environment.ts`, but if we do a production build environment.prod.ts will be used. The file and environment mapping is in Angular CLI configuration file (.angular-cli.json)
favicon.icoThis is the favorite icon for your application which is typically displayed in the browser address bar and next to the page name in a list of bookmarks. Angular CLI provides this favorite icon out of the box. You may replace this favicon with your own company favicon
index.htmlThe main HTML page that is served when someone visits your site
main.tsThe main entry point for the application. This file contains the code to bootstrap the application root module (AppModule)
polyfills.tsThis is the polyfills file. Angular is built on the latest standards of the web platform. Targeting such a wide range of browsers is challenging because not all browsers support all features of modern browsers. This can be compensated by using polyfill scripts as they implement the missing features in JavaScript. So these polyfills allow us to use an API regardless of whether it is supported by a browser or not
styles.cssThis file contains the global styles of our application. Styles that are local and specific to a component are often defined with in the component itself for easier maintenance
test.tsThis file is the main entry point for unit tests and loads all the .spec and framework files
tsconfig.app.jsonTypeScript compiler configuration for the Angular app
tsconfig.spec.jsonTypeScript compiler configuration for the unit tests
typings.d.tsThis is the TypeScript typings file. Many JavaScript libraries, such as jQuery, Angular etc extend the JavaScript environment with features and syntax that the TypeScript compiler doesn't recognize natively. When the typeScript compiler doesn't recognize something, it throws an error. So, we use TypeScript type definition files to tell the compiler about those libraries. These TypeScript type definition files have the extension d.ts. TypeScript editors leverage these type definition files to display type information

Many libraries include type definition files in their npm packages. Angular is one such library. For example, if you look inside node_modules/@angular/core/ folder in an Angular application, it already contains the type definition files. All the files that have the extenstion d.ts are the type definition files. We will discuss more about these type definition files in our upcoming videos
app.component.
{ts,html,css,spec.ts}
The root component (AppComponent) TypeScript, HTML template, StyleSheet and Spec files
app.module.tsThis is the root application module (AppModule)

Angular CLI project structure - 1

Leave a Comment

In this video we will discuss the Angular project structure. I have split this into 2 videos. In this video, we will discuss all the files and folders in the Angular project, except the "src" folder and it's contents. In our next video we will discuss the "src" folder and it's contents.


One of the easiest ways to create a working angular project, is by using the Angular CLI. The following Angular CLI command creates a working Angular Project out of the box
ng new AngularProject

The image below shows the Angular project in Visual Studio Code.

angular cli project structure

As you can see there are several files in the project. The table below shows the purpose of each file/folder.

File / FolderPurpose
package.jsonThis file contains the packages to build and run our application. It contains two sets of packages, dependencies and devDependencies. The dependencies are essential for running the application. The devDependencies are only required to develop the application. These packages are installed into the node_modules folder by the Node Package Manager (npm), when npm install commaned is excuted. You can also add your own custom scripts here.

"scripts" property in package.json file contains the useful npm commands. Notice we have "start": "ng serve". This means when we execute npm start it executes ng serve which builds and starts the server. In addition if you also want to launch the browser and open the application
CHANGE "start": "ng serve" TO "start": "ng serve --open"
node_modulesThe packages specified in package.json file are installed into this folder when we run npm install command
e2e FolderContains end-to-end tests and their configuration files. We will discuss end-to-end tests in our upcoming videos
.angular-cli.jsonThis is the Angular CLI configuration file. We discussed the use of this file in our previous video.
.editorconfigConfiguration file for Visual Studio Code. The settings in this file let you set certain code style guidelines. For example what indent_style do you want - spaces or tabs and what should be the indent size etc. You can share this editorconfig file with other developers to maintain consistent coding styles. To read more about editor configuration please visit http://editorconfig.org
.gitignoreThis file is used to determine files and folders you don't want to check in to source control. For example one of the folders we do not want to check in to source control is /dist folder which is auto generated when we build the application. So this folder is listed in this file. So, all the files and folders listed in this file are ignored, when a change set is checked in to source control.
karma.conf.jsKarma is the unit test runner for angular applications. As the name implies, karma.conf.js is the configuration file for Karma.
protractor.conf.jsProtractor is an end-to-end test framework for Angular applications. As the name implies, protractor.conf.js is the configuration file for Protractor.
README.mdThis is a README file which contains the commonly used Angular CLI commands out of the box. You may enhance it with your own project documentation so that anyone checking out the repo knows the commands to use to build, run and test your app.
tsconfig.jsonThis is the TypeScript compiler configuration file. This file has several TypeScript compiler configuration settings. For example, to compile TypeScript to JavaScript on saving a TypeScript file set compileOnSave setting to true. If you do not want .map files to be generated, set sourceMap to false. .map files are used for debugging your application.
tslint.jsonAngular has a linting tool that checks our TypeScript code for programmatic and stylistic errors as well as non-adherence to coding standards and conventions. tslint.json is the configuration file for linting. We will discuss the settings in this file when we discuss linting in our upcoming videos.

In our next video we will discuss the "src" folder and it's contents.

Angular CLI configuration file

Leave a Comment

In this video we will discuss the significance of the Angular CLI configuration file (.angular-cli.json)


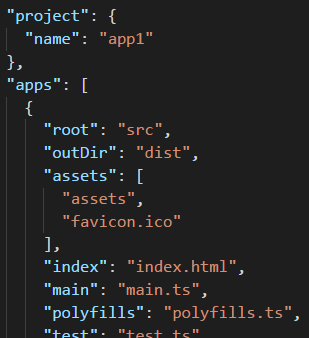
This is the configuration file that the Angular CLI uses. As you can see from the image, it has several settings in it.

Angular CLI configuration file


The settings from this file are used when we
  • Generate angular features likes components, pipes, services etc
  • Run unit and end-to-end tests
  • Build the application etc.
We will be revisiting this file many times as we progress through this Angular CLI course.

The table below shows some of the settings and their purpose. We will discuss the other settings and their purpose as we progress through the course.

SettingPurpose
project : nameName of the project
apps: rootThe root directory of the application. Default is src. We can change this using the "source-dir" option when generating a new angular project using the "ng new" command
apps: outDirThe output directory for build results. Default is dist
apps: assetsList of application assets that you want to copy when building your project. By default, the src/assets/ folder and src/favicon.ico are copied over
apps: indexThe name of the start HTML file which is index.html by default
apps: mainThe name of the main entry-point file. main.ts by default
apps: polyfillsThe name of the polyfills file. Angular is built on the latest standards of the web platform. Targeting such a wide range of browsers is challenging because not all browsers support all features of modern browsers. This can be compensated by using polyfill scripts that implement missing features in JavaScript
apps: stylesGlobal styles to be included in the build. Default is styles.css. We can also use less or scss. To change to less or scss, use the "style" option when generating a new angular project using the "ng new" command
apps: prefixThe selector prefix to apply for the generated components. Default is "app". This can be changed by using the "prefix" option when generating a new angular project using the "ng new" command

The important point to take away is that the values in the Angular CLI configuration file depends on the options that you have used with the "ng new" command when generating a new angular project. For example, if you do not use the --prefix option with the "ng new" command, then the default value "app" is stored in the configuration file for "prefix" setting. So the root component (AppComponent) that is created at the application generation time has "app" as the selector prefix.

Instead if you want "pragim" as the prefix, use --prefix flag along with "ng new" command. When you do this several things happen
  1. "pragim" is stored as the "prefix" setting value in .angular-cli.json configuration file
  2. "pragim" is used as the selector prefix for the root component that the "ng new" command generates
  3. Any new component that you generate in the future using the following command will also have "pragim" as the selector prefix
    ng generate component componentName
  4. If you want to override the prefix setting in the angular cli configuration file, you can use --prefix option with the generate command as shown below. This will generate the component "xyz" with the prefix "tech" instead of "pragim"ng generate component xyz --prefix tech
  5. Some of the options like --prefix can be used with several commands like ng new and ng generate
Please note : If you generate a project with --skip-install flag and when you try to generate a new component using "ng new" command before executing the "npm install" command you will get the following error
node_modules appears empty you may need to run npm install

To fix this, please first execute "npm install" to install the required npm packages and then generate the component.

Angular CLI ng new options

Leave a Comment

In this video we will discuss some of the common options that we can use with ng new command.


The table below shows the common options, their data types, default values, alias and a short description of what they do.
FlagTypeDefaultAliasPurpose
--dry-runBooleanfalse-dRun through without making any changes. Just reports the files that will be created
--skip-installBooleanfalse-siSkip installing packages
--skip-testsBooleanfalse-stSkip creating tests
--inline-styleBooleanfalse-isUse inline styles when generating the new application
--inline-templateBooleanfalse-itUse inline templates when generating the new project

Customize Command Prompt

Leave a Comment

In this video we will discuss how to customise command prompt window. You might be wondering why are we talking about customising Command Window in an Angular CLI course. As we know, Angular CLI is a command line tool. We run it using the command prompt window. If we know how to customise the command prompt window to suit our needs, then we have better experience using the Angular CLI. 


If you already know, how to customise the command prompt window, you may skip this video.

As far as Angular CLI is concerned, the most useful command I think is, ng --help. When we type this command in the command prompt window and hit enter key, it displays all the Angular CLI commands and the options we can use with these commands.


As we scroll up in the command prompt window, notice we are not able to see all the commands and their associated options. To fix this we have to increase the buffer size. To increase the buffer size there are 2 simple steps

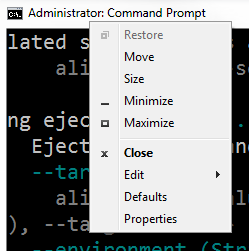
Step 1 : Right click on the "title bar" of the command window and select "Properties" from the context menu
Customize Command Prompt

Step 2 : Click on the "Layout" tab and set the "Height" property to 9999 under "Screen Buffer Size" section, and click "OK"
increase number of lines in command prompt

With this change in place, execute that same command ng --help. Notice now we can see all the commands and their associated options.

There is lot of help text displayed on the screen. If you want to find a specific command you can use the search feature of the command window. To use the search feature, right click on the "title bar" of the command window and select "Edit" from the context menu. You can then use the "Find" window to search for the command you are looking for.

To redirect the output of ng --help command to the windows clipboard, use the CLIP command as shown below.
ng --help | clip

Once you have the output copied in the clipboard you can paste it anywhere you want it. For example in a notepad, word document etc.

You can also redirect the output directly to a text document using the following command. This command creates a text document with name MyTextDoc.txt  in the folder where you have executed the command. This text documents will have the output of the command ng --help.
ng --help >MyTextDoc.txt

Similarly you can also redirect the output to a word document.
ng --help >MyWordDoc.doc

From the properties window of the command prompt you can also change the cursor size, font size, font colour and background colour.

Angular CLI Create new project

Leave a Comment

In this video we will discuss 

  1. How to create a new angular project from scratch using Angular CLI
  2. Run the app
  3. Run unit and end-to-end test

In this course we will use Visual Studio Code as the editor. Visual Studio Code is free and you can use it on any platform - Windows, Mac or Linux. If you have not installed it already, please install it by downloading from the following link.
https://code.visualstudio.com/download


To create a new Angular Project, open Command Prompt as an Administrator and execute the following command. This command creates all the required files and also installs all the required packages. Depending on your computer and internet connection speed, this command takes a few minutes to complete.

c:\>ng new MyFirstApp
  • ng is the Angular CLI
  • new for creating a new application
  • MyFirstApp is the name of your angular application
There are several options that we can use with "ng new". We will discuss all these options in our next video.

Once the above command has completed successfully you will see the following messages.
Installed packages for tooling via npm.
Project 'MyFirstApp' successfully created.

So what did this "ng new" command do
  • A new folder with name MyFirstApp is created
  • All the required configuration and source files are created.
  • All the npm dependencies are installed in node_modules folder
  • Unit and end-to-end tests are created
  • The Karma unit test runner is configured
  • The Protractor end-to-end test framework is configured
We will discuss unit tests, end-to-end tests, Karma and Protractor in our upcoming videos.

Please note that all these code and configuration files are created by the Angular CLI out of the box while still following the angular teams best practices and conventions.

Now, go to the folder (MyFirstApp) that contains our angular project, by executing the following command. cd stands for change directory
cd MyFirstApp

Now execute the following command at the command prompt to open the project folder in Visual Studio Code. Notice there is a single space and a DOT after the word code.
code .

At this point in Visual Studio Code you will see all the Angular project files. Also notice node_modules folder, that conatins all the installed packages.
angular cli create new project

We will discuss, what all these files are and their purpose in our upcoming videos.

To run the project using Angular CLI, type the following command at the command prompt. This command builds the application and opens it in our default browser. The flag --open, launches our default browser and runs the application. By default the application runs on port 4200. We can change this port number if required. We will discuss how to do that in our upcoming videos.
ng serve --open

At the moment, the angular development server is running in watch mode, meaning when a file changes, those changes are automatically detected, compiled and the browser reloads to reflect the changes. This is called live reload. We can turn this live reload functionality off, if required. Again we will discuss how to do this in our upcoming videos.

To stop the server, press CTRL + C while you are on the command prompt and then "Y" and ENTER key. This will stop the server.

To run all the unit tests, use the following command
ng test

To run all the end-to-end tests, use the following command
ng e2e

We will discuss Unit tests, end-to-end tests and all the options we can use to run them using Angular CLI in our upcoming videos.

Installing Angular CLI

Leave a Comment

We will discuss how to install Angular CLI


Prerequisites for installing Angular CLI : To install Angular CLI you should have installed Node 6.9.0 or higher, and NPM 3 or higher

To check the versions that you have on your machine type the following commands in a command window.
  • node -v 
  • npm -v
You can get the latest version of Node and NPM from the following website. Click on the correct download link depending on the Operating System you have.
https://nodejs.org/en/download/

Once you have Node and NPM installed. Run Command Prompt as an administrator and execute the following command. Flag -g installs Angular CLI globally on your machine.
npm install -g @angular/cli

You can also use i as shortcut for install. So the above command can also be rewritten as shown below
npm i -g @angular/cli

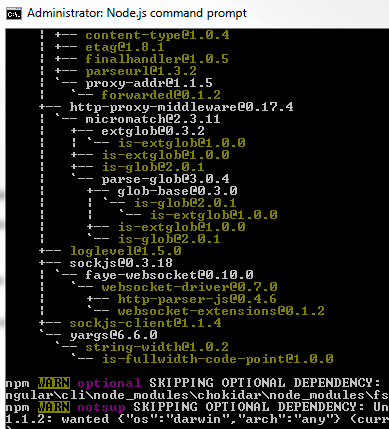
If you see a tree structure as shown below, you have Angular CLI installed successfully. 
install angular cli on windows 10

To verify the version of Angular CLI installed, execute the following command
ng -v

At the time of this recording, I have Angular CLI version 1.4.2 installed on my machine as you can see from the screenshot below.
angular cli setup

If you run into any problems installing Angular CLI, follow these steps and hopefully Angular CLI will be installed successfully.

Step 1 : Delete "npm" folder from the following path
C:\Users\Your_UserName\AppData\Roaming

Please note : If you cannot find "AppData" folder, make sure in your windows operating system, you have "Show hidden files, folders, and drives" option is turned on. "AppData" is a hidden folder.

Step 2 : Once you have the "npm" folder deleted, uninstall node.js. On a windows machine you can uninstall node.js from Control Panel\All Control Panel Items\Programs and Features. Right click on "Node.js" and select "uninstall" from the context menu.

Step 3 : Reinstall Node.js by downloading the appropriate installer for your operating system from the following link.
https://nodejs.org/en/download/

Step 4 : Run Command Prompt as an Administrator and try to install Angular CLI again using the following command. Hopefully this time it installs successfully. If not, please leave the problem you are facing as a comment on this video and we will try to help as soon as we can. Also, if you had a problem and you solved it yourself, please let us know what the problem is and how you solved it by leaving a comment, so it could help others with a similar problem. After all, it's all about sharing and learning from each other.
npm install -g @angular/cli

What is Angular CLI

Leave a Comment

1. What is Angular CLI

2. Why should we use Angular CLI and the benefits it provide

Before watching this course I strongly recommend to watch our Angular 2 tutorial for beginners course in which we have discussed all the basics of Angular. Once you have a good understanding of the angular basics, it will be easy for you to get the most out of this Angular CLI course.

First let's understand why should we use Angular CLI and what problems it solves.

If you have any experience with Angular, then you already know manually setting up an Angular application from scratch is a laborious and time consuming process. We have to
  1. Create a separate application folder and add the package definition file ( ie. package.json) and other configuration files. We will discuss what these configuration files are in detail in our upcoming videos in this series.
  2. Install the packages using NPM
  3. Create the root application component (i.e AppComponent) as every angular application should have atleast one component which is the root component. This root component bootstraps the angular application. 
  4. Create the root application module (AppModule) as every angular application should have atleast one module which is the root module
  5. Create main.ts file which is the entry point to the application. The code in this file, loads the angular root module - AppModule
  6. Create index.html which hosts our application
You have to manually write all the boilerplate code yourself, which is not only monotonous but also time consuming. If you have an inline view template and inline styles for your component, then it is enough if you just create the TypeScript component class file. But if you have lot of HTML and styles, then for maintainability and separation of concerns, you want your HTML to be in a separate template file and your styles in a separate stylesheet. In this case you will have to manually create the HMTL template and CSS files as well in addition to the component class file.

In a real world application, we will have many components. Just imagine the amount of time we have to spend to create these different component files and the same boilerplate code. In an Angular application, in addition to components, we also have directives, pipes, services etc. Again imagine the amount of time it takes to create that same boilerplate code for all these.

In a real world, we usually have more than one developer working on a given angular project. While all these developers are creating these different files and writing the required boiler plate code, are they following the angular teams best practices and conventions. What if the developers are not following them. How do we enforce them. Well, one way to enforce these is by manual code reviews. Code reviews are not only time consuming but also error prone. 

The other option is to have some tooling in place to address this. Angular CLI is such a tool. It help us create angular applications, components, modules, pipes, directives, services and much more with great speed and consistency while still following the angular teams best practices and conventions.

What is Angular CLI
  1. CLI stands for Command Line Interface. So Angular CLI is command line tool the help us 
  2. Create Angular applications faster and with great consistency
  3. Create the boiler plate code for angular features like components, directives, pipes, services etc.
  4. Create boiler plate code for TypeScript features like classes, interfaces, enums etc.
  5. It follows angular best practices and conventions out of the box
  6. Run Unit and End-to-End (e2e) tests
  7. Create optimised builds for deployment to production
We will see all these in action in our upcoming videos.

No doubt Angular CLI, will greatly help us improve our productivity as it can get an angular app up and running in no time. It can also generate components, directives, pipes, services etc with great speed. However, to get the most out of this tutorial and to understand what CLI does, it is better to understand how to manually create an angular project from scratch. Also learn how to manually create components, pipes, services, modules etc. Once you have a good working knowledge of how these different pieces fit together in an angular application, we can then use tools like Angular CLI to boost our productivity. Otherwise, if a there is a problem with a feature generated by Angular CLI, it might take a very long time to identify what is wrong. We have covered the basics of creating components, services, pipes etc in our Angular 2 course.

Difference between AngularJS, Angular 2 and Angular 4

Leave a Comment

So far Google  has released 3 versions of Angular and you can see the timelines below.

VersionYear
AngularJS2010
Angular 22016
Angular 42017

What is the difference between AngularJS and Angular 2
The first version of Angular is called AngularJS and was released in the year 2010. Some people call it Angular 1, but it is officially called AngularJS. 

Angular 2 is released in the year 2016. The most important thing to keep in mind is that, Angular 2 is not a simple upgrade from angular 1. 

Angular 2 is completely rewritten from the ground up and as a result the way we write applications with AngularJS and Angular 2 is very different. 

AngularJS applications revolve around the concept of controllers. To glue a controller and a view in AngularJS we use $scope. With Angular 2 both controllers and $scope are gone. Angular 2 is entirely component based, which means we create a set of independent or loosely coupled components and put them together to create an Angular 2 application. So components are the building blocks of an Angular 2 application. The advantage of the component-based approach is that, it facilitates greater code reuse. For example, if you have a rating component, you may use it on an employee page to rate an employee or on a product page to rate a product. From unit testing standpoint, the use of components make Angular2 more testable. 

From a performance standpoint, Angular 2 is 5 times faster compared to AngularJS.

AngularJS was not built for mobile devices, where as Angular 2 on the other hand is designed from the ground up with mobile support in mind. 

With Angular 2 we have more language choices. In additon to nativa JavaScript we can use TypeScript, Dart, PureScript, Elm, etc. Among all these languages, TypeScript is the most popular language for developing Angular 2 applications as it provides the following benefits.
1. Intellisense 
2. Autocompletion
3. Code navigation
4. Advanced refactoring
5. Strong Typing
6. Supports ES 2015 (also called ES 6) features like classes, interfaces and inheritance. 

We already discussed these differences in Part 1 of Angular 2 tutorial

Angular 4 is released in 2017. So, What is the difference between Angular 2 and Angular 4

If you have worked with both Angular 1 and Angular 2, then you already know that the API's and patterns that we use to build applications are very different between these 2 versions. From a developer stand point, it is like learning 2 different frameworks. Since Angular 2 is a complete rewrite from Angular 1, moving from Angular 1 to Angular 2 is a total breaking change. 

However, changing from Angular 2 to Angular 4 and even future versions of Angular, won’t be like changing from Angular 1. It won’t be a complete rewrite, it will simply be a change in some core libraries. From a developer standpoint, building an application using Angular 2 and Angular 4 is not very different. We still use the same concepts and patterns.  Angular 4 is simply, the next version of Angular 2. The underlying concepts are still the same and if you have already learnt Angular 2 then you’re well prepared to switch to Angular 4.

The most important point to keep in mind is, Angular 4 is backwards compatible with Angular 2 for most applications.

What has changed and what is new in Angular 4

Some under the hood changes to reduce the size of the AOT (Ahead-of-Time) compiler generated code. Migrating to Angular 4 may reduce the production bundles by hundreds of kilobytes. As a developer this change will not affect the way we write angular applications in any way.

TypeScript 2.1 and 2.2 compatibility. Angular is updated with a more recent version of TypeScript, for better type checking throughout our application. Up until Angular 4, only TypeScript 1.8 was supported. With Angular 4, we can use typescript 2.1 or 2.2 which means we can use all the new features of TypeScript with Angular 4.

Animation features are pulled out of @angular/core and are moved into their own package. This means that if you don’t use animations, this extra code will not end up in your production bundles. On the other hand, if you do have animations in your application, you may have to change your existing code to pull the animation features from the animations package.

We can now use an if/else style syntax with *ngIf structural directive. In Angular 2, to implement if/else logic, we use 2 *ngIf structural directives. With Angular 4, we can use it's new if/else style syntax with *ngIf structural directive. We will discuss an example of this in our upcoming videos.

What happened to Angular 3. Why did we move straight from Angular 2 to Angular 4. What is the reason for skipping Angular 3.
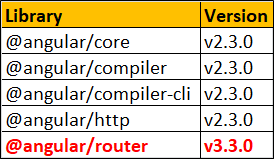
Except the Router library, all the other Angular core libraries are versioned the same way and are shipped as NPM packages as you can see below. While all the other core angular packages are at Version 2, the router library is already at Version 3.
why angular 3 is not released

Due to this misalignment of the router package’s version, the angular team decided to go straight for Angular v4. This way, all the core packages are aligned which will be easier to maintain and help avoid confusion in the future.

Some naming guidelines are also provided by the Angular team
  1. Use "AngularJS" to describe versions 1.x or earlier
  2. Use "Angular" for versions 2.0.0 and later. 
  3. Use the version numbers "Angular 4.0", "Angular 2.4" when you need to talk about a specific release. Otherwise it is just enough if you use the word Angular. For example, you are an Angular developer and not Angular 2.0 developer or Angular 4.0 developer.
  4. Angular 4 is simply, the next version of Angular 2. The underlying concepts are still the same and if you have already learnt Angular 2 then you’re well prepared to switch to Angular 4.
Do I have to learn AngularJS 1 before learning Angular 2
No. You can think of AngularJS 1 and Angular 2 as 2 different frameworks. The concepts, the API's and patterns that we use to build applications are very different between these 2 versions. So there is no need to learn AngularJS 1 before you learn Angular 2.

Do I have to learn Angular 2 before learning Angular 4
From a developer standpoint, building an application using Angular 2 and Angular 4 is not very different. We still use the same concepts, APIs and patterns. Angular 4 is simply, the next version of Angular 2 and contains a few changes and enhancements as discussed above. So you really have 2 options here. Learn Angular 2 first and then the changes and enhancements introduced in Angular 4, OR learn all the angular concepts using version 4. Either ways you are an Angular developer. 

Angular observable unsubscribe

Leave a Comment

Let us understand this with an example. Here is what we want to do. When the request to the server is in progress we want to display "Cancel Request" button.

Angular observable unsubscribe


The "Cancel Request" button should only be visible to the user when there is a request in progress. When the request fails permanently after exhausting all the retry attempts the button should disappear. 
observable unsubscribe example

Along the same lines if the request completes successfully, then also the button should disappear.
how to unsubscribe from observable angular 2

When the user cancels the request, by clicking the "Cancel Request" button, the request should be cancelled and button should disappear.
angular cancel observable

To achieve this, include the following HTML in employee.component.html file. This HTML is for the "Cancel Request" button. Please pay attention to the structural directive ngIf on the <div> element that contains the button. As you can see we are showing the "Cancel Request" button only if the subscription is not closed (!subscription.closed), meaning only when there is a request to the Observable is in progress. 

The ngIf directive will take care of showing and hiding the <div> element depending on whether the subscription is closed or not. We are also binding the click event of the button to "onCancelButtonClick()" method. We will create both the subscription object and the "onCancelButtonClick()" method in the component class.

<div style="margin-top:5px" *ngIf="!subscription.closed">
    <input type="button" class="btn btn-primary" value="Cancel Request"
           (click)="onCancelButtonClick()" />
</div>

Now modify the code in employee.component.ts file as shown below. The relavant code is commented and self-explanatory.

import { Component, OnInit } from '@angular/core';
import { IEmployee } from './employee';
import { EmployeeService } from './employee.service';
import { ActivatedRoute } from '@angular/router';
import { Router } from '@angular/router';

import 'rxjs/add/operator/retrywhen';
import 'rxjs/add/operator/delay';
import 'rxjs/add/operator/scan';
// import ISubscription.
import { ISubscription } from "rxjs/Subscription";

@Component({
    selector: 'my-employee',
    templateUrl: 'app/employee/employee.component.html',
    styleUrls: ['app/employee/employee.component.css']
})
export class EmployeeComponent implements OnInit {
    employee: IEmployee;
    statusMessage: string = 'Loading data. Please wait...';
    retryCount: number = 1;

    // Create a class property of type ISubscription
    // The ISubscription interface has closed property
    // The ngIf directive in the HTML binds to this property
    // Go to the difinition of ISubscription interface to
    // see the closed property
    subscription: ISubscription;

    constructor(private _employeeService: EmployeeService,
        private _activatedRoute: ActivatedRoute,
        private _router: Router) { }

    ngOnInit() {
        let empCode: string = this._activatedRoute.snapshot.params['code'];

        // Use the subscription property created above to hold on to the
        // subscription.We use this object in the onCancelButtonClick()
        // method to unsubscribe and cancel the request
        this.subscription = this._employeeService.getEmployeeByCode(empCode)
            .retryWhen((err) => {
                return err.scan((retryCount, val) => {
                    retryCount += 1;
                    if (retryCount < 4) {
                        this.statusMessage = 'Retrying...Attempt #' + retryCount;
                        return retryCount;
                    }
                    else {
                        throw (err);
                    }
                }, 0).delay(1000)
            })
            .subscribe((employeeData) => {
                if (employeeData == null) {
                    this.statusMessage =
                        'Employee with the specified Employee Code does not exist';
                }
                else {
                    this.employee = employeeData;
                }
            },
            (error) => {
                this.statusMessage =
                    'Problem with the service. Please try again after sometime';
                console.error(error);
            });
    }

    onBackButtonClick(): void {
        this._router.navigate(['/employees']);
    }

    // This method is bound to the click event of the "Cancel Request" button
    // Notice we are using the unsubscribe() method of the subscription object
    // to unsubscribe from the observable to cancel the request. We are also
    // setting the status message property of the class to "Request Cancelled"
    // This message is displayed to the user to indicate that the request is cancelled
    onCancelButtonClick(): void {
        this.statusMessage = 'Request cancelled';
        this.subscription.unsubscribe();
    }
}