HI WELCOME TO SIRIS
Showing posts with label web api. Show all posts

Dependency Injection in ASP.NET Web API

Let’s think of a scenario where you are having the fever, you go to a medical shop and ask for medicine but then in return, the medical guy asked which or what type of medicine you need. Ooopz!! Now what? You land up visiting the doctor who understands your needs and writes down the medicine which would work for you. Amazing!! Isn’t it. You got your work done with just a call of service. And that’s what Dependency Injection is in software development.
Dependency Injection aka DI is a way in which one object (The Doctor) is capable to give the dependencies of another object (The patient) as per the need. I won’t be going in depth of explaining Dependency Injection in this article though.

Dependnecy Injection Containers

In the above scenario, different doctors have different ways of treating the illness or giving you the service as per need. Similarly, there are different kinds, popularly known as containers, of dependency injection. In other ways, different design patterns for the dependency injection containers. Below are few of them.
  1. Castle Windsor : This is one of the mature and best Inversion of Control container for .NET and Silverlight applications
  2. Unity : If you are looking for Lightweight extensible dependency injection container, Unity is one of the container you can select from. It comes with support for constructor, property, and method call injection
  3. Autofac : One of the preferred IoC
  4. DryIoc : Simple, fast and fully featured IoC container.
  5. Ninject : Called as ninja of .NET dependency injectors
  6. StructureMap : The original IoC/DI Container for .Net
  7. Spring.Net
  8. Open source application framework
  9. LightInject : An ultra-lightweight IoC container
  10. Simple Injector : An easy-to-use Dependency Injection (DI) library for .NET 4+, It can support Silverlight 4+, Windows Phone 8, Windows 8 including Universal apps and Mono.
  11. Microsoft.Extensions.Dependency Injection : A default IoC container in-built in ASP.NET Core applications.
  12. Scrutor : An extensions for Microsoft.Extensions.Dependency Injection which supports assembly scanning
  13. VS MEF : Managed Extensibility Framework (MEF) implementation used by Visual Studio.
  14. TinyIoC : Best for small scale projects as it’s easy to use and hassle free as well.
    Let us understand the ninja of .Net dependency injection, The Ninject.

Introduction to Ninject in ASP.NET Web API

Ninject is a light-weighted, flexible and open source dependency injector for .Net applications. Due to its flexible nature, managing the application at code level becomes easier and reusable. Ninject is hosted in GitHub. For more details about its advantages and the differences between older-newer versions, you can visit https://github.com/ninject/Ninject

Configuring the Ninject in Web API2

Let’s now see how we can introduce Ninject in our application. I will consider the same example, I created in the article Content Negotiation in ASP.NET WebAPI, I will be enabling the ProductController to use the Ninject Dependecy Injection to exchange the desired data and for testing will be using POSTMAN. If you are unaware of POSTMAN, I would suggest you to first go through Understanding Model Binding in ASP.NET Web API. Here I have explained and how to use POSTMAN. So now let’s get started with the Ninja, The NINJECT!! Current the ProductsController looks as below :


STEP 1

Create an Interface with in the model folder as follows
  1. public interface IProducts
  2. {
  3. IQueryable<Product> LoadProducts();
  4. }
Please Note, for time being I am only converting the first action method ‘LoadProducts’ to use Ninject. This method brings all the product data from server.

STEP 2

For the body of the method in the interface, I will make database call. To achieve that, first I created a Service Folder under the root project. In that folder, I created a service class ‘ProductService’ which inherits the interface ‘IProducts’. The class looks as follows
  1. public class ProductService : IProducts
  2. {
  3. private AdventureWorksEntities db = new AdventureWorksEntities();
  4. public IQueryable<Product> LoadProducts()
  5. {
  6. return db.Products;
  7. }
  8. }

STEP 3

Now let us change our ProductsController code to use the interface and the service class.
  1. private readonly IProducts productRepository;
  2. public ProductsController(IProducts product_Repository)
  3. {
  4. this.productRepository = product_Repository;
  5. }
  6. [HttpGet]
  7. // GET: api/Products
  8. public IQueryable<Product> LoadProducts()
  9. {
  10. //return db.Products;
  11. return productRepository.LoadProducts();
  12. }

STEP 4

Now finally the time comes, the time to include The Ninja of Dependency Injection, Ninject in the application. To incorporate Ninject with in the application, firstly we need to install two packages.
  • Ninject.Web.WebApi
  • Ninject.Web.WebApi.WebHost
  • Both the packages are available in Nuget. You can install it either of the way mentioned below,
  • Right click on project => select Manage NuGet packages =>Browse and install the required packages
  • Tools => NuGet Package Manager => Package Manager Console
  • 2.1. If you have multiple projects, you need to select the correct project where you want to install the package.
  • 2.2. PM => Install-Package Ninject.Web.WebApi
  • PM => Install-Package Ninject.Web.WebApi.WebHost
Note that when we install Ninject.Web.WebApi, two more packages get installed automatically
  • Ninject
  • Ninject.Web.Common
Whereas when you install Ninject.Web.Common.WebHost, it installs WebActivatorEx package and also add a new class called Ninject.Web.Common.cs with in App_Start directory.

STEP 5

Now the last step. To enable the use of ProductService class via IProduct interface, we first need to bind them. For this, go to the ‘RegisterServices’ method in ‘Ninject.Web.Common.cs’ file with in App_Start directory.
  1. private static void RegisterServices(IKernel kernel)
  2. {
  3. kernel.Bind<IProducts>().To<ProductService>();
  4. }
Here we are done with making changes in the code to configure Ninject Dependency Injector container. Let’s go ahead and test it using PostMan.


Similarly you can change the code structure for other action methods to use Ninject.
Summry
Dependency Injection being one of the way in which reusability and maintaining the application at code level becomes easy, Ninject serves as a strong open-source IoC for .Net application. Its easily available via NuGet Manager and also under implementing the same is easier.

Token Based Authentication in ASP.NET Web API

ASP.NET Web API is a service which can be accessed over the HTTP by any client. So, providing the security to the Web API is very important, which can be easily done with the process called Token based authentication. Token-based authentication is a process where the user send his credential to the server, server will validate the user details and generate a token which is send as response to the users, and user store the token in client side, so client do further HTTP call using this token which can be added to the header and server validates the token and send a response. This article will give you a step by step process to implement the token-based authentication in ASP.NET Web API 2.

Implementation of Token Based Authentication

Step 1

Open visual studio 2017 => create a new Web API project => Name the project, in my case, I named it as Token_Auth_Web_API, set the Authentication to Individual User Account as shown in below figure.


Step 2

Go to Startup.cs file under App_Start folder in the solution
  1. // Configure the application for OAuth based flow
  2. PublicClientId = "self";
  3. OAuthOptions = new OAuthAuthorizationServerOptions
  4. {
  5. TokenEndpointPath = new PathString("/Token"),
  6. Provider = new ApplicationOAuthProvider(PublicClientId),
  7. AuthorizeEndpointPath = new PathString("/api/Account/ExternalLogin"),
  8. AccessTokenExpireTimeSpan = TimeSpan.FromDays(14),
  9. // In production mode set AllowInsecureHttp = false
  10. AllowInsecureHttp = true
  11. };
Install the Owin using the below command in package manager console
  1. Install-Package Owin -Version 1.0.0
Owin :open web interface for .NET is a middleware which defines the interface between the web server and application.
TokenEndPointPath : This is a kind of request path client applications which communicate with server directly as part of the OAuth protocol. It must begin with slash “/”
  1. Provider : The object provided by the application to process the event raised by the authorization server middleware.
  2. AuthorizeEndpointPath : The request path where the client application will redirect the client/user to obtain user account to issue a token
  3. AccessTokenExpireTimeSpan : Defines the validity of token
  4. AllowInsecureHttp : It will allow a normal http request to authorize, if it is set to false, it will process only https request.

Step 3

To register the user, we are going to using api/Account/Register End point from client which is available in AccountController of our WEB API project, as shown below.
  1. // POST api/Account/Register
  2. [AllowAnonymous]
  3. public async Task<IHttpActionResult> Register(RegisterBindingModel model)
  4. {
  5. if (!ModelState.IsValid)
  6. {
  7. return BadRequest(ModelState);
  8. }
  9.  
  10. var user = new ApplicationUser() { UserName = model.Email, Email = model.Email };
  11.  
  12. IdentityResult result = await UserManager.CreateAsync(user, model.Password);
  13.  
  14. if (!result.Succeeded)
  15. {
  16. return GetErrorResult(result);
  17. }
  18.  
  19. return Ok();
  20. }
Go to the Index View of the home controller, as shown in below figure and add the below code
Home=> Index.cshtml
  1. <script src="http://ajax.googleapis.com/ajax/libs/jquery/1.10.2/jquery.min.js"></script>
  2. <h4> Registration Form</h4>
  3. <div id="loginDiv" style="width:50%">
  4. <div style="width:50%">
  5. <div class="form-group">
  6. <label for="txtEmail">First Name </label>
  7. <input type='email' name="email" id="txtEmail" class="form-control">
  8. </div>
  9. <div class="form-group">
  10. <label>Password</label>
  11. <input type="password" id="textPwd" class="form-control">
  12. </div>
  13. <div class="form-group">
  14. <label>Confrim Password</label>
  15. <input type="password" id="txtConfirmPwd" class="form-control">
  16. </div>
  17. </div>
  18. <button id="register" class="btn btn-default">Submit</button>
  19. </div>
  20. <h4>Login </h4>
  21. <div id="loginDiv" style="width:50%">
  22. <div class="form-group">
  23. <label for="txtEmail">First Name </label>
  24. <input type='email' name="email" id="loginEmail" class="form-control">
  25. </div>
  26. <div class="form-group">
  27. <label>Password</label>
  28. <input type="password" id="loginPwd" class="form-control">
  29. </div>
  30. <button id="btnLogin" class="btn btn-default">Submit</button>
  31. </div>
  32. <div>
  33. <label id="msg"></label>
  34. </div>
  35. <script>
  36. $(document).ready(function () {
  37. $("#register").on('click', function () {
  38. var data = { Email: $("#txtEmail").val().trim(), Password: $("#textPwd").val().trim(), ConfirmPassword: $("#txtConfirmPwd").val().trim() };
  39. $.ajax({
  40. url: "http://localhost:49501/api/Account/Register",
  41. type: 'POST',
  42. data: data,
  43. success: function (resp) {
  44. window.location.href = '/Home/Index';
  45. }
  46. })
  47. });
  48. $("#btnLogin").on('click', function () {
  49. //var data = { Email: $("#loginEmail").val().trim(), Password: $("#textPwd").val().trim(), ConfirmPassword: $("#loginPwd").val().trim() };
  50. $.ajax(
  51. {
  52. url: "/TOKEN",
  53. type: "POST",
  54. data: $.param({ grant_type: 'password', username: $("#loginEmail").val(), password: $("#loginPwd").val() }),
  55. headers: { 'Content-Type': 'application/x-www-form-urlencoded' },
  56. success: function (resp) {
  57. sessionStorage.setItem('userName', resp.userName);
  58. sessionStorage.setItem('accessToken', resp.access_token);
  59. var authHeaders = {};
  60. authHeaders.Authorization = 'Bearer ' + resp.access_token;
  61. $.ajax({
  62. url: "http://localhost:49501/api/values",
  63. type: "GET",
  64. headers: authHeaders,
  65. success: function (response) {
  66. $("#loginEmail").val("");
  67. $("#loginPwd").val("");
  68. $("#msg").text(response);
  69. }
  70. });
  71. },
  72. error: function () {
  73. $("#msg").text("Authentication failed");
  74. }
  75. })
  76. });
  77. })
  78. </script>
From the above HTML code, it is obvious we have two form
  • Registration Form
  • Login Form
Registration Form : Registration Form is used to register the user using the /api/Account/Register API Service which doesn’t require any authentication
Login Form : In this user request to give their credential, once they submit the form /TOKEN post service is fired, once the service validates the user it will generate a access token and send it is as response to server with username as shown in below figure.


In Login Ajax call success, we are saving the token and user details, and making another API call /api/values, this function definition is decorated with [authorize] attribute. we need to pass the access token as an authorization header whenever this HTTP service request happens from the client side.
  1. // GET api/values
  2. [EnableCors(origins: "*", headers: "*", methods: "*", exposedHeaders: "X-My-Header")]
  3. [Authorize]
  4. public IEnumerable<string> Get()
  5. {
  6. return new string[] {"You are successfully Authenticated to Access the Service"};
  7. }
[EnableCors(origins: "*", headers: "*", methods: "*", exposedHeaders: "X-My-Header")] : Enabled the CROS origin, so that it can be accessed from any domain
[Authorize] : It is used to authenticate the token send from the client side, once the authentication is successfully the Get() will be fired

Client-side HTTP request with Authorization Header

  1. $("#btnLogin").on('click', function () {
  2. $.ajax(
  3. {
  4. url: "/TOKEN",
  5. type: "POST",
  6. data: $.param({ grant_type: 'password', username: $("#loginEmail").val(), password: $("#loginPwd").val() }),
  7. headers: { 'Content-Type': 'application/x-www-form-urlencoded' },
  8. success: function (resp) {
  9. sessionStorage.setItem('userName', resp.userName);
  10. sessionStorage.setItem('accessToken', resp.access_token);
  11. var authHeaders = {};
  12. authHeaders.Authorization = 'Bearer ' + resp.access_token;
  13. $.ajax({
  14. url: "http://localhost:49501/api/values",
  15. type: "GET",
  16. headers: authHeaders,
  17. success: function (response) {
  18. $("#loginEmail").val("");
  19. $("#loginPwd").val("");
  20. $("#msg").text(response);
  21. }
  22. });
  23.  
  24. },
  25. error: function () {
  26. $("#msg").text("Authentication failed");
  27. }
  28. })
authHeaders.Authorization = 'Bearer ' + resp.access_token : We are defining the authorization header with the access token when the /api/values HTTP call happens. In server side the token is validated, once its success it will return a message “You are successfully Authenticated to Access the Service”
Note : we need to send grant_type: 'password' as the data along with user name and password through the body of HTTP request which accessing the URL /TOKEN


Header with /api/values HTTP call


Success


From the above figures it is obvious the token is validated, and the service returns a message.


Invalid Credential Entry


If the credential is wrong the service /TOKEN will return the error message which is shown above
Summary
From this article we have learned the complete process of token-based authentication in ASP.NET Web API 2, where we have seen how to generate the token by sending the user credential and how to use the token with HTTP header for further communication with server through HTTP request to access a secured API Service.

ASP.NET Web API Versioning Strategies

Web API Versioning is required as the business grows and business requirement changes with the time. As Web API can be consumed by multiple clients at a time, Versioning of Web API will be necessarily required so that Business changes in the API will not impact the client that are using/consuming the existing API.

Web API Versioning Ways

Web API Versioning can be done by using the following methods:
  1. URI
  2. QueryString parameter
  3. Custom Header parameter
  4. Accept Header parameter

Web API Versioning using URI

In this method, Web API URI is changed with the help of routing and is more readable. Let’s say, we have an existing running API in which one URI returns some response. All Clients are consuming the same API and one client wants some changes by requesting to add new properties. With Versioning, we can achieve the same without breaking the existing API flow. In this case, Web API Versioning using URI is one of the best ways to achieve the same.
For Demonstration, we have two controller EmployeeV1 and EmployeeV2. Both will return different data as EmployeeV1 return employees details with ID, Name, Age, City, State property and EmployeeV2 returns employees with ID, FirstName, LastName (In V1, we have name property), DOB (In V1 we have Age property), City, State, Country etc. property.


Image: EmployeeV1Controller


Image: EmployeeV2Controller
Now open WebApiConfig.cs file and configure the route as mentioned in below image.


Image: WebApiConfig.cs
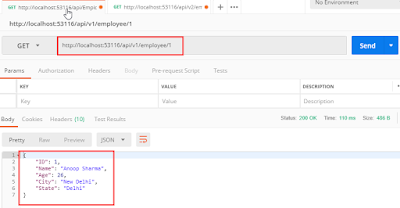
In the above image, we have configured the route so that if Web API receives an HTTP request, it tries to match with the one of the routes in the routing table and call the mapped API controller. Let’s try to hit the API with the Postman.


Image: Hitting the V1 API with the Postman
In the above image, we hit the Web API with the configured V1 route. As we already specified in the route, “/api/v1/employee” will call the EmployeeV1Controller. Now, let's call the V2 API with the Postman. In the below image, we can clearly see that we are able to call EmployeeV2Controller without any issue.


Image: Hitting the V2 API with the Postman
We can also use attribute-based routing for URI based API Versioning.


Image: Attribute based routing in Web API

Web API Versioning using QueryString parameter

In Web API Versioning using Query String, a query string parameter is added to the query string in order to find the controller or Action to which request is sent. Whenever a request comes, SelectController() method of DefaultHttpControllerSelector Class selects the controller information from the information passed in the URI. In order to achieve the versioning with Query String, we need to create a Custom DefaultHttpControllerSelector and override the SelectController() method.
Code Snippet
  1. public class CustomSelectorController : DefaultHttpControllerSelector
  2. {
  3. HttpConfiguration _config;
  4. public CustomSelectorController(HttpConfiguration config):base(config) {
  5. _config = config;
  6. }
  7. public override HttpControllerDescriptor SelectController(HttpRequestMessage request)
  8. {
  9. //returns all possible API Controllers
  10. var controllers = GetControllerMapping();
  11. //return the information about the route
  12. var routeData = request.GetRouteData();
  13. //get the controller name passed
  14. var controllerName = routeData.Values["controller"].ToString();
  15. string apiVersion = "1";
  16. //get querystring from the URI
  17. var versionQueryString = HttpUtility.ParseQueryString(request.RequestUri.Query);
  18. if (versionQueryString["version"]!=null)
  19. {
  20. apiVersion = Convert.ToString(versionQueryString["version"]);
  21. }
  22. if (apiVersion=="1") {
  23. controllerName = controllerName + "V1";
  24. }
  25. else
  26. {
  27. controllerName = controllerName + "V2";
  28. }
  29. //
  30. HttpControllerDescriptor controllerDescriptor;
  31. //check the value in controllers dictionary. TryGetValue is an efficient way to check the value existence
  32. if (controllers.TryGetValue(controllerName,out controllerDescriptor)) {
  33. return controllerDescriptor;
  34. }
  35. return null;
  36. }
  37. }
Before running the API, remove the routing attribute added in the Web API Versioning using URI. Replace the IHttpControllerSelector with CustomSelectorController in WebApiConfig.cs file.
Image: Replace IHttpControllerSelector with CustomSelectorController
Now, let’s hit the API and fetch the data from the version 1 i.e. EmployeeV1Controller using Postman.


Image: Fetch Data using Query string i.e. from EmployeeV1Controller
And get data from EmployeeV2Controller with as version=2 as a query string parameter and an id to fetch the value of particular employees.


Image: using Query string i.e. from EmployeeV2Controller with id=2

Web API Versioning using Custom Header parameter

Custom Headers are used for providing additional information, troubleshooting and implementing server-side logic, etc. We will send the version information in the custom header and check the its value and return the response according to its value.
Code Snippet
  1. //Web API Versioning using Custom Headers
  2. public override HttpControllerDescriptor SelectController(HttpRequestMessage request)
  3. {
  4. //returns all possible API Controllers
  5. var controllers = GetControllerMapping();
  6. //return the information about the route
  7. var routeData = request.GetRouteData();
  8. //get the controller name passed
  9. var controllerName = routeData.Values["controller"].ToString();
  10. string apiVersion = "1";
  11. //Custom Header Name to be check
  12. string customHeaderForVersion = "X-Employee-Version";
  13. if (request.Headers.Contains(customHeaderForVersion)) {
  14. apiVersion=request.Headers.GetValues(customHeaderForVersion).FirstOrDefault();
  15. }
  16. if (apiVersion == "1")
  17. {
  18. controllerName = controllerName + "V1";
  19. }
  20. else
  21. {
  22. controllerName = controllerName + "V2";
  23. }
  24. //
  25. HttpControllerDescriptor controllerDescriptor;
  26. //check the value in controllers dictionary. TryGetValue is an efficient way to check the value existence
  27. if (controllers.TryGetValue(controllerName, out controllerDescriptor))
  28. {
  29. return controllerDescriptor;
  30. }
  31. return null;
  32. }
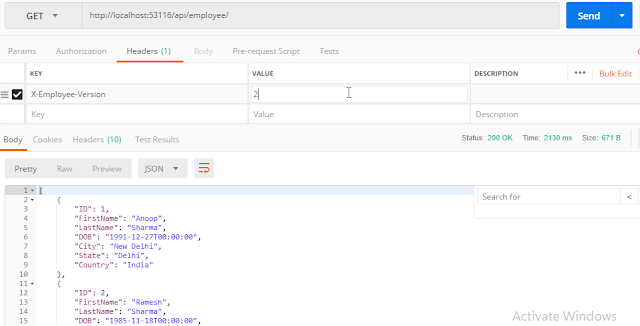
Now, hit the API using Postman with the custom headers mentioned in the code.


Image: Custom Header for API Versioning
But in case user pass same headers multiple times, request.Headers.GetValues(customHeaderForVersion).FirstOrDefault() will return multiple values separated by comma. Let’s try the same scenario with Postman. Add the break point In the CustomSelectorController.cs so that It can be analyzed on hitting the send button from the Postman.


Image: Same Custom Header added multiple times
You will see comma separated as same Custom header is passed multiple times.


Image: Comma Separated custom header values
In order to fix that, first check that apiVersion variable contains a comma. If true, then pick the first value separated by the comma from the headers.

Web API Versioning using Accept Header parameter

Accepts Headers requests the server about the file format of the data required by the browser. This data is expressed as MIME Types which stands for “Multipurpose Internet Mail Exchange”. The MIME type is generally case-insensitive, but traditionally written in small letters. We need to make small changes in the above code in order to accept the version parameter value from the accept header.

Pass the accept header using the postman in order to test the API Versioning.

Image: Get request with Accept Parameter using Postman
Summary
As the application grows and business need increase, Versioning of the API is one of the difficult and important part of the API as it makes the API backward compatible. We can do Versioning in ASP.NET Web API with URI, QueryString, Custom Headers and Accept Header parameters, etc. We saw each way in details as well. Along with that, another important thing is to have usable and accurate API documentation. I hope this will help you.

Securing ASP.NET Web API using basic Authentication

n previous article, I have explained Custom Authentication and Authorization in ASP.NET MVC. Now, I am going to show you how to implement basic HTTP authentication for your Web API by extending ASP.NET WEB API's AuthotrizeAttribute. Before implementing basic HTTP authentication, let's understand what is it?

Basic HTTP Authentication

In basic HTTP authentication the client passes their username and password in the HTTP request header. Typically, using this technique we encrypt user credentials string into base64 encoded string and decrypt this base64 encoded string into plain text. You can also use another encryption and decryption technique.

Custom Principal

Since WebAPI is build on the top of ASP.NET Framework, hence it can use ASP.NET Framework features like ASP.NET membership and provider. ASP.NET provides IPrincipal and IIdentity interfaces to represents the identity and role for a user. For ASP.NET Web API, you can also create a custom solution by evaluating the IPrincipal and IIdentity interfaces which are bound to the HttpContext as well as the current thread.
  1. public class CustomPrincipal : IPrincipal
  2. {
  3. public IIdentity Identity { get; private set; }
  4. public bool IsInRole(string role)
  5. {
  6. if (roles.Any(r => role.Contains(r)))
  7. {
  8. return true;
  9. }
  10. else
  11. {
  12. return false;
  13. }
  14. }
  15.  
  16. public CustomPrincipal(string Username)
  17. {
  18. this.Identity = new GenericIdentity(Username);
  19. }
  20.  
  21. public int UserId { get; set; }
  22. public string FirstName { get; set; }
  23. public string LastName { get; set; }
  24. public string[] roles { get; set; }
  25. }
Now you can put this CustomPrincipal objects into the thread’s currentPrinciple property and into the HttpContext’s User property to accomplish your custom authentication and authorization process.

Custom ASP.NET Web API Authorization Filter

Like ASP.NET MVC, Web API also provides Authorization filter to authorize a user. This filter can be applied to an action, a controller, or even globally. This filter is based on AuthorizeAttribute class exist in System.Web.Http namespace. You can customize this filter by overriding OnAuthorization() method as shown below:
  1. //custom authorize filter attribute
  2. public class CustomAuthorizeAttribute : AuthorizeAttribute
  3. {
  4. private const string BasicAuthResponseHeader = "WWW-Authenticate";
  5. private const string BasicAuthResponseHeaderValue = "Basic";
  6. readonly DataContext Context = new DataContext();
  7.  
  8. public string UsersConfigKey { get; set; }
  9. public string RolesConfigKey { get; set; }
  10.  
  11. protected CustomPrincipal CurrentUser
  12. {
  13. get { return Thread.CurrentPrincipal as CustomPrincipal; }
  14. set { Thread.CurrentPrincipal = value as CustomPrincipal; }
  15. }
  16.  
  17. public override void OnAuthorization(HttpActionContext actionContext)
  18. {
  19. try
  20. {
  21. AuthenticationHeaderValue authValue = actionContext.Request.Headers.Authorization;
  22.  
  23. if (authValue != null && !String.IsNullOrWhiteSpace(authValue.Parameter) && authValue.Scheme == BasicAuthResponseHeaderValue)
  24. {
  25. Credentials parsedCredentials = ParseAuthorizationHeader(authValue.Parameter);
  26.  
  27. if (parsedCredentials != null)
  28. {
  29. var user = Context.Users.Where(u => u.Username == parsedCredentials.Username && u.Password == parsedCredentials.Password).FirstOrDefault();
  30. if (user != null)
  31. {
  32. var roles = user.Roles.Select(m => m.RoleName).ToArray();
  33. var authorizedUsers = ConfigurationManager.AppSettings[UsersConfigKey];
  34. var authorizedRoles = ConfigurationManager.AppSettings[RolesConfigKey];
  35.  
  36. Users = String.IsNullOrEmpty(Users) ? authorizedUsers : Users;
  37. Roles = String.IsNullOrEmpty(Roles) ? authorizedRoles : Roles;
  38.  
  39. CurrentUser = new CustomPrincipal(parsedCredentials.Username, roles);
  40.  
  41. if (!String.IsNullOrEmpty(Roles))
  42. {
  43. if (!CurrentUser.IsInRole(Roles))
  44. {
  45. actionContext.Response = actionContext.Request.CreateResponse(HttpStatusCode.Forbidden);
  46. actionContext.Response.Headers.Add(BasicAuthResponseHeader, BasicAuthResponseHeaderValue);
  47. return;
  48. }
  49. }
  50.  
  51. if (!String.IsNullOrEmpty(Users))
  52. {
  53. if (!Users.Contains(CurrentUser.UserId.ToString()))
  54. {
  55. actionContext.Response = actionContext.Request.CreateResponse(HttpStatusCode.Forbidden);
  56. actionContext.Response.Headers.Add(BasicAuthResponseHeader, BasicAuthResponseHeaderValue);
  57. return;
  58. }
  59. }
  60.  
  61. }
  62. }
  63. }
  64. }
  65. catch (Exception)
  66. {
  67. actionContext.Response = actionContext.Request.CreateResponse(HttpStatusCode.Unauthorized);
  68. actionContext.Response.Headers.Add(BasicAuthResponseHeader, BasicAuthResponseHeaderValue);
  69. return;
  70.  
  71. }
  72. }
  73.  
  74. private Credentials ParseAuthorizationHeader(string authHeader)
  75. {
  76. string[] credentials = Encoding.ASCII.GetString(Convert.FromBase64String(authHeader)).Split(new[] { ':' });
  77.  
  78. if (credentials.Length != 2 || string.IsNullOrEmpty(credentials[0]) || string.IsNullOrEmpty(credentials[1]))
  79. return null;
  80.  
  81. return new Credentials() { Username = credentials[0], Password = credentials[1], };
  82. }
  83. }
  84. //Client credential
  85. public class Credentials
  86. {
  87. public string Username { get; set; }
  88. public string Password { get; set; }
  89. }

Applying CustomAuthorize attribute

To make secure your service, decorate your Web API controllers with CustomAuthorize attribute as defined above and specify the uses or roles to access specific service actions/methods. The below product service action Getproduct can be access only by Admin users.
  1. public class ProductController : ApiController
  2. {
  3. [CustomAuthorize(Roles="Admin")]
  4. public HttpResponseMessage Getproducts()
  5. {
  6. var products = new Product[]
  7. {
  8. new Product()
  9. {
  10. Id = 1,
  11. Name = "Soap",
  12. Price =25.12
  13. },
  14. new Product()
  15. {
  16. Id = 2,
  17. Name = "Shampoo",
  18. Price =25.12
  19. }
  20. };
  21.  
  22. var response = Request.CreateResponse>(HttpStatusCode.OK, products);
  23. return response;
  24. }
  25. }

Calling Web API and passing client credential from ASP.NET MVC

  1. public class HomeController : Controller
  2. {
  3. //
  4. // GET: /Home/
  5. public ActionResult Index()
  6. {
  7. string FullName = User.FirstName + " " + User.LastName;
  8. HttpClient client = new HttpClient();
  9. string authInfo = "admin" + ":" + "123456";
  10. authInfo = Convert.ToBase64String(Encoding.Default.GetBytes(authInfo));
  11. client.DefaultRequestHeaders.Authorization = new AuthenticationHeaderValue("Basic", authInfo);
  12.  
  13. client.BaseAddress = new Uri("http://localhost:63173/");
  14.  
  15. HttpResponseMessage response = client.GetAsync("api/product/").Result;
  16. if (response.IsSuccessStatusCode)
  17. {
  18. // Parse the response body. Blocking!
  19. var data = response.Content.ReadAsAsync>().Result;
  20. return View();
  21. }
  22. return View();
  23. }
  24. }
What do you think?
I hope you will enjoy the tips while implementing role-based or user-based security in your ASP.NET Web API. I would like to have feedback from my blog readers. Your valuable feedback, question, or comments about this article are always welcome.