HI WELCOME TO Sirees
Showing posts with label angular. Show all posts

Deploy angular app to IIS

Leave a Comment

Here are the steps


Step 1 : Build your angular application. 

If you want to deploy a development build do a development build using the following Angular CLI command. The base-href option on the build command sets the base-href element in index.html to "/ePortal/" instaed of "/". In the IIS server, we will create an application with name "ePortal" in just a bit.
ng build --base-href /ePortal/


If you want to deploy a production build do a production build using the following Angular CLI command. 
ng build --prod --base-href /ePortal/

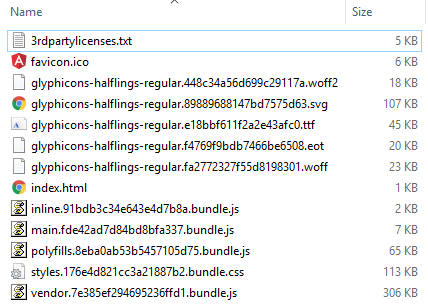
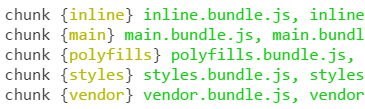
In our case let's deploy a production build. After the build is complete, you will notice a folder with name "dist" in your Angular project folder. This folder contains all the build files. These build files need to be copied to a folder on the server where we have IIS installed.

Step 2 : Create a folder on the server where you have IIS installed. You can name the folder anything you want. I am going to name the folder "ProductionBuild" and I am creating it in C:\ drive.

Step 3 : Now copy all the contents of the "dist" folder into "ProductionBuild" folder

Step 4 : Open IIS. There are several ways to do this. One way is to type "inetmgr" in the "Run" window and click "OK"

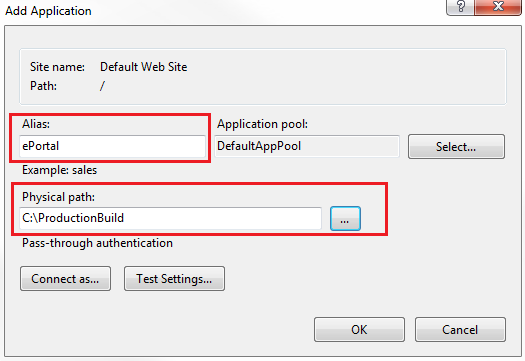
Step 5 : Create an application in IIS. Name it "ePortal". This name has to match the value we have specified for the --base-href option in Step 1. 
  • Exapand the root IIS node
  • Expand Sites
  • Right click on "Default Web Site" and select "Add Application" from the context menu
  • In the "Alias" textbox, type "ePortal"
  • Set the "Physical Path" to folder that contains the build files. In our case it is "ProductionBuild" folder in C:\ drive
deploy angular app to iis

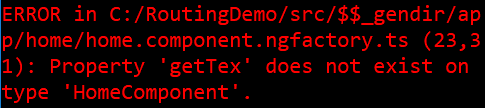
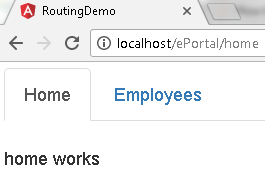
At this point, if you launch the browser and navigate to http://localhost/ePortal/home, you will see the "home works" message as expected. When you click on the "Employees" tab it also works as expected.

angularjs 2 refresh page 404

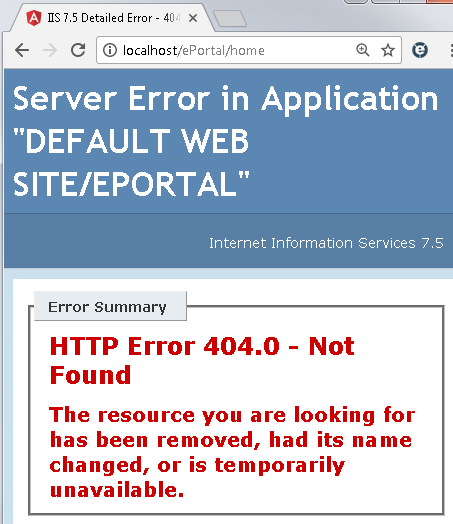
However, when you "Refresh" the page by pressing F5, you will see the following HTTP 404 error

angularjs 2 browser refresh not working

Step 6 :  To fix this Page Refresh issue in Angular, include the following URL rewrite rule in you web.config file. This web.config file should be in copied the "ProductionBuild" folder where we have the rest of the build files.

<?xml version="1.0" encoding="utf-8"?>
<configuration>
  <system.webServer>
    <rewrite>
      <rules>
        <rule name="AngularJS Routes" stopProcessing="true">
          <match url=".*" />
          <conditions logicalGrouping="MatchAll">
            <add input="{REQUEST_FILENAME}" matchType="IsFile" negate="true" />
            <add input="{REQUEST_FILENAME}" matchType="IsDirectory" negate="true" />
            <add input="{REQUEST_URI}" pattern="^/(api)" negate="true" />
          </conditions>
          <action type="Rewrite" url="/ePortal" />
        </rule>
      </rules>
    </rewrite>
  </system.webServer>
</configuration>

Please note : You may also point the IIS application directly to the "dist" folder in RoutingDemo project folder. The downside of this is every time you rebuild your application, the "dist" folder is deleted and recreated.  This means you will loose the web.config file and you have to create it again.

Angular AOT vs JIT

Leave a Comment

In this video we will discuss Ahead-of-Time compilation and Just-in-Time compilation in Angular.


In Angular we have 2 models of compilation
  • JIT - Just-in-Time Compilation : JIT compilation as the name implies, compiles the application Just-in-Time in the browser at runtime.
  • AOT - Ahead-of-Time Compilation : AOT compilation compiles the application at build time.

By default, with the development build we get JIT compilation. This is how it works. The application code along with the angular compiler is downloaded by the browser. At run-time, when a request is issued to the application, the JIT-compiler in the browser compiles the application code before it is executed. This means our user who made that first request has to wait for the application to compile first.

In our previous videos we have seen that, when we build our angular application, the following JavaScript bundles are generated.
  1. Inline
  2. Main
  3. Polyfills
  4. Styles
  5. Vendor
The vendor bundle contains the compiler along with the angular framework. The compiler code is roughly half of the Angular framework.

There is a tool called source-map-explorer that we can use to inspect the JavaScript bundles. This tool analyzes the source map generated with the bundle and draws a map of all dependencies.

To be able to use this tool we have to install it first. To install this tool, execute the following command
npm install source-map-explorer --save-dev

Once we have the tool installed, if you have not done the development build yet, do the development build using the following command.
ng build

Once the build is complete, you will have the JavaScript bundles along with the source map files. Now execute the following command. 
node_modules\.bin\source-map-explorer dist\vendor.bundle.js

The above command runs the source-map-explorer against the vendor bundle and we see the graph of it as shown below. Notice the angular compiler is around 45% percent of the bundle size. As this is development build and not optimised, notice the total size of the bundle is 2.19 MB.
angular aot vs jit

With AOT compilation the angular application is pre-compiled. So this means the browser loads executable code so it can render the application immediately, without waiting to compile the application first. 

This also mean with AOT, as the application is already pre-compiled, there is also no need for the browser to download the Angular compiler. As we already know, the compiler code is roughly half of the Angular framework, so omitting it dramatically reduces the application size.

By default, the production build is Ahead-of-Time compiled. So there is no need to bundle up the angular compiler code in the vendor bundle. This brings down the vendor bundle size by almost 50%. In addition it is also minified, uglified and tree-shaked to remove any code that we are not referencing in our application. So the bundler size is further reduced.

Now, execute the following command to generate a production build. Notice I have also turned on sourcemap option. Without the sourcemap we will not be able to use the source-map-explorer tool.
ng build --prod --sourcemap true

Once the production build is complete, execute the following command. Vendor bundle name in your production build may be slightly different. Change it accordingly and execute the command.
node_modules\.bin\source-map-explorer dist\vendor.7e385ef294695236ffd1.bundle.js

Here is the graph produced by the above command. Notice now, we do not have the compiler in the bundle. The bundle size is just 313 KB.
angular production build

The AOT compiler also detects and reports template binding errors at build time itself. Let us understand this with an example.

Include the following function HomeComponent class in home.component.ts file
getText(): string {
  return 'Hello Pragim';
}

In home.component.html include the following <div> element. Notice I have deliberately mis-spelled the getText() function name.
<div [innerText]='getTex()'>

Save changes, and execute the following command. This command does a development build in-memory. At the moment we are not using AOT, so we will not know about the template binding error that is introduced above. Notice at build time we do not see any errors.
ng serve

Now launch your default browser and navigate to http://localhost:4200. We see the "home works" message as expected. However, we do not see the message returned by getText() function. This is because we deliberately mis-spelled the getText() function name. We will see this error in the browser developer tools. So this proves that, with JIT compilation we will only come to know about the template binding errors at runtime.

With AOT compilation, template binding errors are detected and reported at build time itself as apposed to runtime. To prove this, execute the following command. Notice we are using --aot option for pre-compiling our in-memory build.
ng serve --aot

The build completes with the following error. So this proves that, with AOT compilation, template binding errors are detected and reported at build time itself as apposed to runtime
angular aot error

By default, the following 2 commands use JIT compilation 
ng build
ng serve

With either of these command we can use --aot option to turn on Ahead-of-Time compilation
ng build --aot
ng serve --aot

The production build uses AOT by default. If you want to turn off AOT for the production build, you can do so by setting --aot option to false as shown below.
ng build --prod --aot false

At this point, we cannot use source-map-explorer to check if the angular compiler is in the vendor bundle because we do not have sourcemap files. If you want to inspect the bundles make sure you also turn on sourcemaps.

Angular dev build vs prod build

Leave a Comment

In this video we will discuss the differences between a development build and a production build in angular.


To generate a development build we can use either 
ng build 
OR
ng build --dev

To generate a production build we use 
ng build --prod

Here are some of the differences between a development build and a production build in angular.

Source Maps : Development build generate Source Maps where as production build does not. 

What are Source Maps
To improve the performance, the application's JavaScript and CSS files are combined and compressed. It is extremely difficult to debug those compressed files. A source map holds information about the original files and can be used to map the code within a compressed file back to it’s original position in a source file. So with the help of these source maps we can easily debug our applications even after the the files are compressed and combined.

By default, a development build produce source maps where as a production build does not. However, we can change this default behaviour by using --sourcemaps option along with the ng build command. It's alias is -sm.

The following command produces a development build without source maps as we have set -sm option to false
ng build --dev -sm false

On the other hand, if you want source maps along with your production build set -sm option to true as shown below.
ng build --prod -sm true

Extracts CSS : With the development build global styles are extracted to .js files where as with the production build they are extracted to .css files. To change this default behaviour use --extract-css option or it's alias -ec with the ng build command.

The following command produces a development build with global styles extracted to .css file(s) instead of .js ones.
ng build --dev -ec true

Minification & Uglification : A Prod Build is both minified and uglified, where as a Dev Build is not.

What is Minification 
The process of removing excess whitespace, comments, and optional tokens like curly brackets and semicolons is called Minification. 

What is Uglification
The process of transforming code to use short variable and function names is called uglification.

The minified and uglified version of the file is smaller in size than the full version, resulting in faster response times and lower bandwidth costs.

If you look at the bundles generated by the prod build, you will notice that they are minified and uglified. Notice, extra whitespaces, comments, and optional tokens like curly brackets and semicolons are removed. Also notice, the code is transformed by using short variable and function names. On the other hand, the bundles generated by the dev build, are not minified and uglified.

Tree Shaking : A Prod build is Tree Shaked, where as a Dev build is not.

What is Tree Shaking
Tree shaking is the process of removing any code that we are not actually using in our application from the final bundle. It's one of the most effective techniques to reduce the application size.

If you look at the bundles generated by the production build, they are significantly less in size compared with the bundles generated by the development build. This is because with the production build the code is tree shaked to remove dead code i.e the code that is not referenced by the application.

Ahead-of-Time (AOT) Compilation : With a production build we get AOT (Ahead-of-Time) compilation, i.e the Angular component templates are pre-compiled, where as with a development build they are not. We will discuss Ahead-of-Time compilation in detail in our next video.

The following table summarizes the differences between a development build and a production build
FeatureDevelopment BuildProduction Build
Source MapsYesNo
Extracts CSS.js file.css file
MinifactionNoYes
UglificationNoYes
Tree ShakingNoYes
AOTNoYes

Compile angular app

Leave a Comment

In this video we will discuss compiling angular applications. Along the way we will discuss producing builds both for development and production use. We will also discuss the differences between ng serve and ng build commands.


 This command builds and serves the application from memory for faster development experience. ng serve command does not write the build files to the disk, so we cannot use it for deploying our application on a different server. For example, if we want to deploy our application to a test, staging or production server we cannot use ng serve command. For this we use a different command and that is ng build command.

When we execute ng build command it creates a folder with name "dist" and copies all the build files into that folder. Now the question that comes to our mind is, why is the folder named "dist". The folder is named "dist" because that is what is specified as the output directory for the build in the Angular CLI configuration file. Notice the "outDir" property is set to "dist".

By default the ng build command does a development build, not a production build. The development build is not optimised for production use. The development build is typically used for testing. With a development build it is easier to debug as the development build contains source map files.

ng build command on my machine produced the following files in the "dist" folder
ng build development

As you can see in the "dist" folder we have 
1. The favicon
2. Glyphicon files
3. Our host page index.html
4. Bundle files and their corresponding source map files

Please note : Both the following commands are equivalent and does the same thing, i.e they produce a development build
ng build or ng build --dev

If you want to deploy the application to a server, copy the contents of the "dist" folder to a folder on the server. We will discuss deployment in detail in a later video.

The bundle files (inline, main, polyfills,styles, & vendor) generated by the development build are not optimised, meaning the bundles are not minified or treeshaked to remove the code that is not being used. A production build on the other hand will have all the performance optimisation techniques like Ahead-of-time (AOT) compilation, minification, uglification and treeshaking implemented. So the sizes of the bundles that the production build produces will be significantly less than the sizes of the bundles that a dev build produces. 

To do a production build use --prod option with the ng build command. ng build command with --prod option on my machine produced the following files in the "dist" folder. 
angular production build
  1. Notice the file sizes in the production build are significantly less than the file sizes in the development build. 
  2. With the production build, by default, we do not get the source map files because we usually do not need them on a production server. 
  3. Also notice, Production build extracts css from global styles into a css file instead of js ones.
In addition to these 3 differences between a dev build and a production build, there are several other differences as well. We will discuss them in detail in our next video.

ng serve vs ng build

ng serve
  • Compiles and serves the application from memory
  • Does not write the build files to the disk
  • Typically used to run the application on local development machine
  • Cannot be used for deploying the build to another server (Ex. Testing, Staging or Production server)
ng build
  • Compiles the application to the "dist" folder
  • Can be used to produce both development & production builds
  • Typically used to deploy the application on another server

Angular cli ng serve options

Leave a Comment

To see the list of all options that we can use with "ng serve" command use --help option

ng serve --help

The following page also shows all the options that can be used with ng serve
https://github.com/angular/angular-cli/wiki/serve

The following command, builds and launches the application in your default browser.
ng serve --open

Many of our channel subscribers have sent me emails saying their application is using Internet Explorer, but they want to use Google chrome instead. So thier question is how to change my default browser. Well that's simple and it really depends on the operating system you have. For example, on a Windows 7 operatin system here are the steps to change your default browser.
  1. Click on the Windows Start Button and in the "Search programs and files" text box type: Control
  2. Control Panel would appear in the list. Click on it.
  3. In the "Control Panel" window, click on "Default Programs"
  4. In the "Default Programs" window, click on "Set your default programs"
  5. In the list of programs that appear, select the "Browser" that you want to be the default browser and then click on the link that says "Set this program as default"
That's it. At this point, execute "ng serve --open" command and you will have your application launched in your specified default browser.

Instead of using the full option name --open, you can also use it's alias -o

The following table shows the common options, alias, default value & their purpose
OptionAliasDefaultPurpose
--watch-wtrueRun build when files change
--live-reload-lrtrueWhether to reload the page on change
--open-ofalseOpens the url in default browser
--port-p4200The port on which the server is listening
--extract-css-ecExtract css from global styles onto css files instead of js ones

Running angular app locally

Leave a Comment

In this video we will discuss

  • How to compile and run an angular application locally on your development machine
  • What happens behind the scenes when we compile and run an angular application
  • What is bundling and why is it important for performance

So far in this video series we have been using the following command to build and run our angular application.
ng serve --open

Have you ever thought about what happens behind the scenes when we execute this command. Behind the scenes, Angular CLI runs Webpack to build and bundle all JavaScript and CSS code. The following are the bundles.

Bundle FileWhat it contains
inline.bundle.jsWebPack runtime. Required for WebPack to do it's job
main.bundle.jsAll our application code that we write
polyfills.bundle.jsBrowser Polyfills
styles.bundle.jsStyles used by the application
vendor.bundle.jsAngular and 3rd party vendor files

What is bundling and why is it important for performance
A typical real world angular application is made up of many components. Each component code is in it's own .ts file which gets transpiled to JavaScript i.e to a .js file. Along the same lines, a component may also have it's own .css file for styles. So our angular application code is in many small files. In addition to our application code files, we also have vendor code files like Angular, jQuery etc. 

Web browsers have a limit on how many scripts or CSS files they can download simultaneously. 

Because of this browser limitation, your application may suffer from performance perspective, if it has many JavaScript and CSS files to download. 

Bundling can solve this problem by combining many small application and library files into a few bundles. As mentioned before, Angular CLI runs WebPack for building and bundling angular applications.

There are several ways to see these generated bundles.
1. If you have executed the "ng serve --open" command in a command prompt window, upon build completion you can see the generated bundles in the command prompt window as shown in the image below.

angular build bundles

2. If you have executed the "ng serve --open" command in Visual Studio Code Integrated Terminal, upon build completion you can see the generated bundles in the integrated terminal window as shown in the image below.

what does ng serve do

3. "ng serve --open" command builds and runs the application. By default the application runs at port number 4200. You can change this default port number if you want to. We will discuss how to do that in our upcoming videos. When the application is served in the browser you can see the generated bundles on the "Elements" tab in Browser Developer Tools.

angular cli ng serve

4. You can also see these bundles on the "Sources" tab in Browser Developer Tools.
run angular app locally

5. To see the bundles along with their sizes click on the Network tab. If you don't see the bundles, refresh the browser window by pressing F5.

angular bundle js files

In addition to bundling, we can also use other optimisation techniques like Ahead-of-Time (AOT) Compilation, Minification, Uglification and TreeShaking to improve performance. We will discuss all these techniques and how to implement them in our upcoming videos.

The ng serve command builds and serves the application from memory for a faster development experience. It does not write the build artefacts to the disk, so we cannot use this command if you want to deploy the build to another server. For example, if you want to deploy your angular application to a test server for testing, or to your production server we cannot use ng serve. We instead use ng build. This command writes the build artefacts to the specified output folder, so the application can be deployed elsewhere. We will discuss ng build in our upcoming videos.

To customise the in-memory builds that the "ng serve" command produces, there are several options that we can use along with this command. 

Angular CLI generate routing module

Leave a Comment

To make Angular CLI generate a routing module, all you have to do is use --routing option along with the ng new command when generating a new Angular project.

ng new RoutingDemo --routing

In our previous video, we discussed the steps to implement routing in a separate module, and them import that routing module in the application root module AppModule. Here are those steps.


Step 1 : Set <base href> in index.html.

Step 2 : Create a separate routing module file. You can name it anything you want. I named it app-routing.module.ts.

Step 3 : Import the angular RouterModule into your application routing module (app-routing.module.ts). Also don't forget to re-export RouterModule.

Step 4 : Configure the application routes. 

Step 5 : Import the application routing module (app-routing.module.ts) in the root AppModule.

Step 6 : Specify where you want the routed component view template to be displayed using the <router-outlet> directive

Step 7 : Create a navigation menu and tie the configured routes with the menu using the routerLink directive. Optionally, use the routerLinkActive directive to style the current route that is active, so the user knows the page that he is on, in the application.

Out of the above 7 steps, we only need to implement steps 4 & 7. The rest of the steps are implemented by the Angular CLI out of the box. Just imagine the amount of time we save.

Before we can implement steps 4 & 7. Let's generate the following 3 components.
ComponentAngular CLI Command
HomeComponentng g c home
EmployeesComponentng g c employees
PageNotFoundComponentng g c pageNotFound

Now let's implement Step 4. In app-routing.module.ts file specify the application routes. Copy and paste the following code. In addition to the routes, notice we are also importing HomeComponentEmployeesComponent & PageNotFoundComponent as we are referencing these components in the route configuration.

import { HomeComponent } from './home/home.component';
import { EmployeesComponent } from './employees/employees.component';
import { PageNotFoundComponent } from './page-not-found/page-not-found.component';

const routes: Routes = [
  { path: 'home', component: HomeComponent },
  { path: 'employees', component: EmployeesComponent },
  { path: '', redirectTo: '/home', pathMatch: 'full' },
  { path: '**', component: PageNotFoundComponent }
];

Now let's implement Step 4. In app.component.html copy and paste the following code.

<div style="padding:5px">
    <ul class="nav nav-tabs">
        <li routerLinkActive="active">
            <a routerLink="home">Home</a>
        </li>
        <li routerLinkActive="active">
            <a routerLink="employees">Employees</a>
        </li>
    </ul>
    <br/>
    <router-outlet></router-outlet>
</div>

Finally we need to install and reference Bootstrap, to style the navigation menu. To install bootstrap execute the following npm command. We can execute this command in the command prompt window or in the integrated terminal window in Visual Studio Code.
npm install bootstrap@3 --save

Once Bootstrap is installed, open .angular-cli.json file and specify the path to the Bootstrap stylesheet in the styles property as shown below.
"styles": [
  "../node_modules/bootstrap/dist/css/bootstrap.min.css",
  "styles.css"
]

At this point stop the server. Build and run the application again using the following Angular CLI command. Routing should be working as expected.
ng serve --open

Implementing routing in separate module in angular

Leave a Comment

we implemented routing. At the moment, all the routing code is implemented in the root AppModule. However, for separation of concerns and maintainability, it is better to implement routing in a separate module and then import that routing module in the AppModule. If routing is in it's own module, it is easier to find and change routing code if required.


Moving routing code into it's own module is easy and straight forward
Step 1 : Create a new file in the 'app' folder. Name it app-routing.module.ts

Step 2 : Copy and paste the following code in it. The code is commented and self-explanatory.

// Import NgModule decorator to decorate AppRoutingModule class
import { NgModule } from '@angular/core';
// Import RouterModule and Routes type from angular router library
import { RouterModule, Routes } from '@angular/router';

// Import the following 3 components as we will reference
// them in the route definitions below
import { HomeComponent } from './home/home.component';
import { EmployeesComponent } from './employees/employees.component';
import { PageNotFoundComponent } from './page-not-found/page-not-found.component';

// Configure the routes. The Routes type and the
// referenced components are imported above
const appRoutes: Routes = [
  { path: 'home', component: HomeComponent },
  { path: 'employees', component: EmployeesComponent },
  { path: '', redirectTo: '/home', pathMatch: 'full' },
  { path: '**', component: PageNotFoundComponent }
];

// The NgModule decorator is imported above
// Pass the configured routes to the forRoot() method
// to let the angular router know about our routes
// Export the imported RouterModule so it is available
// to the module that imports this AppRoutingModule
@NgModule({
  imports: [RouterModule.forRoot(appRoutes)],
  exports: [RouterModule],
})
export class AppRoutingModule { }

Step 3 : Modify the code in the root AppModule in app.module.ts. The code is commented and self-explanatory.

import { BrowserModule } from '@angular/platform-browser';
import { NgModule } from '@angular/core';

import { AppRoutingModule } from './app-routing.module';
import { AppComponent } from './app.component';
import { HomeComponent } from './home/home.component';
import { EmployeesComponent } from './employees/employees.component';
import { PageNotFoundComponent } from './page-not-found/page-not-found.component';

@NgModule({
  declarations: [
    AppComponent,
    HomeComponent,
    EmployeesComponent,
    PageNotFoundComponent
  ],
  // Import AppRoutingModule which contains our routing code
  // AppRoutingModule has also exported angular RouterModule, so
  // all the RouterModule features are also availble to this module
  // including the <router-outlet> directive used in the AppComponent
  // If AppRoutingModule module did not export RouterModule we get
  // 'router-outlet' is not a known element error
  imports: [BrowserModule, AppRoutingModule],
  providers: [],
  bootstrap: [AppComponent]
})
export class AppModule { }

Save all changes and run the project using the following command
ng serve --open

Notice routing in our angular application works exactly the same way as before. We now have routing implemented in it's own module.

To quickly recap, here are the steps to implement routing in a separate module.

Step 1 : Set <base href> in index.html.

Step 2 : Create a separate routing module file. You can name it anything you want. I named it app-routing.module.ts.

Step 3 : Import the angular RouterModule into your application routing module (app-routing.module.ts). Also don't forget to re-export RouterModule.

Step 4 : Configure the application routes. 

Step 5 : Import the application routing module (app-routing.module.ts) in the root AppModule.

Step 6 : Specify where you want the routed component view template to be displayed using the <router-outlet> directive

Step 7 : Create a navigation menu and tie the configured routes with the menu using the routerLink directive. Optionally, use the routerLinkActive directive to style the current route that is active, so the user knows the page that he is on, in the application.

In our next video, we will discuss, how Angular CLI generates most of this routing code out of the box.