In this tutorial, I will show you step by step to build Node.js CRUD example with SQL Server (MSSQL) using Express for Rest API sample project, Sequelize ORM for interacting with MSSQL database.
Contents [hide]
Node.js CRUD example with SQL Server overview
We will build Rest Apis that can create, retrieve, update, delete and find Tutorials by title.
First, we start with an Express web server. Next, we add configuration for MSSQL database, create Tutorial model with Sequelize, write the controller. Then we define routes for handling all CRUD operations (including custom finder).
The following table shows overview of the Rest APIs that will be exported:
| Methods | Urls | Actions |
|---|---|---|
| GET | api/tutorials | get all Tutorials |
| GET | api/tutorials/:id | get Tutorial by id |
| POST | api/tutorials | add new Tutorial |
| PUT | api/tutorials/:id | update Tutorial by id |
| DELETE | api/tutorials/:id | remove Tutorial by id |
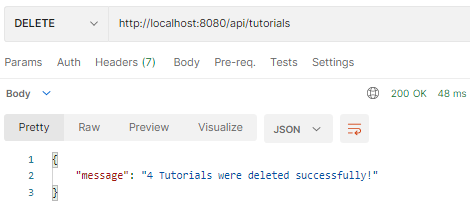
| DELETE | api/tutorials | remove all Tutorials |
| GET | api/tutorials/published | find all published Tutorials |
| GET | api/tutorials?title=[kw] | find all Tutorials which title contains 'kw' |
Finally, we’re gonna test the Rest Apis using Postman.
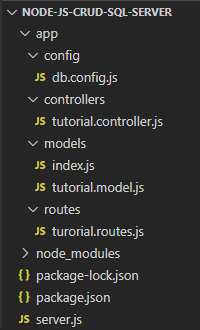
This is our project structure:
Create Node.js MSSQL App
First, we create a folder:
$ mkdir node-js-crud-sql-server
$ cd node-js-crud-sql-server
Next, we initialize the Node.js App with a package.json file:
npm init
name: (node-js-crud-sql-server)
version: (1.0.0)
description: Node.js CRUD example with SQL Server (MSSQL)
entry point: (index.js) server.js
test command:
git repository:
keywords: node js, crud, sql server, mssql, express, sequelize, rest api
author: bezkoder
license: (ISC)
Is this ok? (yes) yes
We need to install necessary modules: express, sequelize, tedious.
Run the command:
npm install express sequelize tedious cors --save
The package.json file should look like this:
{
  "name": "node-js-crud-sql-server",
  "version": "1.0.0",
  "description": "Node.js CRUD example with SQL Server",
  "main": "server.js",
  "scripts": {
    "test": "echo \"Error: no test specified\" && exit 1"
  },
  "keywords": [
    "node js",
    "sql server",
    "mssql",
    "crud",
    "express",
    "sequelize",
    "rest api"
  ],
  "author": "bezkoder",
  "license": "ISC",
  "dependencies": {
    "cors": "^2.8.5",
    "express": "^4.17.1",
    "sequelize": "^6.6.5",
    "tedious": "^11.4.0"
  }
}
Connect to SQL Server using Node.js and mssql package
Sequelize Official website recommends tedious as connector library for MSSQL (which we install above).
If you want to use mssql instead of tedious, you can run the command:npm install mssql
Setup Express web server
In the root folder, let’s create a new server.js file:
const express = require("express");
const cors = require("cors");
const app = express();
var corsOptions = {
  origin: "http://localhost:8081"
};
app.use(cors(corsOptions));
// parse requests of content-type - application/json
app.use(express.json());
// parse requests of content-type - application/x-www-form-urlencoded
app.use(express.urlencoded({ extended: true }));
// simple route
app.get("/", (req, res) => {
  res.json({ message: "Welcome to bezkoder application." });
});
// set port, listen for requests
const PORT = process.env.PORT || 8080;
app.listen(PORT, () => {
  console.log(`Server is running on port ${PORT}.`);
});
What we do are:
– import express, and cors modules:
- Express is for building the Rest apis
- cors provides Express middleware to enable CORS with various options.
– create an Express app, then add body-parser (json and urlencoded) and cors middlewares using app.use() method. Notice that we set origin: http://localhost:8081.
– define a GET route which is simple for test.
– listen on port 8080 for incoming requests.
Now let’s run the app with command: node server.js.
Open your browser with url http://localhost:8080/, you will see:
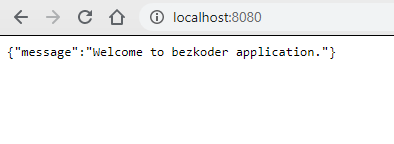
Yeah, the first step is done. We’re gonna work with Sequelize in the next section.
Configure MSSQL database & Sequelize
In the app folder, we create a separate config folder for configuration with db.config.js file like this:
module.exports = {
  HOST: "localhost",
  PORT: "1434",
  USER: "zkoder",
  PASSWORD: "123456",
  DB: "bezkoder_db",
  dialect: "mssql",
  pool: {
    max: 5,
    min: 0,
    acquire: 30000,
    idle: 10000
  }
};
First five parameters are for SQL Server / MSSQL connection.pool is optional, it will be used for Sequelize connection pool configuration:
max: maximum number of connection in poolmin: minimum number of connection in poolidle: maximum time, in milliseconds, that a connection can be idle before being releasedacquire: maximum time, in milliseconds, that pool will try to get connection before throwing error
For more details, please visit API Reference for the Sequelize constructor.
Initialize Sequelize
We’re gonna initialize Sequelize for working with SQL Server (MSSQL) in app/models folder that will contain model in the next step.
Now create app/models/index.js with the following code:
const dbConfig = require("../config/db.config.js");
const Sequelize = require("sequelize");
const sequelize = new Sequelize(dbConfig.DB, dbConfig.USER, dbConfig.PASSWORD, {
  host: dbConfig.HOST,
  port: dbConfig.PORT,
  dialect: dbConfig.dialect,
  pool: {
    max: dbConfig.pool.max,
    min: dbConfig.pool.min,
    acquire: dbConfig.pool.acquire,
    idle: dbConfig.pool.idle,
  },
});
const db = {};
db.Sequelize = Sequelize;
db.sequelize = sequelize;
db.tutorials = require("./tutorial.model.js")(sequelize, Sequelize);
module.exports = db;
Don’t forget to call sync() method in server.js:
...
const app = express();
app.use(...);
const db = require("./app/models");
db.sequelize.sync();
...
In development, you may need to drop existing tables and re-sync database. Just use force: true as following code:
db.sequelize.sync({ force: true }).then(() => {
  console.log("Drop and re-sync db.");
});
Define the Sequelize Model
In models folder, create tutorial.model.js file like this:
module.exports = (sequelize, Sequelize) => {
  const Tutorial = sequelize.define("tutorial", {
    title: {
      type: Sequelize.STRING
    },
    description: {
      type: Sequelize.STRING
    },
    published: {
      type: Sequelize.BOOLEAN
    }
  });
  return Tutorial;
};
This Sequelize Model represents tutorials table in MSSQL database. These columns will be generated automatically: id, title, description, published, createdAt, updatedAt.
After initializing Sequelize, we don’t need to write CRUD functions, Sequelize supports all of them:
- create a new Tutorial:
create(object) - find a Tutorial by id:
findByPk(id) - get all Tutorials:
findAll() - update a Tutorial by id:
update(data, where: { id: id }) - remove a Tutorial:
destroy(where: { id: id }) - remove all Tutorials:
destroy(where: {}) - find all Tutorials by title:
findAll({ where: { title: ... } })
These functions will be used in our Controller.
We can improve the example by adding Comments for each Tutorial. It is the One-to-Many Relationship and I write a tutorial for this at:
Sequelize Associations: One-to-Many example
Or you can add Tags for each Tutorial and add Tutorials to Tag (Many-to-Many Relationship):
Sequelize Many-to-Many Association example
In the Sequelize Associations tutorials above, we use MySQL. But you can easily modify db.config.js to work with SQL Server.
Create the Controller
Inside app/controllers folder, let’s create tutorial.controller.js with these CRUD functions:
- create
- findAll
- findOne
- update
- delete
- deleteAll
- findAllPublished
const db = require("../models");
const Tutorial = db.tutorials;
const Op = db.Sequelize.Op;
// Create and Save a new Tutorial
exports.create = (req, res) => {

};
// Retrieve all Tutorials from the database.
exports.findAll = (req, res) => {

};
// Find a single Tutorial with an id
exports.findOne = (req, res) => {

};
// Update a Tutorial by the id in the request
exports.update = (req, res) => {

};
// Delete a Tutorial with the specified id in the request
exports.delete = (req, res) => {

};
// Delete all Tutorials from the database.
exports.deleteAll = (req, res) => {

};
// Find all published Tutorials
exports.findAllPublished = (req, res) => {

};
Let’s implement these functions.
Create a new object
Create and Save a new Tutorial:
exports.create = (req, res) => {
  // Validate request
  if (!req.body.title) {
    res.status(400).send({
      message: "Content can not be empty!"
    });
    return;
  }
  // Create a Tutorial
  const tutorial = {
    title: req.body.title,
    description: req.body.description,
    published: req.body.published ? req.body.published : false
  };
  // Save Tutorial in the database
  Tutorial.create(tutorial)
    .then(data => {
      res.send(data);
    })
    .catch(err => {
      res.status(500).send({
        message:
          err.message || "Some error occurred while creating the Tutorial."
      });
    });
};
Retrieve objects (with condition)
Retrieve all Tutorials/ find by title from the database:
exports.findAll = (req, res) => {
  const title = req.query.title;
  var condition = title ? { title: { [Op.like]: `%${title}%` } } : null;
  Tutorial.findAll({ where: condition })
    .then(data => {
      res.send(data);
    })
    .catch(err => {
      res.status(500).send({
        message:
          err.message || "Some error occurred while retrieving tutorials."
      });
    });
};
We use req.query.title to get query string from the Request and consider it as condition for findAll() method.
Retrieve a single object
Find a single Tutorial with an id:
exports.findOne = (req, res) => {
  const id = req.params.id;
  Tutorial.findByPk(id)
    .then(data => {
      res.send(data);
    })
    .catch(err => {
      res.status(500).send({
        message: "Error retrieving Tutorial with id=" + id
      });
    });
};
Update an object
Update a Tutorial identified by the id in the request:
exports.update = (req, res) => {
  const id = req.params.id;
  Tutorial.update(req.body, {
    where: { id: id }
  })
    .then(num => {
      if (num == 1) {
        res.send({
          message: "Tutorial was updated successfully."
        });
      } else {
        res.send({
          message: `Cannot update Tutorial with id=${id}. Maybe Tutorial was not found or req.body is empty!`
        });
      }
    })
    .catch(err => {
      res.status(500).send({
        message: "Error updating Tutorial with id=" + id
      });
    });
};
Delete an object
Delete a Tutorial with the specified id:
exports.delete = (req, res) => {
  const id = req.params.id;
  Tutorial.destroy({
    where: { id: id }
  })
    .then(num => {
      if (num == 1) {
        res.send({
          message: "Tutorial was deleted successfully!"
        });
      } else {
        res.send({
          message: `Cannot delete Tutorial with id=${id}. Maybe Tutorial was not found!`
        });
      }
    })
    .catch(err => {
      res.status(500).send({
        message: "Could not delete Tutorial with id=" + id
      });
    });
};
Delete all objects
Delete all Tutorials from the database:
exports.deleteAll = (req, res) => {
  Tutorial.destroy({
    where: {},
    truncate: false
  })
    .then(nums => {
      res.send({ message: `${nums} Tutorials were deleted successfully!` });
    })
    .catch(err => {
      res.status(500).send({
        message:
          err.message || "Some error occurred while removing all tutorials."
      });
    });
};
Find all objects by condition
Find all Tutorials with published = true:
exports.findAllPublished = (req, res) => {
  Tutorial.findAll({ where: { published: true } })
    .then(data => {
      res.send(data);
    })
    .catch(err => {
      res.status(500).send({
        message:
          err.message || "Some error occurred while retrieving tutorials."
      });
    });
};
This controller can be modified a little to return pagination response:
{
    "totalItems": 8,
    "tutorials": [...],
    "totalPages": 3,
    "currentPage": 1
}
You can find more details at:
Server side Pagination in Node.js with Sequelize and MySQL
Define Routes
When a client sends request for an endpoint using HTTP request (GET, POST, PUT, DELETE), we need to determine how the server will reponse by setting up the routes.
These are our routes:
/api/tutorials: GET, POST, DELETE/api/tutorials/:id: GET, PUT, DELETE/api/tutorials/published: GET
Create a turorial.routes.js inside app/routes folder with content like this:
module.exports = app => {
  const tutorials = require("../controllers/tutorial.controller.js");
  var router = require("express").Router();
  // Create a new Tutorial
  router.post("/", tutorials.create);
  // Retrieve all Tutorials
  router.get("/", tutorials.findAll);
  // Retrieve all published Tutorials
  router.get("/published", tutorials.findAllPublished);
  // Retrieve a single Tutorial with id
  router.get("/:id", tutorials.findOne);
  // Update a Tutorial with id
  router.put("/:id", tutorials.update);
  // Delete a Tutorial with id
  router.delete("/:id", tutorials.delete);
  // Delete all Tutorials
  router.delete("/", tutorials.deleteAll);
  app.use('/api/tutorials', router);
};
You can see that we use a controller from /controllers/tutorial.controller.js.
We also need to include routes in server.js (right before app.listen()):
...
require("./app/routes/turorial.routes")(app);
// set port, listen for requests
const PORT = ...;
app.listen(...);
Test the APIs
Run our Node.js application with command: node server.js.
The console shows:
Server is running on port 8080.
Executing (default): IF OBJECT_ID('[tutorials]', 'U') IS NULL CREATE TABLE [tutorials] ([id] INTEGER NOT NULL IDENTITY(1,1) , [title] NVARCHAR(255) NULL, [description] NVARCHAR(255) NULL, [published] BIT NULL, [createdAt] DATETIMEOFFSET NOT NULL, [updatedAt] DATETIMEOFFSET NOT NULL, PRIMARY KEY ([id]));
Executing (default): EXEC sys.sp_helpindex @objname = N'[tutorials]';
Using Postman, we’re gonna test all the Apis above.
- Create a new Tutorial using
POST /tutorialsApi - Retrieve all Tutorials using
GET /tutorialsApi - Retrieve a single Tutorial by id using
GET /tutorials/:idApi - Update a Tutorial using
PUT /tutorials/:idApi - Find all Tutorials which title contains ‘node’:
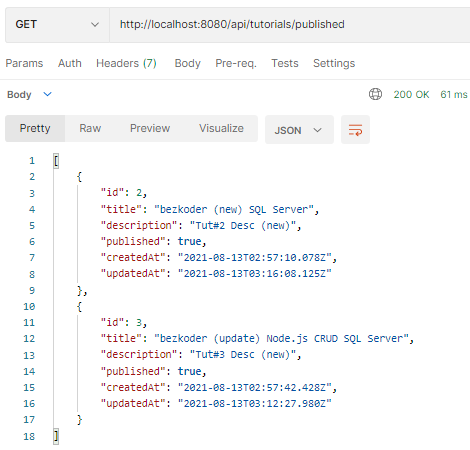
GET /tutorials?title=node - Find all published Tutorials using
GET /tutorials/publishedApi - Delete a Tutorial using
DELETE /tutorials/:idApi - Delete all Tutorials using
DELETE /tutorialsApi

After creating some new Tutorials, you can check MSSQL table:


Check tutorials table after some rows were updated:


Tutorial with id=4 was removed from tutorials table:

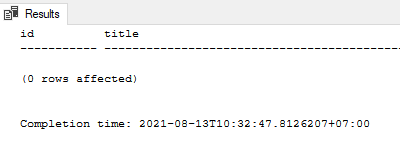
Now there are no rows in tutorials table:
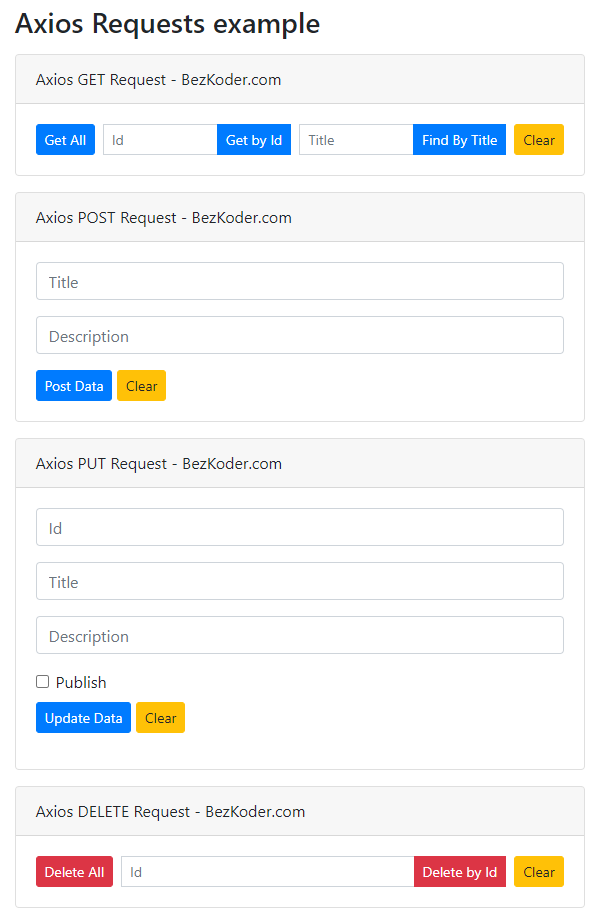
You can use the Simple HTTP Client using Axios to check it.