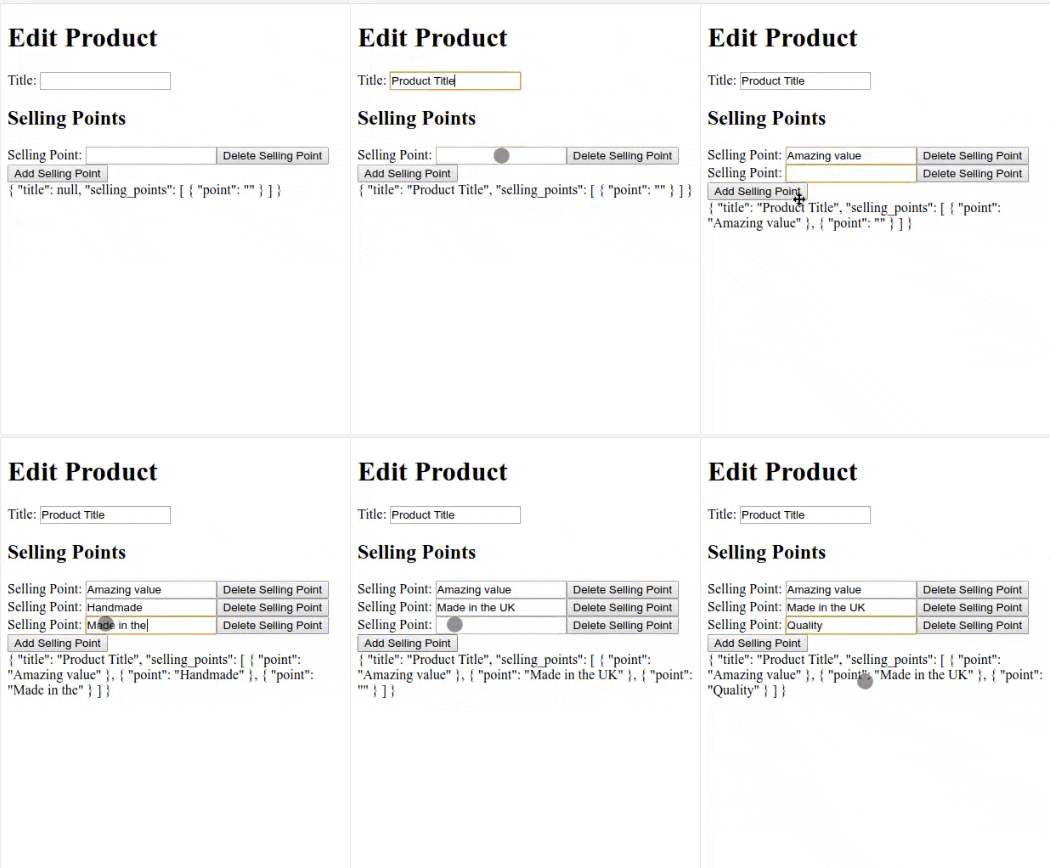
For this we'll create an example form which allows an admin user to add multiple selling points (rows) to a product to demonstrate dynamicaly adding multiple form inputs to a form. It starts simple, but once you've got the core concepts of it it's easyier to create more complex (such as nested multiple inputs).
- "Add row" button to duplicate form fields
- Easily repeat / remove fields as the user needs to add more records
"Sometimes you need to present an arbitrary number of controls or groups. For example, a hero may have zero, one, or any number of addresses." - Angular Docs
The specific part of Angular6 to learn here is called FormArray. You essentially need to learn the utilities: Reactive forms, FormArray, FormBuilder and FormGroup.

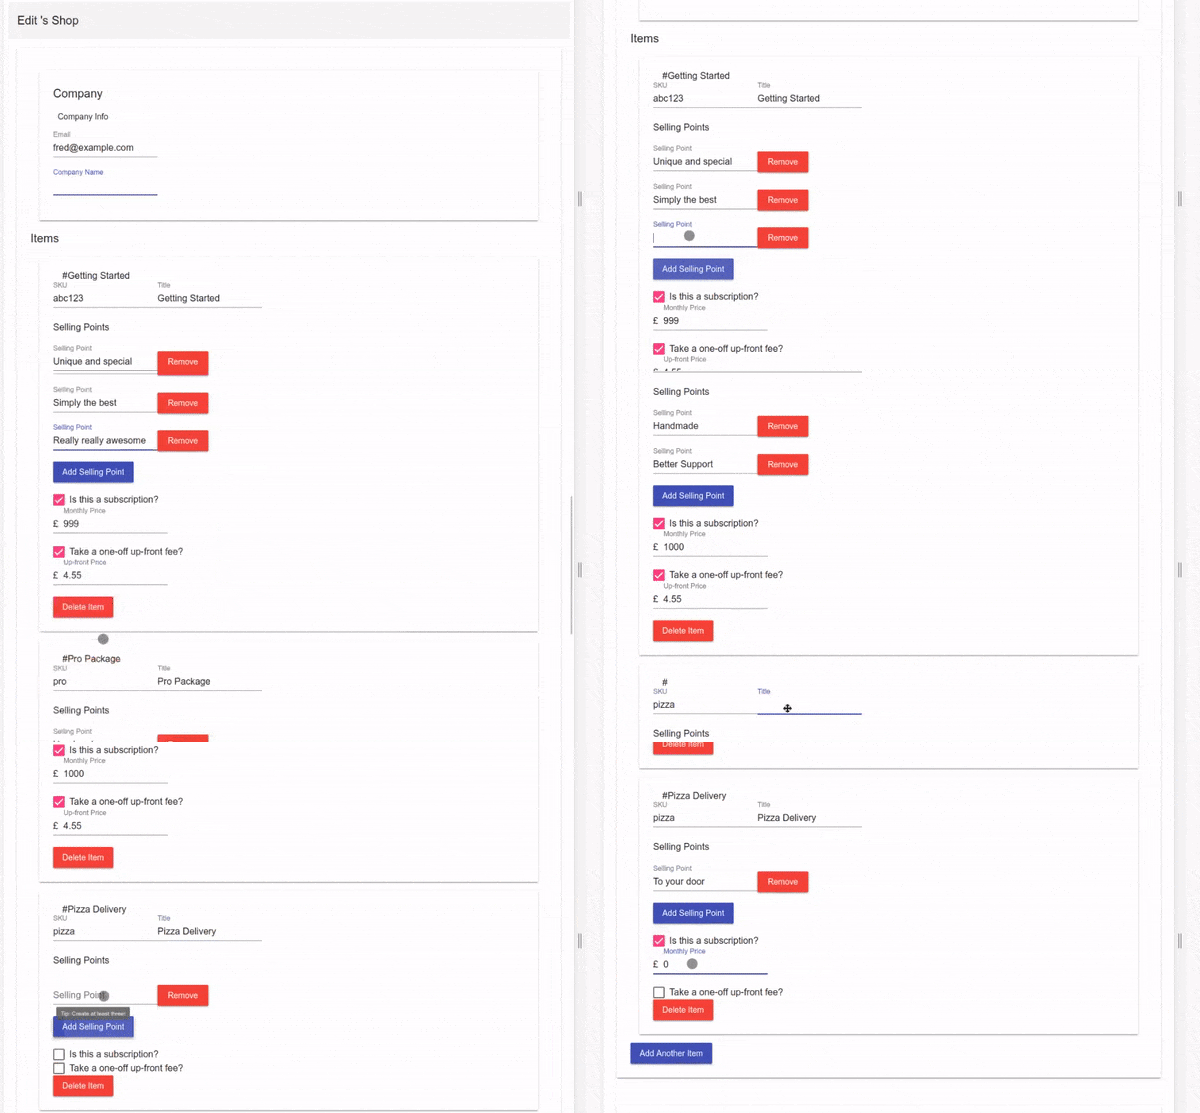
It sets the foundations to be able to build somthing slightly more complex with nested multiple elements being repeated:

Create Angular app
First make sure your install of Angular and npm is up to date.
ng new myapp
Generate your product class
ng generate class product
Here we define a class Product which has a name, and an array [] of selling points of type SellingPoint.
myapp/src/app/product.ts:
export class Product {
    name: string
    selling_points: SellingPoint[]
}

export class SellingPoint {
    selling_point: string
}
Show me your code and conceal your data structures, and I shall continue to be mystified. Show me your data structures, and I won't usually need your code; it'll be obvious - Fred Brooks (adapted to more modern terms)
The above is very relevant when tackling angular reactive forms, think about the data structure you're modeling first, and the rest will follow.
Import ReactiveFormsModule
To use reactive forms, you must import the ReactiveFormsModule. Add the import of the ReactiveFormsModule module from @angular/forms, and add it to the imports array because doing so "tells Angular about other NgModules that this particular module (which is out app, called AppModule by default) needs to function properly" (docs). Otherwise you will get the "No provider for FormBuilder" error.
myapp/src/app/app.module.ts:
import { BrowserModule } from '@angular/platform-browser';
import { NgModule } from '@angular/core';

import { ReactiveFormsModule } from '@angular/forms';

import { AppComponent } from './app.component';

@NgModule({
  declarations: [
    AppComponent
  ],
  imports: [
    BrowserModule,
    ReactiveFormsModule
  ],
  providers: [],
  bootstrap: [AppComponent]
})
export class AppModule { }
Create form component & import everything you need
ng generate component productForm
Update your app.component.html to reference your new component:
myapp/src/app/app.component.html:
<app-product-form></app-product-form>
Now import the FormBuilder, FormGroup, FormArray, and FormControl modules into your productForm component. You also need to import the Product and SellingPoint classes we defined, because we'll be referencing them when we create (instantiate) the form.
Instantiating the form (creating it's initial layout) was a key stumbling block for me when wanting to learn Angular reactive forms. Think of it like this: You must give Angular the skeleton of your form , all its elements and form groups before you start putting data into it. You are programatically defining your forms' structure, rather than in html. This way you can more easily references parts of the form in your template and manipulate it later.
Here's the form component before instantiating the form:
myapp/src/app/product-form/product-form.component.ts:
import { Component, OnInit } from '@angular/core';
import { FormBuilder, FormGroup, FormArray, FormControl } from '@angular/forms';

@Component({
  selector: 'app-product-form',
  templateUrl: './product-form.component.html',
  styleUrls: ['./product-form.component.css']
})
export class ProductFormComponent implements OnInit {

  constructor(private fb: FormBuilder) { }

  productForm: FormGroup;

  ngOnInit() {
  }
}
Next, here is the form component after instantiating the form:
myapp/src/app/product-form/product-form.component.ts:
import { Component, OnInit } from '@angular/core';
import { FormBuilder, FormGroup, FormArray, FormControl } from '@angular/forms';
import { Product, SellingPoint } from '../product'

@Component({
  selector: 'app-product-form',
  templateUrl: './product-form.component.html',
  styleUrls: ['./product-form.component.css']
})
export class ProductFormComponent implements OnInit {

  constructor(private fb: FormBuilder) { }

  productForm: FormGroup;

  ngOnInit() {

    /* Initiate the form structure */
    this.productForm = this.fb.group({
      title: [],
      selling_points: this.fb.array([this.fb.group({point:''})])
    })
  }
}
Define a get accessor for your sellingPoints
We're going to be looping over n selling point inputs in our template (there could be zero, or many). We add little accessor function to get these form controls easily:
myapp/src/app/product-form/product-form.component.ts
import { Component, OnInit } from '@angular/core';
import { FormBuilder, FormGroup, FormArray, FormControl } from '@angular/forms';
import { Product, SellingPoint } from '../product'

@Component({
  selector: 'app-product-form',
  templateUrl: './product-form.component.html',
  styleUrls: ['./product-form.component.css']
})
export class ProductFormComponent implements OnInit {

  constructor(private fb: FormBuilder) { }

  productForm: FormGroup;

  ngOnInit() {

    /* Initiate the form structure */
    this.productForm = this.fb.group({
      title: [],
      selling_points: this.fb.array([this.fb.group({point:''})])
    })
  }

  ///////// This is new ////////
  get sellingPoints() {
    return this.productForm.get('selling_points') as FormArray;
  }
  ///////////End ////////////////
}
If this
getsyntax looks odd to you it's because it's using typescript accessors, which are "getters/setters as a way of intercepting accesses to a member of an object. This gives you a way of having finer-grained control over how a member is accessed on each object."
Write your html form finally
Start with the basic form. We'll then an the 'add more' / 'delete' buttons.
myapp/src/app/product-form/product-form.component.html:
<h1>Edit Product</h1>

<form [formGroup]="productForm">

  <label>
    Title: <input formControlName="title" />
  </label>
  <h2>Selling Points</h2>

  <label>
    Selling Point: <input formControlName="point" />
  </label>
</form>

{{ this.productForm.value | json }}
[formGroup]="productForm"refers to the variable we declared inmyapp/src/app/product-form/product-form.component.tswhich was:productForm: FormGroup;formControlName="title"refers to the property name we gave to the formGroup when we initiated the form (also inmyapp/src/app/product-form/product-form.component.ts) which was:/* Initiate the form structure */ this.productForm = this.fb.group({ title: [], selling_points: this.fb.array([this.fb.group({point:''})]) })
Add formArray to allow multiple values to be added
Now we're going to increase the complexity of the form slightly to mirror the structure of the form we've defined in myapp/src/app/product-form/product-form.component.ts:
myapp/src/app/product-form/product-form.component.ts:
<h1>Edit Product</h1>
<form [formGroup]="productForm">
<label>
Title: <input formControlName="title" />
</label>
<h2>Selling Points</h2>
<div formArrayName="selling_points">
<div *ngFor="let item of sellingPoints.controls; let pointIndex=index" [formGroupName]="pointIndex">
<label>
Selling Point: <input formControlName="point" />
</label>
</div>
</div>
</form>
{{ this.productForm.value | json }}
We've added:
- Two div wrappers
- One for
formArrayName - Another for looping over the selling points, with
*ngForandformGroupName
- One for
If you forget to specify formArrayName in your outer div, then you will recieve the error: "Error: Cannot find control with unspecified name attribute", which only makes a lot of sense if you know that's what you've forgotten to do! ¯\(ツ)/¯ to fix it, you must wrap your *ngFor loop in an outer div, and specify the formArrayName=yourFormArrayName. In our case, the name is selling_points. But why, how do we know that? Take a look here:
Snippet from myapp/src/app/product-form/product-form.component.ts:
this.productForm = this.fb.group({
title: [],
selling_points: this.fb.array([this.fb.group({point:''})])
})
Because we set selling_points equal to a formArray (that's what this.fb.array.. is doing), in our template, we must reference this name as this is what allows Angular to match it to the correct array of form controls:
<div formArrayName="selling_points">
<div *ngFor="let item of sellingPoints.controls; let pointIndex=index" [formGroupName]="pointIndex">
<label>
Selling Point: <input formControlName="point" />
</label>
</div>
</div>
Notice we're making use of our getter sellingPoints() (defined in myapp/src/app/product-form/product-form.component.ts) which returns an FormArray but we further call its .controls property so we can loop over each form input.
If you neglect to include another 'formGroupName' or valid index for the nested formArray, then you will get "Cannot find control with path". To fix this, make sure you remember to do *ngFor as above, referencing the correct property names. For example, if we remove point from our form initiation in myapp/src/app/product-form/product-form.component.ts then our loop would fail with. "Error: Cannot find control with path: 'selling_points -> 0 -> point'".
Add the add() and delete() methods
Finally we're adding the "Add row" type functionality, we can do this now because:
- We've defined our data structures (Product, SellingPoints)
- Initiated our
productFormby defining it's properties, FormArray, and FormGroup (so we can reference them in our template) - See the added
addSellingPoint()anddeleteSellingPoint()defined below
myapp/src/app/product-form/product-form.component.ts
import { Component, OnInit } from '@angular/core';
import { FormBuilder, FormGroup, FormArray, FormControl } from '@angular/forms';
import { Product, SellingPoint } from '../product'
@Component({
selector: 'app-product-form',
templateUrl: './product-form.component.html',
styleUrls: ['./product-form.component.css']
})
export class ProductFormComponent implements OnInit {
constructor(private fb: FormBuilder) { }
productForm: FormGroup;
ngOnInit() {
  /* Initiate the form structure */
  this.productForm = this.fb.group({
    title: [],
    selling_points: this.fb.array([this.fb.group({point:''})])
  })
}
get sellingPoints() {
return this.productForm.get('selling_points') as FormArray;
}
/////// This is new /////////////////
addSellingPoint() {
this.sellingPoints.push(this.fb.group({point:''}));
}
deleteSellingPoint(index) {
this.sellingPoints.removeAt(index);
}
//////////// End ////////////////////
}
How does this work?
addSellingPoint()
Accesses the selling_points property, which we defined as a FormArray during ngOnInit() in the same file (myapp/src/app/product-form/product-form.component.ts). We call the push method to push another FormGroup and finally kick it off by passing this FormGroup a selling point form control {point:''} (FormGroup converts this json into a html form input).
deleteSellingPoint(index)
deleteSellingPoint(index) takes an index (which will be passed by our templat) to delete the form input at the given index number. It does this by using the FormArray.removeAt() method.
Finalise your template: add/remove row buttons
Add the the (click) event listeners on buttons for the addition, and removal of arbitary rows to your form!
- Notice the
addSellingPoint()button is placed outside of the*ngForloop - The
deleteSellingPoint(pointIndex)is within the*ngForloop
myapp/src/app/product-form/product-form.component.html:
<h1>Edit Product</h1>

<form [formGroup]="productForm">

  <label>
    Title: <input formControlName="title" />
  </label>
  <h2>Selling Points</h2>

  <div formArrayName="selling_points">
    <div *ngFor="let item of sellingPoints.controls; let pointIndex=index" [formGroupName]="pointIndex">
    <label>
      Selling Point: <input formControlName="point" />
    </label>
    <button type="button" (click)="deleteSellingPoint(pointIndex)">Delete Selling Point</button>
    </div>
    <button type="button" (click)="addSellingPoint()">Add Selling Point</button>
  </div>

</form>

{{ this.productForm.value | json }}
Create a component to hold the form
Add required imports:
- From @angular/core:
- Component
- Input: For input bindingbetween component & template
- OnChanges: For building form with initial values, and reacting to changes
- From @angular/forms:
Build out your html form
Create your html form as you would, then wrap Angular formGroup reactive directive to your <form> element. <form [formGroup]="jamlaForm">
"formGroup is a reactive form directive that takes an existing FormGroup instance and associates it with an HTML element. In this case, it associates the FormGroup you saved as (jamlaForm) with the
<form>element." - Angular Docs
Without adding formGroup to your html form, you'll get the "Template parse errors: No provider for ControlContainer because the formGroup directive has no form group to associate with.
Additionally, note the use of Angular's formControlName, this replaces html's standard <input name="xyz" /> convention and is how formGroup knows which form inputs to watch. formControlName "Syncs a FormControl in an existing FormGroup to a form control element by name"(docs).


0 comments:
Post a Comment
Note: only a member of this blog may post a comment.