In this example, we will see How To Create Sidebar Component In React. We use the library called react-burger-menu. This library will help us to build a sidebar menu component in React.js. We are not using Redux so we will build with plain React.js.
# Create Sidebar Component In React
First, we install the React.js and then install the third-party GitHub library called react-burger-menu.
#1: Install React.js
Type the following command to install React.js.
npx create-react-app sidebar
Go inside the folder and open it in VSCode editor.
cd sidebar
code .
Now, install the react-burger-menu library using the following command.
npm install react-burger-menu --save

# or

yarn add react-burger-menu
#2: Create a Sidebar Menu
Inside the src folder, create one file called sidebar.js. In this sidebar component, we can add the list item that can display inside that sidebar. Here, we will make use of react-burger-menu as well.
So, write the following code inside the sidebar.js file.
// sidebar.js

import React from 'react';
import { slide as Menu } from 'react-burger-menu';

export default props => {
  return (
    <Menu>
      <a className="menu-item" href="/">
        Home
      </a>

      <a className="menu-item" href="/laravel">
        Laravel
      </a>

      <a className="menu-item" href="/angular">
        Angular
      </a>

      <a className="menu-item" href="/react">
        React
      </a>

      <a className="menu-item" href="/vue">
        Vue
      </a>

      <a className="menu-item" href="/node">
        Node
      </a>
    </Menu>
  );
};
So, here we have imported the slide component from the react-burger-menu.
Write the following code inside an App.js file.
// App.js

import React from 'react';
import SideBar from './sidebar';

import './App.css';

export default function App() {
  return (
    <div id="App">
      <SideBar />
      <div id="page-wrap">
        <h1>kansiris</h1>
        <h2>Check out our tutorials the side menubar</h2>
      </div>
    </div>
  );
}
Now, finally add the css code inside App.css file.
html,
body {
  margin: 0;
}

#App {
  font-family: sans-serif;
  height: 100vh;
}

#page-wrap {
  text-align: center;
  overflow: auto;
}

.bm-item {
  display: inline-block;
  text-decoration: none;
  margin-bottom: 10px;
  color: #d1d1d1;
  transition: color 0.2s;
}

.bm-item:hover {
  color: white;
}

.bm-burger-button {
  position: fixed;
  width: 36px;
  height: 30px;
  left: 36px;
  top: 36px;
}

.bm-burger-bars {
  background: #373a47;
}

.bm-cross-button {
  height: 24px;
  width: 24px;
}

.bm-cross {
  background: #bdc3c7;
}

.bm-menu {
  background: #373a47;
  padding: 2.5em 1.5em 0;
  font-size: 1.15em;
}

.bm-morph-shape {
  fill: #373a47;
}

.bm-item-list {
  color: #b8b7ad;
}

.bm-overlay {
  background: rgba(0, 0, 0, 0.3);
}
After saving the file, go to the terminal and start the React development server.
npm start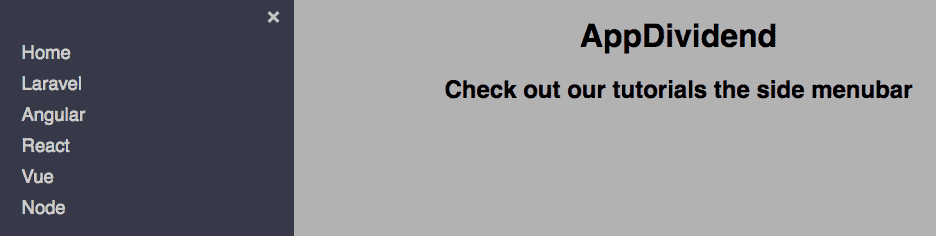
So at this URL: http://localhost:3000/. You can see that our React.js project is up and running.
To try out our different animations, merely change the imported slide at the top of our sidebar.js file to any of the other animation, such as bubble. To use a different animation you can substitute slide with any of the following.
1. slide
2. stack
3. elastic
4. bubble
5. push
6. pushRotate
7. scaleDown
8. scaleRotate
9. fallDown
10. reveal
2. stack
3. elastic
4. bubble
5. push
6. pushRotate
7. scaleDown
8. scaleRotate
9. fallDown
10. reveal
Properties
Some animations require certain other elements to be on your page.
Page Wrapper
An element wrapping the rest of the content on your page.
<Menu pageWrapId={ "page-wrap" } />
<main id="page-wrap">
  .
  .
  .
</main>
Outer container
An element containing everything, including the menu component.
<div id="outer-container">
  <Menu pageWrapId={ "page-wrap" } outerContainerId={ "outer-container" } />
  <main id="page-wrap">
    .
    .
    .
  </main>
</div>
Finally, How To Create Sidebar Component In React Tutorial Example is over. Thanks for taking.


0 comments:
Post a Comment
Note: only a member of this blog may post a comment.