Getting Started With Axios Promise Based HTTP Client Tutorial Example is today’s leading topic. Axios is the Promise based HTTP client for the browser and node.js. It supports all modern browsers, including support for IE8 and higher. It is promise-based, and this lets us write async/await code to perform XHR requests very quickly. Using Axios, It is effortless to send an asynchronous HTTP request to the server or REST endpoints and perform any CRUD operations. An Axios library can be used in your everyday JavaScript application or can be used together with more advanced frameworks like Vue.js, Angular, or Node.js.Getting Started With Axios Tutorial Example will teach you how to use Axios to send a POST request to the server or send GET request to fetch the data.
Axios has lots of advantages over the native Fetch API:
- It supports older browsers (Fetch needs a polyfill)
- It has as a way to abort a request.
- It has a way to set a response timeout.
- It has built-in CSRF protection.
- It supports upload progress.
- It performs automatic JSON data transformation.
- It works with Node.js very well.
In this tutorial, you’ll learn how to install and add Axios to your project and perform an asynchronous HTTP request. We’ll cover a real-world scenario throughout this example.
Getting Started With Axios
We will use Axios with Node.js.
Okay, first create one folder called axios-prac by the following command.
mkdir axios-prac
cd axios-prac
Now, we need to create the package.json file. So let us build using the following command.
npm init -y
#1: Install Axios HTTP Library.
Now, we need to install an axios library. We can install it using the npm or yarn.
npm install axios --save

# or

yarn add axios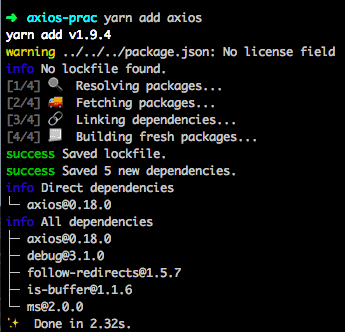
#2: Create the server.js file.
Inside the root folder, create one file called server.js.
Now, we send an HTTP request using Axios to GitHub api server and try to fetch the data. So let us add the following code inside the server.js file.
// server.js

const axios = require('axios');

async function getGithubData() {
  let res = await axios.get('https://api.github.com/users/KrunalLathiya');
  console.log(res.data.login);
}

getGithubData();
Here, also we have used an async-await feature of ES7. Save the file and go to the terminal or CMD and type the following command to run the node server.
node server
You can see that my name has printed that means, we have successfully sent an HTTP Request using Axios.
So, this is how anyone can use Axios with Node.js. It is effortless. It is the primary example of Axios API. Let us dive into Axios and get more details.
#The Axios Api
You can start an HTTP request from the axios object:
If you are using plain JS, then you can use axios using the following code.
axios({
  url: 'https://api.github.com/users/KrunalLathiya',
  method: 'get'
})
But generally, we do not use the above syntax. Instead, we can use the following syntax.
axios.get()
axios.post()
Axios offers methods for all the HTTP verbs, which are less popular but still used:
- axios.put()
- axios.delete()
- axios.patch()
- axios.options()
- axios.head()
If we do not want to use async-await and make use of the promise to resolve the response, then we can write the following code.
// server.js

const axios = require('axios');

function getGithubData() {
  axios.get('https://api.github.com/users/KrunalLathiya')
    .then(res => {
      console.log(res.data.login);
    });
}

getGithubData();
We will get the same result, but we have used promise to resolve the request and get the data.
If the promise does not resolve, it will be rejected, and we can get an error in the catch block.
// server.js

const axios = require('axios');

function getGithubData() {
  axios.get('https://api.github.com/users/KrunalLathiya')
    .then(res => {
      console.log(res.data.login);
    })
    .catch(err => {
      console.log(err);
    });
}

getGithubData();
We can also pass the parameter to the Axios GET Request. The syntax for that is following.
axios.get('/user', {
    params: {
      ID: 12345
    }
  })
  .then(function (response) {
    console.log(response);
  })
  .catch(function (error) {
    console.log(error);
  })
  .then(function () {
    // always executed
  });
#Axios Request Config/Options
If we need to set up the global config, then we can write the following code inside JS file.
axios.defaults.headers.post['header1'] = 'value' // for POST requests
axios.defaults.headers.common['header1'] = 'value' // for all requests
We can send a GET request with the Authorization Token. Let us say we need to add the JWT token in the request then we can write the following object with the request. The following code is the syntax.
axios.get('https://kansiris.org', {
 headers: {
   Authorization: 'Bearer ' + token //the token is a variable which holds the token
 }
});
If we are working with the POST request, then we can also add the config object like the following code.
let config = {
  headers: { 'Content-Type': 'application/x-www-form-urlencoded' },
  responseType: 'blob'
};

axios.post('https://kansiris.org', data, config)
     .then((response) => {
        console.log(response.data);
});
So, here we have passed the three parameters in the axios post request.
- URL (Where we need to send an HTTP request).
- Data (That needs to be posted and saved in the database).
- Request object.
So, you can pass the following options in the request.
baseUrl: if you specify a base URL, it’ll be prepended to any relative URL you use.headers: It is an object of key-value pairs to be sent as headers.params: an object of key/value pairs that will be serialized and appended to the URL as a query string.responseType: if we want to get the response in a format other than JSON then we can set this property to arraybuffer, blob, document, text, or stream.auth: Auth option is used when we need to pass an object with the usernameand password credentials for HTTP Basic authentication on the request.
#Axios Response Object
When the HTTP request is successful sent, than then() callback will receive a response object with the following properties:
data: the payload returned from the server. By default, Axios expects JSON and will parse this back into a JavaScript object for you.status: the HTTP code returned from the server.statusText: the HTTP status message returned by the server.headers: all the headers sent back by the server.config: the original request configuration.request: the actual XMLHttpRequest object (when running in a browser).
#Axios error object
If there is any problem with the axios request, the promise will be rejected with an error object containing the following properties:
message: the error message text.response: the response object (if received) as described in the previous section.request: the actual XMLHttpRequest object (when running in a browser).config: the original request configuration.
#Axios Post Request
Performing a POST request is just like making a GET request, but instead of axios.get(), you use axios.post():
An object containing the POST parameters is the second argument:
axios.post('https://kansiris.org', {
  foo: 'bar'
})
#Axios Interceptors
We can intercept the request or response at some given point of time like while sending a request or while receiving the response object. Axios also allows us to add functions called interceptors. Like transforms, these interceptor functions can be attached to fire when a request is made, or when a response is received.
// Add a request interceptor
axios.interceptors.request.use((config) => {
    // Do something before request is sent
    return config;
  }, (error) => {
    // Do something with request error
    return Promise.reject(error);
  });

// Add a response interceptor
axios.interceptors.response.use((response) => {
    // Do something with response data
    return response;
  }, (error) => {
    // Do something with response error
    return Promise.reject(error);
  });
#Multiple Axios Requests simultaneously.
To execute multiple requests in parallel, provide an array argument to axios.all(). When all requests are complete, you’ll receive an array containing the response objects in the same order they were sent. Alternatively, you can use axios spread to spread the array into multiple arguments. The spread is preferred since dealing with array indexes could be misleading.
// Requests will be executed in parallel...
axios.all([
    axios.get('https://api.github.com/users/codeheaven-io');
    axios.get('https://api.github.com/users/codeheaven-io/repos')
  ])
  .then(axios.spread(function (userResponse, reposResponse) {
    //... but this callback will be executed only when both requests are complete.
    console.log('User', userResponse.data);
    console.log('Repositories', reposResponse.data);
  }));
#Third-party Add-ons
Axios can benefit from an ecosystem of third-party libraries that extend its functionality. From interceptors to testing adaptors to loggers, there’s quite a variety available. Here are a few that I think you may find useful:
- axios-mock-adaptor: It allows you to easily mock requests to facilitate testing your code.
- axios-cache-plugin: It is a wrapper for selectively caching GET requests.
- redux-axios-middleware: If you’re a Redux user, this middleware provides a neat way to dispatch Ajax requests with open old actions.
Finally, Getting Started With Axios Promise Based HTTP Client Tutorial Example is over. Thanks for taking.


0 comments:
Post a Comment
Note: only a member of this blog may post a comment.