HI WELCOME TO SIRIS
Showing posts with label react.js. Show all posts

React js or react-native with Asp.net Web API – User Registration, Login and Logout Operations part1

Leave a Comment

1. Install and Configure Required Modules for React.js

We need additional modules for navigating the views, accessing RESTful API and styling the front end. Type this commands to install the required modules.
npm install --save react-router-dom
npm install --save-dev bootstrap
npm install --save axios
Next, open and edit `src/index.js` then replace all codes with this.
import React from 'react';
import ReactDOM from 'react-dom';
import { BrowserRouter as Router, Route } from 'react-router-dom';
import '../node_modules/bootstrap/dist/css/bootstrap.min.css';
import '../node_modules/bootstrap/dist/css/bootstrap-theme.min.css';
import './index.css';
import App from './App';
import registerServiceWorker from './registerServiceWorker';
import Login from './components/Login';
import Register from './components/Register';

ReactDOM.render(
  <Router>
      <div>
        <Route exact path='/' component={App} />
        <Route path='/login' component={Login} />
        <Route path='/register' component={Register} />
      </div>
  </Router>,
  document.getElementById('root')
);
registerServiceWorker();
As you see that Login and Register added as the separate component. Bootstrap also included in the import for make the views better. Now, create the new login and register files.
mkdir src/components
touch src/components/Login.js
touch src/components/Register.js


2. Add List of Book to Existing App Component

As you see in the previous step that App component act as home or root page. This component handles the list of books. Open and edit `src/App.js` then replace all codes with this codes.
import React, { Component } from 'react';
import ReactDOM from 'react-dom';
import { Link } from 'react-router-dom';
import axios from 'axios';

class App extends Component {

  constructor(props) {
    super(props);
    this.state = {
      books: []
    };
  }

  componentDidMount() {
    axios.defaults.headers.common['Authorization'] = localStorage.getItem('jwtToken');
    axios.get('/api/book')
      .then(res => {
        this.setState({ books: res.data });
        console.log(this.state.books);
      })
      .catch((error) => {
        if(error.response.status === 401) {
          this.props.history.push("/login");
        }
      });
  }

  logout = () => {
    localStorage.removeItem('jwtToken');
    window.location.reload();
  }

  render() {
    return (
      <div class="container">
        <div class="panel panel-default">
          <div class="panel-heading">
            <h3 class="panel-title">
              BOOK CATALOG &nbsp;
              {localStorage.getItem('jwtToken') &&
                <button class="btn btn-primary" onClick={this.logout}>Logout</button>
              }
            </h3>
          </div>
          <div class="panel-body">
            <table class="table table-stripe">
              <thead>
                <tr>
                  <th>ISBN</th>
                  <th>Title</th>
                  <th>Author</th>
                </tr>
              </thead>
              <tbody>
                {this.state.books.map(book =>
                  <tr>
                    <td><Link to={`/show/${book._id}`}>{book.isbn}</Link></td>
                    <td>{book.title}</td>
                    <td>{book.author}</td>
                  </tr>
                )}
              </tbody>
            </table>
          </div>
        </div>
      </div>
    );
  }
}

export default App;
As you can see, there's a call to Book RESTful API when the page is loaded. If API calls response `401` error status then it will be redirected to the login page. We also put a logout button inside the condition where JWT token does not exist in local storage.


3. Add a Component for Login

Previously we have created a Javascript file for login component. Now, open and edit `src/components/Login.js` then add/replace this lines of codes.
import React,{Component} from 'react';
import FaceBookLogin from 'react-facebook-login';
import GoogleLogin from 'react-google-login';
import {PostData} from './postdata';
import {Redirect} from 'react-router-dom';
import Header from '../Results/Header';
import './login.css'
class Welcome extends Component{
constructor(){
    super();
    this.state={
        redirect: false,
        datas:[],
        mode:'view',username:'',username1:'',email:'',email1:'',password:'',password1:'',telphone:''
    };
    
    this.handleSave = this.handleSave.bind(this);
    this.handleEdit = this.handleEdit.bind(this);
    this.handleEdit3 = this.handleEdit3.bind(this);
    this.handleEdit2 = this.handleEdit2.bind(this);
    this.handleEdit1 = this.handleEdit1.bind(this);
    this.onChange = this.onChange.bind(this);
}

onChange(e){
    const state = this.state
    state[e.target.name] = e.target.value;
    this.setState(state);
}

  
  handleSave() {
    this.setState({text: this.state.inputText, mode: 'view'});
  }

  handleEdit() {
    this.setState({mode: 'edit'});
  }
  handleEdit3() {
    const {username,username1,email,email1,password1,telphone,password} = this.state;

    this.setState({mode: 'edit1'});
  }
  handleEdit2(){
    var url = document.referrer;
    alert(url);
    var url1 = url.split('://')[1].split('/')[1]
    alert(url1)
    const {username,username1,email,email1,password1,telphone,password} = this.state;
fetch('http://localhost:49716/api/UseAuth/login?username=' + username + '&&password='+password)
.then((res) => res.json())
.then((res) => { // responseData = undefined
localStorage.setItem('UserName',res.UserName);
localStorage.setItem('UserID',res.UserLoginId);
  alert(res);
  this.props.history.push('/'+url1);

});

    }


  handleEdit1(){
const{username,username1,email,email1,password,password1,telphone} = this.state;
fetch('http://localhost:49716/api/UseAuth/register?customerphoneno=' + telphone + '&&customername='+username1+ '&&password='+password1+ '&&email='+email)
.then((result) =>{localStorage.setItem('jwktoken1',result.data);
this.setState({message:'Registration failed'});this.props.history.push("/login")}).catch((error)=>{if(error.responce.status === 401){this.setState({message: "Registration failed"})}});
  }

signup(res,type){
let postData;
if(type === 'facebook' && res.email){
    postData ={
name:res.name,
provider:type,
email:res.email,
provider_id:res.id,
token: res.accessToken,
provider_pic: res.picture.data.url
};
}
if(type === 'google' && res.w3.U3){
    postData ={
        name:res.w3.ig,
        provider:type,
        email:res.w3.U3,
        provider_id:res.El,
        token: res.access_token,
        provider_pic: res.w3.Paa
    };
}

if(postData){
PostData('signup',postData).then((result)=>{
    let responseJson = result;
    sessionStorage.setItem("userData",JSON.stringify(responseJson));
    this.setState({redirect:true});
});
}
else{}
}


renderButton() {
    const {username,username1,email,email1,password1,telphone,password} = this.state;
    if(this.state.mode === 'view') {
      return (
<div>
<div className="row">
<label>Please Login </label></div>
<div className="row">
       <label>username</label> <input type="text" value={username} id="username" name="username" placeholder ="username" onChange={this.onChange}/></div>
       <div className="row">     <label>password</label><input type="text" id="password" value={password} name="password" placeholder="password" onChange={this.onChange}/></div>
       <div className="row">
        <button onClick={this.handleEdit2}>
            login
          </button></div>
          <div className="row">    <a onClick={this.handleEdit}>
            Register
          </a></div>
          <div className="row"> <a onClick={this.handleEdit3}>
            forgot password
          </a>    </div>
          </div>
      );
    } else  if(this.state.mode === 'edit'){
      return (
        <div>
            <div className="row">    <label>Please Register </label>    </div>
            <div className="row">    <label>username</label> <input type="text" value={username1} name= "username1" placeholder="Username" onChange={this.onChange}/>    </div>
            <div className="row">    <label>password</label><input type="text" value={password1}  name= "password1" placeholder="Password" onChange={this.onChange}/>    </div>
            <div className="row">    <label>email ID</label> <input type="email" value={email} name="email" placeholder="Email" onChange={this.onChange}/>    </div>
            <div className="row">   <label>Phone No</label> <input type="tel" value={telphone} name="telphone" placeholder="telphone" onChange={this.onChange}/>    </div>

            <div className="row"> <button onClick={this.handleEdit1}>
            Register
          </button>    </div>
          <div className="row">  <a onClick={this.handleSave}>
            Login
          </a>    </div>
          <div className="row"> <a onClick={this.handleEdit3}>
            forgot password
          </a>    </div>
          </div>
      );
    } else if(this.state.mode === 'edit1'){
return(
<div>
<div className="row">    <label> request for new Password </label>    </div>

<div className="row">    <label>email ID</label> <input type="email" value= {email1} id="email1" name="email1" placeholder="Email" onChange={this.onChange} required />    </div>

<div className="row">  <a onClick={this.handleSave}>
            Login
          </a>    </div>
</div>
);

    }
  }


render(){
if(this.state.redirect || sessionStorage.getItem('userData'))
{
    return(<Redirect to={'/home'}/>)
}
const responseFacebook = (response) => {
console.log('facebook console');
console.log(response);
this.signup(response,'facebook');
}

const responseGoogle = (response) =>{
console.log("google console");
console.log(response);
this.signup(response,'google');
}
var shown = {
    display: this.state.shown ? "block" : "none"
    
};

var hidden = {
    display: this.state.hidden ? "block" : "none"
}
return(
<div>
    <Header/>
    <h2 id = "welcome"> </h2>
    <div className="container">
  <div className="row">
    <div className="col-md-3">
    <div  >
    {this.renderButton()}
  </div>


    </div>
  </div>
    </div>
    </div>
</div> 


    </div>

);

}

}

export default Welcome;


4. Run and Test the Full Stack Secure Application

It's a time for test the whole full stack secure application. The React.js application will integrate with Express.js by building the React.js application. Type this command to build the React.js application.
npm run-script build
Next, type this command to run the Express.js application.
npm start
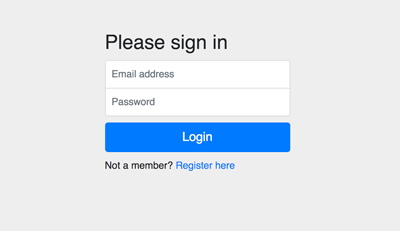
Open the browser then point to `localhost:3000`. You will see the default landing page redirected to the login page.
Securing MERN Stack Web Application using Passport - Login Page
And here's the rest of the register page and main page.
Securing MERN Stack Web Application using Passport - Register Page
Securing MERN Stack Web Application using Passport - Main Page
That's it, the complete tutorial of securing full stack web application using Passport.js authentication. If there's something wrong with the steps of the tutorial, you can compare it with the full working source code from our GitHub.

React.JS — Component Data Transfer

Leave a Comment
In React JS, there’s often a need to pass data from one component to another. If you are passing data from somewhere in a component, to somewhere else inside the same component, this can be done through state.

So what is state?

The heart of every React component is its “state”, an object that determines how that component renders & behaves. In other words, “state” is what allows you to create components that are dynamic and interactive.
Think of state as the difference between water, ice and vapor. It’s the same object, but depending on conditions, it can behave differently. That’s the same way we use state within components. We can change the way objects appear, or interact by changing the state of those objects within a component.

How do I change state in a component?

Normally you would need to declare the state after you set the constructor. That might look something like this:
class component_A extends Component {
 constructor() {
 super();
 this.state = {
 data: [],
 };
}
In this case, we are defining the state of data. I’ve defined it here as an empty array. We could have used an empty object, or empty quotes, depending on the data type we wanted to change the state of. Then when we are ready to change the state, we would simply use “this.setState.” With our example above, it might look like this:
this.setState({data: data});
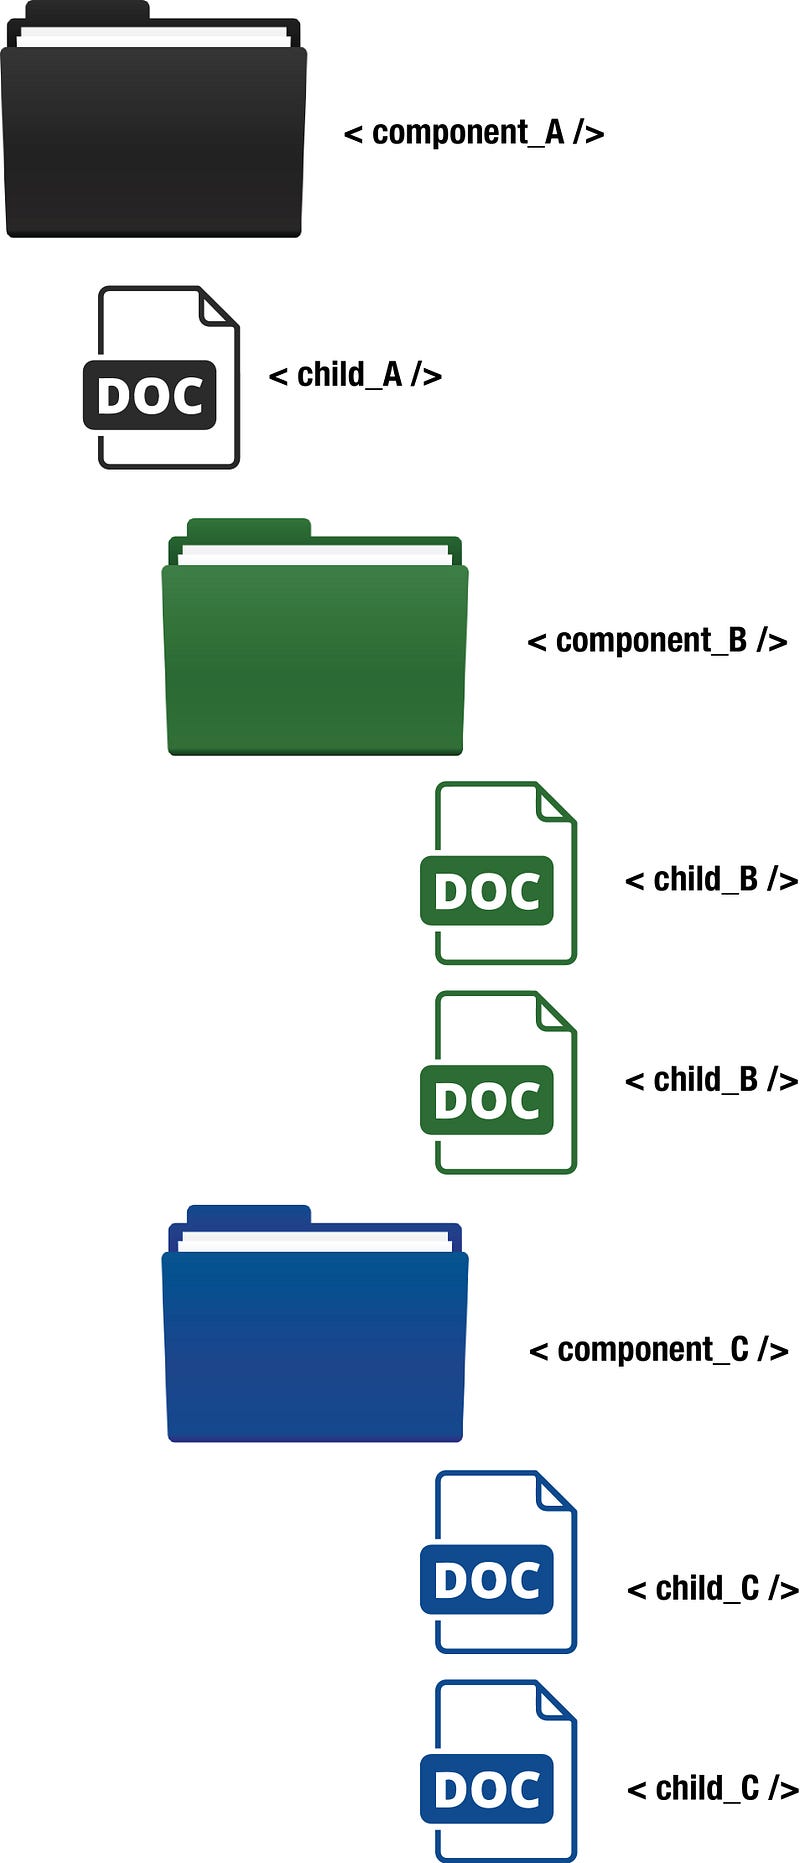
Okay, so let’s say you have two components, and you need to pass data from one component to another. Well, you wouldn’t be able to use state. State can only be transferred within the component where it was created. Instead, you can use props, or properties. Let’s imagine you have a React project, with a file structure that looks like the following:
Here, we have component_A, with files nested inside of it, and then it’s child components, component_B and component_C. It’s very likely that component_A would have data that we would need to access in component_C. How would we access that, or pass the data from component_A to component_C? Basically, what we want to do, is this:
I want to pass the property of color from the parent component to one of the child components. We can pass prop using “this” the same way we set the state in a component earlier. In that example, the state could the be used and passed throughout the component. Passing data from parent to child components is only slightly trickier, in that, we can’t pass data in an unbroken chain to other components. In the above example, we would actually need to pass the data, in this case, {this.props.color} from component_A to component_B and then to component_C. It would look like this:

What if I want to pass data back up the chain, from child to parent?

This is a slightly more difficult process.
  1. Define a callback in the parent which takes the data as a parameter.
  2. Pass that callback as a prop to the child.
  3. Call the callback using this.props.[callback] in the child, and pass in the data as an argument.
From our above example, our code might look something like this:
class component_A extends Component {
 constructor() {
 super();
 this.state = {
 listDataFromComponent_C: “ “,
 };
}
myCallback = (dataFromComponent_C) => {
this.setState({ dataFromComponent_C: dataFromComponent_C});
Now from within the child component (component_C) we can pass something to callbackFromParent:
this.props.callbackFromParent(listInfo);
Because props are static, while state can be changed, once you have passed data from a child to a parent, or from parent to a child, you may need to interact with it differently within that new component. In order to do this, set this parameter as a state within the new component. It might look like the following:
class component_A extends Component {
constructor (props) {
super(props);
this.state = {
dataFromComponent_C: “ “
};
},
myCallback = (dataFromComponent_C) => {
this.setState({ dataFromComponent_C: dataFromComponentC });
This is just a brief explanation of how to change data within a component, and transfer data to other child and parent components. I hope this is helpful, and feel free to reach out if you have any questions, or if I missed anything. Thanks!

show hide divs in react js method 2

Leave a Comment
class App extends React.Component {
  constructor(props) {
    super(props);
    this.state = {text: '', inputText: '', mode:'view'};
    
    this.handleChange = this.handleChange.bind(this);
    this.handleSave = this.handleSave.bind(this);
    this.handleEdit = this.handleEdit.bind(this);
  }
  
  handleChange(e) {
    this.setState({ inputText: e.target.value });
  }
  
  handleSave() {
    this.setState({text: this.state.inputText, mode: 'view'});
  }

  handleEdit() {
    this.setState({mode: 'edit'});
  }
  
  renderInputField() {
    if(this.state.mode === 'view') {
      return <div></div>;
    } else {
      return (
          <p>
            <input
              onChange={this.handleChange}
              value={this.state.inputText}
            />
          </p>
      );
    }
  }
  
  renderButton() {
    if(this.state.mode === 'view') {
      return (
          <button onClick={this.handleEdit}>
            Edit
          </button>
      );
    } else {
      return (
          <button onClick={this.handleSave}>
            Save
          </button>
      );
    }
  }
  
  render () {
    return (
      <div>
        <p>Text: {this.state.text}</p>
        {this.renderInputField()}
        {this.renderButton()}
      </div>
    );
  }
}

ReactDOM.render(
  <App />,
  document.getElementById('root')
);

Server-side paging and sorting in React JS

Leave a Comment

Introduction

This is the 3rd article of the series "React.js with asp.net MVC application".
In the previous post, I have shown you Displaying tabular data from database in react js Today I am going to show you server-side paging and sorting  using React.js, ASP.NET MVC and entity framework.

In the previous article, we fetched all the data from a server at once which can be a performance issue fetching a large amount of data from server side at once. To resolve this performance issue, here in this article I will show you how to implement server-side paging and sorting in React JS.

Here We will fetch a list of employee data (JSON data) from a database via ajax and then we will create React components for displaying the employee data list in the tabular format with server-side paging and sorting.

Just follow the following steps in order to implement Datatables server-side paging, sorting and filtering in React JS.

[Note: If you already visited my previous article and implemented the same, you can start from step - 7.]
Here In this article, I have used Visual Studio 2013 

Step - 1: Create New Project.

Go to File > New > Project > ASP.NET  Web Application (under web) > Entry Application Name > Click OK > Select Empty template > Checked MVC (under "Add folders and core references for" option) > OK

Step-2: Add a Database.

Go to Solution Explorer > Right Click on App_Data folder > Add > New item > Select SQL Server Database Under Data > Enter Database name > Add.

Step-3: Create a table for store data.

Open Database > Right Click on Table > Add New Table > Add Columns > Save > Enter table name > Ok.

In this example, I have used a table as below


Employee Table 

Step-4: Add Entity Data Model.

Go to Solution Explorer > Right Click on Project name form Solution Explorer > Add > New item > Select ADO.net Entity Data Model under data > Enter model name > Add.
A popup window will come (Entity Data Model Wizard) > Select Generate from database > Next >
Chose your data connection > select your database > next > Select tables > enter Model Namespace > Finish.

Step-5: Create an MVC Controller.

Go to Solution Explorer > Right Click on Controllers folder form Solution Explorer > Add > Controller > Enter Controller name > Select Templete "empty MVC Controller"> Add.

Here I have created a controller named "HomeController"

Step-6: Add new action into your controller for getting the view, where we will implement our ReactJS component. 

Here I have added "Index" Action into "Home" Controller. Please write this following code
  1. public ActionResult Index()
  2. {
  3. return View();
  4. }

Step-7: Add view for your Action and design.

Right Click on Action Method (here right click on Index action) > Add View... > Enter View Name > Select View Engine (Razor) > Add.
HTML Code 
  1. @{
  2. ViewBag.Title = "Index";
  3. }
  4.  
  5. <h2>Show tabular data from database in React JS with server-side paging and sorting</h2>
  6.  
  7. @* HTML *@
  8. <div class="container" id="griddata">
  9. </div>
  10.  
  11. @* CSS *@
  12. <link href="https://maxcdn.bootstrapcdn.com/bootstrap/3.3.6/css/bootstrap.min.css" rel="stylesheet" />
  13. <link href="//maxcdn.bootstrapcdn.com/font-awesome/4.1.0/css/font-awesome.min.css" rel="stylesheet" />
  14. @* Jquery *@
  15. <script src="https://code.jquery.com/jquery-2.2.0.min.js"></script>
  16. @* ReactJS library *@
  17. <script src="https://cdnjs.cloudflare.com/ajax/libs/react/0.14.6/react.js"></script>
  18. <script src="https://cdnjs.cloudflare.com/ajax/libs/react/0.14.6/react-dom.js"></script>
  19. @* JSX Parser *@
  20. <script src="https://cdnjs.cloudflare.com/ajax/libs/babel-core/5.8.23/browser.min.js"></script>
  21. @* ReactJS component *@
  22.  
  23. <script type="text/babel">
  24. @* Here we will create React component *@
  25.  
  26. @* 1. Paging component *@
  27. var GridPager = React.createClass({
  28. render : function(){
  29. var li = [];
  30. var pageCount = this.props.Size;
  31. for(var i = 1; i <=pageCount; i++){
  32. if(this.props.currentPage == i){
  33. li.push(<li key={i} className="active"><a href="#">{i}</a></li>);
  34. }
  35. else{
  36. li.push(<li key={i} ><a href="#" onClick={this.props.onPageChanged.bind(null,i)}>{i}</a></li>);
  37. }
  38. }
  39. return (<ul className="pagination">{li}</ul>);
  40. }
  41. });
  42. @* 2. Table row component *@
  43. var EmployeeGridRow = React.createClass({
  44. render : function(){
  45. return (
  46. <tr>
  47. <td>{this.props.item.FirstName}</td>
  48. <td>{this.props.item.LastName}</td>
  49. <td>{this.props.item.EmailID}</td>
  50. <td>{this.props.item.Country}</td>
  51. <td>{this.props.item.City}</td>
  52. </tr>
  53. );
  54. }
  55. });
  56. @* 3. Table component *@
  57. var EmployeeGridTable = React.createClass({
  58. getInitialState : function(){
  59. return {
  60. Data : {
  61. List : [],
  62. totalPage : 0,
  63. sortColumnName : null,
  64. sortOrder : null,
  65. currentPage : 1,
  66. pageSize : 3
  67. }
  68. }
  69. },
  70. componentDidMount : function(){
  71. this.populateData();
  72. },
  73. @* function for populate data *@
  74. populateData: function(){
  75. var params = {
  76. pageSize : this.state.Data.pageSize,
  77. currentPage : this.state.Data.currentPage
  78. }
  79. if(this.state.Data.sortColumnName){
  80. params.sortColumnName = this.state.Data.sortColumnName;
  81. }
  82. if(this.state.Data.sortOrder){
  83. params.sortOrder = this.state.Data.sortOrder;
  84. }
  85.  
  86. $.ajax({
  87. url : this.props.dataUrl,
  88. type : 'GET',
  89. data : params,
  90. success : function(data){
  91. if(this.isMounted()){
  92. this.setState({
  93. Data : data
  94. });
  95. }
  96. }.bind(this),
  97. error: function(err){
  98. alert('Error');
  99. }.bind(this)
  100. });
  101. },
  102. @* function for pagination *@
  103. pageChanged:function(pageNumber,e){
  104. e.preventDefault();
  105. this.state.Data.currentPage = pageNumber;
  106. this.populateData();
  107. },
  108. @* function for sorting *@
  109. sortChanged : function(sortColumnName, order , e){
  110. e.preventDefault();
  111. this.state.Data.sortColumnName = sortColumnName;
  112. this.state.Data.currentPage = 1;
  113. this.state.Data.sortOrder = order.toString().toLowerCase() == 'asc' ? 'desc':'asc';
  114. this.populateData();
  115. },
  116. @* function for set sort icon on table header *@
  117. _sortClass : function(filterName){
  118. return "fa fa-fw " + ((filterName == this.state.Data.sortColumnName) ? ("fa-sort-" + this.state.Data.sortOrder) : "fa-sort");
  119. },
  120. @* render *@
  121. render : function(){
  122. var rows = [];
  123. this.state.Data.List.forEach(function(item){
  124. rows.push(<EmployeeGridRow key={item.EmployeeID} item={item}/>);
  125. });
  126. return (
  127. <div>
  128. <table className="table table-responsive table-bordered">
  129. <thead>
  130. <tr>
  131. <th onClick={this.sortChanged.bind(this,'FirstName',this.state.Data.sortOrder)}>First Name
  132. <i className={this._sortClass('FirstName')}></i></th>
  133. <th onClick={this.sortChanged.bind(this,'LastName',this.state.Data.sortOrder)}>
  134. Last Name
  135. <i className={this._sortClass('LastName')}></i></th>
  136. <th onClick={this.sortChanged.bind(this,'EmailID',this.state.Data.sortOrder)}>
  137. Email
  138. <i className={this._sortClass('EmailID')}></i>
  139. </th>
  140. <th onClick={this.sortChanged.bind(this,'Country',this.state.Data.sortOrder)}>
  141. Country
  142. <i className={this._sortClass('Country')}></i>
  143. </th>
  144. <th onClick={this.sortChanged.bind(this,'City',this.state.Data.sortOrder)}>
  145. City
  146. <i className={this._sortClass('City')}></i>
  147. </th>
  148. </tr>
  149. </thead>
  150. <tbody>{rows}</tbody>
  151. </table>
  152. <GridPager Size={this.state.Data.totalPage} onPageChanged={this.pageChanged} currentPage={this.state.Data.currentPage}/>
  153. </div>
  154. );
  155. }
  156. });
  157. ReactDOM.render(<EmployeeGridTable dataUrl="/home/getEmployeeList"/>, document.getElementById('griddata'));
  158. </script>
  159. <style>
  160. #griddata th
  161. {
  162. cursor: pointer;
  163. }
  164. .fa
  165. {
  166. float: right;
  167. margin-top: 4px;
  168. }
  169. </style>

If you see, here I have created three React components named GridPager (for generating paging links), EmployeeGridTable (for generating the table, where data will be displayed) and EmployeeGridRow (for generating table rows with data item).

Also, I have added functions populateData (for fetching data from the server), pageChanged(paging functionality), sortChanged (for sorting event) and _sortClass (for adding sort icon on table header column).


Step-8: Add reference of System.Linq.Dynamic

Here I have added System.Linq.Dynamic reference from NuGet packages
Go to Solution Explorer > Right click on References > Manage NuGet packages > Search with "System.Linq.Dynamic" > Install.

Step-9: Add another action to your controller for return  data(employee) list as JSON Data

Here I have used "GetEmployeeData" Action for fetch data. Please write this following code
  1. public JsonResult getEmployeeList(string sortColumnName = "FirstName", string sortOrder = "asc", int pageSize=3, int currentPage=1)
  2. {
  3. List<Employee> List = new List<Employee>();
  4. int totalPage = 0;
  5. int totalRecord = 0;
  6.  
  7. using (MyDatabaseEntities dc = new MyDatabaseEntities())
  8. {
  9. var emp = dc.Employees;
  10. totalRecord = emp.Count();
  11. if (pageSize > 0)
  12. {
  13. totalPage = totalRecord / pageSize + ((totalRecord % pageSize) > 0 ? 1 : 0);
  14. List = emp.OrderBy(sortColumnName + " " + sortOrder).Skip(pageSize * (currentPage - 1)).Take(pageSize).ToList();
  15. }
  16. else
  17. {
  18. List = emp.ToList();
  19. }
  20. }
  21.  
  22. return new JsonResult
  23. {
  24. //Data = new { List = List, totalPage = totalPage, sortColumnName = sortColumnName, sortOrder = sortOrder, currentPage = currentPage},
  25. Data = new { List = List, totalPage = totalPage, sortColumnName = sortColumnName, sortOrder = sortOrder, currentPage = currentPage, pageSize = pageSize },
  26. JsonRequestBehavior = JsonRequestBehavior.AllowGet
  27. };
  28. }
[Note: you can see the line 24 (yellow marked), I have updated this line on 19th feb 2016. Added a missing parameter pageSize]

Step-10: Run Application.

[Note: Here I have updated the code for add search box. You just need to update 2 steps code of this article, step-7 and step-9. Here I have marked updated lines with yellow background.] download
Updated step-7
  1. @{
  2. ViewBag.Title = "Index";
  3. }
  4.  
  5. <h2>Show tabular data from database in React JS with server-side paging and sorting</h2>
  6.  
  7. @* HTML *@
  8. <div class="container" id="griddata">
  9. </div>
  10.  
  11. @* CSS *@
  12. <link href="https://maxcdn.bootstrapcdn.com/bootstrap/3.3.6/css/bootstrap.min.css" rel="stylesheet" />
  13. <link href="//maxcdn.bootstrapcdn.com/font-awesome/4.1.0/css/font-awesome.min.css" rel="stylesheet" />
  14. @* Jquery *@
  15. <script src="https://code.jquery.com/jquery-2.2.0.min.js"></script>
  16. @* ReactJS library *@
  17. <script src="https://cdnjs.cloudflare.com/ajax/libs/react/0.14.6/react.js"></script>
  18. <script src="https://cdnjs.cloudflare.com/ajax/libs/react/0.14.6/react-dom.js"></script>
  19. @* JSX Parser *@
  20. <script src="https://cdnjs.cloudflare.com/ajax/libs/babel-core/5.8.23/browser.min.js"></script>
  21. @* ReactJS component *@
  22.  
  23. <script type="text/babel">
  24. @* Here we will create React component *@
  25. @* New : Search box component *@
  26. var SearchBox = React.createClass({
  27. handleChange : function(e){
  28. console.log('search');
  29. this.props.onSearchChanged(e.target.value);
  30. },
  31. render: function(){
  32. return (
  33. <div style={{marginBottom:15+'px',float:'right'}} ><input type="text" value={this.props.searchText} placeholder="search" onChange={this.handleChange}/></div>
  34. )
  35. }
  36. });
  37. @* 1. Paging component *@
  38. var GridPager = React.createClass({
  39. render : function(){
  40. var li = [];
  41. var pageCount = this.props.Size;
  42. for(var i = 1; i <=pageCount; i++){
  43. if(this.props.currentPage == i){
  44. li.push(<li key={i} className="active"><a href="#">{i}</a></li>);
  45. }
  46. else{
  47. li.push(<li key={i} ><a href="#" onClick={this.props.onPageChanged.bind(null,i)}>{i}</a></li>);
  48. }
  49. }
  50. return (<ul className="pagination">{li}</ul>);
  51. }
  52. });
  53. @* 2. Table row component *@
  54. var EmployeeGridRow = React.createClass({
  55. render : function(){
  56. return (
  57. <tr>
  58. <td>{this.props.item.FirstName}</td>
  59. <td>{this.props.item.LastName}</td>
  60. <td>{this.props.item.EmailID}</td>
  61. <td>{this.props.item.Country}</td>
  62. <td>{this.props.item.City}</td>
  63. </tr>
  64. );
  65. }
  66. });
  67. @* 3. Table component *@
  68. var EmployeeGridTable = React.createClass({
  69. getInitialState : function(){
  70. return {
  71. Data : {
  72. List : [],
  73. totalPage : 0,
  74. sortColumnName : null,
  75. sortOrder : null,
  76. currentPage : 1,
  77. pageSize : 3,
  78. searchText:''
  79. }
  80. }
  81. },
  82. componentDidMount : function(){
  83. this.populateData();
  84. },
  85. @* function for populate data *@
  86. populateData: function(){
  87. var params = {
  88. pageSize : this.state.Data.pageSize,
  89. currentPage : this.state.Data.currentPage,
  90. searchText : this.state.Data.searchText
  91. }
  92. if(this.state.Data.sortColumnName){
  93. params.sortColumnName = this.state.Data.sortColumnName;
  94. }
  95. if(this.state.Data.sortOrder){
  96. params.sortOrder = this.state.Data.sortOrder;
  97. }
  98.  
  99. $.ajax({
  100. url : this.props.dataUrl,
  101. type : 'GET',
  102. data : params,
  103. success : function(data){
  104. if(this.isMounted()){
  105. this.setState({
  106. Data : data
  107. });
  108. }
  109. }.bind(this),
  110. error: function(err){
  111. alert('Error');
  112. }.bind(this)
  113. });
  114. },
  115. @* function for pagination *@
  116. pageChanged:function(pageNumber,e){
  117. e.preventDefault();
  118. this.state.Data.currentPage = pageNumber;
  119. this.populateData();
  120. },
  121. @* function for sorting *@
  122. sortChanged : function(sortColumnName, order , e){
  123. e.preventDefault();
  124. this.state.Data.sortColumnName = sortColumnName;
  125. this.state.Data.currentPage = 1;
  126. this.state.Data.sortOrder = order.toString().toLowerCase() == 'asc' ? 'desc':'asc';
  127. this.populateData();
  128. },
  129. searchChange : function(value){
  130. var d = this.state.Data;
  131. d.searchText = value;
  132. this.setState({
  133. Data : d
  134. });
  135. this.populateData();
  136. },
  137. @* function for set sort icon on table header *@
  138. _sortClass : function(filterName){
  139. return "fa fa-fw " + ((filterName == this.state.Data.sortColumnName) ? ("fa-sort-" + this.state.Data.sortOrder) : "fa-sort");
  140. },
  141. @* render *@
  142. render : function(){
  143. var rows = [];
  144. this.state.Data.List.forEach(function(item){
  145. rows.push(<EmployeeGridRow key={item.EmployeeID} item={item}/>);
  146. });
  147. return (
  148. <div>
  149. <SearchBox onSearchChanged={this.searchChange} searchText={this.state.Data.searchText}/>
  150. <table className="table table-responsive table-bordered">
  151. <thead>
  152. <tr>
  153. <th onClick={this.sortChanged.bind(this,'FirstName',this.state.Data.sortOrder)}>First Name
  154. <i className={this._sortClass('FirstName')}></i></th>
  155. <th onClick={this.sortChanged.bind(this,'LastName',this.state.Data.sortOrder)}>
  156. Last Name
  157. <i className={this._sortClass('LastName')}></i></th>
  158. <th onClick={this.sortChanged.bind(this,'EmailID',this.state.Data.sortOrder)}>
  159. Email
  160. <i className={this._sortClass('EmailID')}></i>
  161. </th>
  162. <th onClick={this.sortChanged.bind(this,'Country',this.state.Data.sortOrder)}>
  163. Country
  164. <i className={this._sortClass('Country')}></i>
  165. </th>
  166. <th onClick={this.sortChanged.bind(this,'City',this.state.Data.sortOrder)}>
  167. City
  168. <i className={this._sortClass('City')}></i>
  169. </th>
  170. </tr>
  171. </thead>
  172. <tbody>{rows}</tbody>
  173. </table>
  174. <GridPager Size={this.state.Data.totalPage} onPageChanged={this.pageChanged} currentPage={this.state.Data.currentPage}/>
  175. </div>
  176. );
  177. }
  178. });
  179. ReactDOM.render(<EmployeeGridTable dataUrl="/home/getEmployeeList"/>, document.getElementById('griddata'));
  180. </script>
Updated step-9 
  1. public JsonResult getEmployeeList(string sortColumnName = "FirstName", string sortOrder = "asc", int pageSize = 3, int currentPage = 1, string searchText = "")
  2. {
  3. List<Employee> List = new List<Employee>();
  4. int totalPage = 0;
  5. int totalRecord = 0;
  6.  
  7. using (MyDatabaseEntities dc = new MyDatabaseEntities())
  8. {
  9. var emp = dc.Employees.Select(a => a);
  10. //Search
  11. if (!string.IsNullOrEmpty(searchText))
  12. {
  13. emp = emp.Where(a => a.FirstName.Contains(searchText) || a.LastName.Contains(searchText) || a.EmailID.Contains(searchText) || a.City.Contains(searchText) || a.Country.Contains(searchText));
  14. }
  15. totalRecord = emp.Count();
  16. if (pageSize > 0)
  17. {
  18. totalPage = totalRecord / pageSize + ((totalRecord % pageSize) > 0 ? 1 : 0);
  19. List = emp.OrderBy(sortColumnName + " " + sortOrder).Skip(pageSize * (currentPage - 1)).Take(pageSize).ToList();
  20. }
  21. else
  22. {
  23. List = emp.ToList();
  24. }
  25. }
  26.  
  27. return new JsonResult
  28. {
  29. //Data = new { List = List, totalPage = totalPage, sortColumnName = sortColumnName, sortOrder = sortOrder, currentPage = currentPage},
  30. Data = new { List = List, totalPage = totalPage, sortColumnName = sortColumnName, sortOrder = sortOrder, currentPage = currentPage, pageSize = pageSize, searchText = searchText },
  31. JsonRequestBehavior = JsonRequestBehavior.AllowGet
  32. };
  33. }

LIVE DEMO  DOWNLOAD