In this tutorial, I will show you how to make Angular 13 connect to MongoDB with Node.js Express. We’re gonna build a full-stack (MEAN stack) CRUD example in which, the back-end server uses Node.js + Express for REST APIs, front-end side is an Angular App with HttpClient, Router and Bootstrap.
MEAN Stack example Overview
We will build a MEAN stack CRUD example: Angular 13 + Nodejs Express + MongoDB Tutorial Application in that:
- Tutorial has id, title, description, published status.
- User can create, retrieve, update, delete Tutorials.
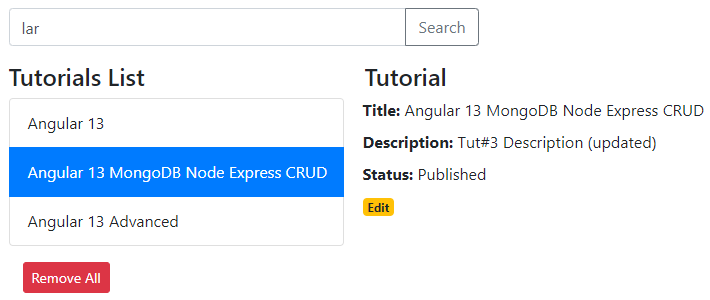
- There is a search box for finding Tutorials by title.
Here are screenshots of the example.
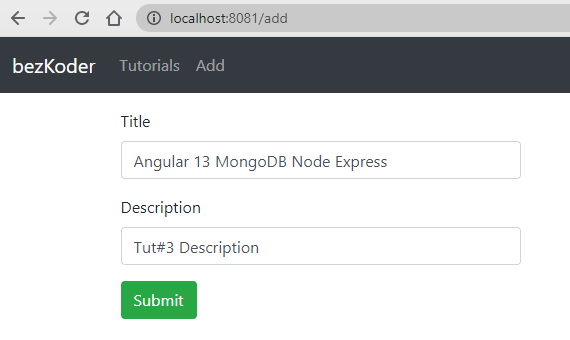
– Add an object:
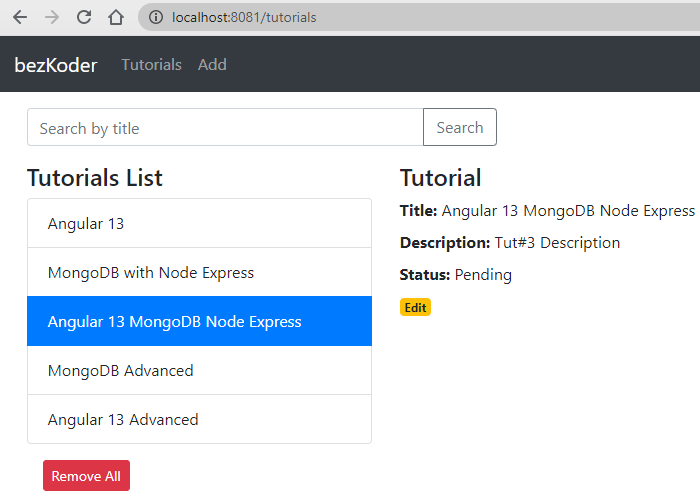
– Retrieve all objects:
– Click on Edit button to update an object:
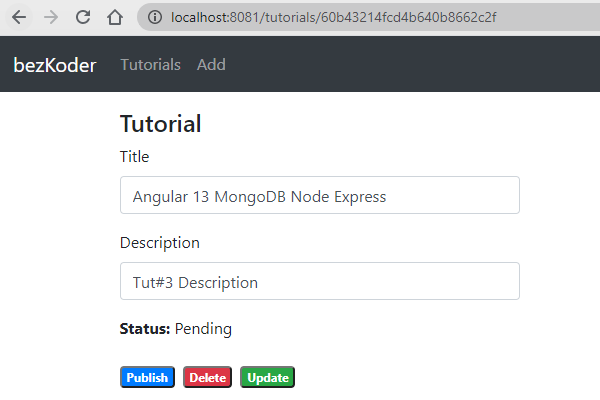
On this Page, you can:
- change status to Published using Publish button
- delete the Tutorial using Delete button
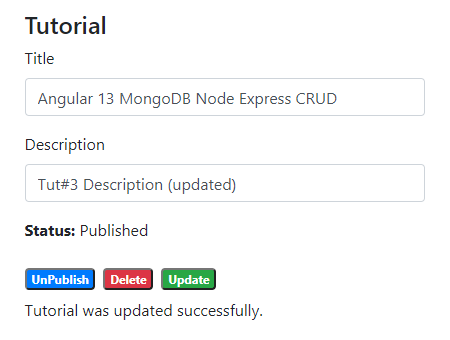
- update the Tutorial details with Update button
If you want to implement Form Validation, please visit:
Angular Form Validation example (Reactive Forms)
– Search Tutorials by title:
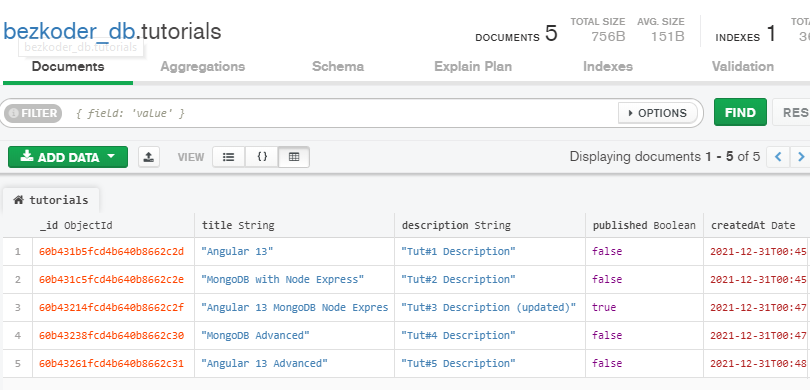
– Check MongoDB Database:
MEAN stack example with Angular 13 Architecture
We’re gonna build the application with following architecture:
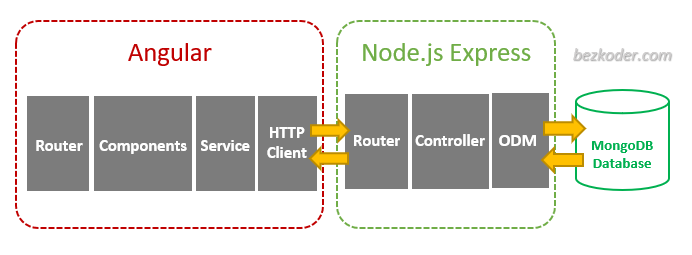
– Node.js Express exports REST APIs & interacts with MongoDB Database using Mongoose ODM.
– Angular 13 Client sends HTTP Requests and retrieves HTTP Responses using HTTPClient, consume data on the components. Angular Router is used for navigating to pages.
Video
This is brief instruction and demo for Angular + Node.js Express application running with MongoDB database.
In the video, we use Angular 10, but the logic and UI are the same as this Angular version 13.
Node.js Express MongoDB Back-end
Overview
These are APIs that Node.js Express App will export:
| Methods | Urls | Actions |
|---|---|---|
| GET | api/tutorials | get all Tutorials |
| GET | api/tutorials/:id | get Tutorial by id |
| POST | api/tutorials | add new Tutorial |
| PUT | api/tutorials/:id | update Tutorial by id |
| DELETE | api/tutorials/:id | remove Tutorial by id |
| DELETE | api/tutorials | remove all Tutorials |
| GET | api/tutorials?title=[kw] | find all Tutorials which title contains 'kw' |
Project Structure
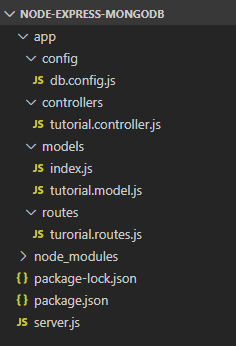
– db.config.js exports configuring parameters for MongoDB connection & Mongoose.
– Express web server in server.js where we configure CORS, initialize & run Express REST APIs.
– Next, we add configuration for MongoDB database in models/index.js, create Mongoose data model in models/tutorial.model.js.
– Tutorial controller in controllers.
– Routes for handling all CRUD operations (including custom finder) in tutorial.routes.js.
Create Node.js App
First, we create a folder:
$ mkdir nodejs-express-mongodb
$ cd nodejs-express-mongodb
Next, we initialize the Node.js App with a package.json file:
npm init
name: (nodejs-express-mongodb)
version: (1.0.0)
description: Node.js Restful CRUD API with Node.js, Express and MongoDB
entry point: (index.js) server.js
test command:
git repository:
keywords: nodejs, express, mongodb, rest, api
author: bezkoder
license: (ISC)
Is this ok? (yes) yes
We need to install necessary modules: express, mongoose and cors.
Run the command:
npm install express mongoose cors --save
Setup Express web server
In the root folder, let’s create a new server.js file:
const express = require("express");
const cors = require("cors");
const app = express();
var corsOptions = {
  origin: "http://localhost:8081"
};
app.use(cors(corsOptions));
// parse requests of content-type - application/json
app.use(express.json());
// parse requests of content-type - application/x-www-form-urlencoded
app.use(express.urlencoded({ extended: true }));
// simple route
app.get("/", (req, res) => {
  res.json({ message: "Welcome to bezkoder application." });
});
// set port, listen for requests
const PORT = process.env.PORT || 8080;
app.listen(PORT, () => {
  console.log(`Server is running on port ${PORT}.`);
});
What we do are:
– import express and cors modules:
- Express is for building the Rest apis
- cors provides Express middleware to enable CORS with various options.
– create an Express app, then add body-parser (json and urlencoded) and cors middlewares using app.use() method. Notice that we set origin: http://localhost:8081.
– define a GET route which is simple for test.
– listen on port 8080 for incoming requests.
Now let’s run the app with command: node server.js.
Open your browser with url http://localhost:8080/, you will see:

Yeah, the first step is done. We’re gonna work with Mongoose in the next section.
Configure MongoDB database & Mongoose
In the app folder, we create a separate config folder for configuration with db.config.js file like this:
module.exports = {
  url: "mongodb://localhost:27017/bezkoder_db"
};
Define Mongoose
We’re gonna define Mongoose model (tutorial.model.js) also in app/models folder in the next step.
Now create app/models/index.js with the following code:
const dbConfig = require("../config/db.config.js");
const mongoose = require("mongoose");
mongoose.Promise = global.Promise;
const db = {};
db.mongoose = mongoose;
db.url = dbConfig.url;
db.tutorials = require("./tutorial.model.js")(mongoose);
module.exports = db;
Don’t forget to call connect() method in server.js:
...
const app = express();
app.use(...);
const db = require("./app/models");
db.mongoose
  .connect(db.url, {
    useNewUrlParser: true,
    useUnifiedTopology: true
  })
  .then(() => {
    console.log("Connected to the database!");
  })
  .catch(err => {
    console.log("Cannot connect to the database!", err);
    process.exit();
  });
Define the Mongoose Model
In models folder, create tutorial.model.js file like this:
module.exports = mongoose => {
  const Tutorial = mongoose.model(
    "tutorial",
    mongoose.Schema(
      {
        title: String,
        description: String,
        published: Boolean
      },
      { timestamps: true }
    )
  );
  return Tutorial;
};
This Mongoose Model represents tutorials collection in MongoDB database. These fields will be generated automatically for each Tutorial document: _id, title, description, published, createdAt, updatedAt, __v.
{
  "_id": "5e363b135036a835ac1a7da8",
  "title": "Js Tut#",
  "description": "Description for Tut#",
  "published": true,
  "createdAt": "2021-07-02T02:59:31.198Z",
  "updatedAt": "2021-07-02T02:59:31.198Z",
  "__v": 0
}
If you use this app with a front-end that needs id field instead of _id, you have to override toJSON method that map default object to a custom object. So the Mongoose model could be modified as following code:
module.exports = mongoose => {
  var schema = mongoose.Schema(
    {
      title: String,
      description: String,
      published: Boolean
    },
    { timestamps: true }
  );
  schema.method("toJSON", function() {
    const { __v, _id, ...object } = this.toObject();
    object.id = _id;
    return object;
  });
  const Tutorial = mongoose.model("tutorial", schema);
  return Tutorial;
};
And the result will look like this-
{
  "title": "BezKoder Tut#",
  "description": "Description for Tut#",
  "published": true,
  "createdAt": "2021-12-02T02:59:31.198Z",
  "updatedAt": "2021-12-02T02:59:31.198Z",
  "id": "5e363b135036a835ac1a7da8"
}
After finishing the steps above, we don’t need to write CRUD functions, Mongoose Model supports all of them:
- create a new Tutorial: object.save()
- find a Tutorial by id: findById(id)
- retrieve all Tutorials: find()
- update a Tutorial by id: findByIdAndUpdate(id, data)
- remove a Tutorial: findByIdAndRemove(id)
- remove all Tutorials: deleteMany()
- find all Tutorials by title: find({ title: { $regex: new RegExp(title), $options: “i” } })
These functions will be used in our Controller.
Create the Controller
Inside app/controllers folder, let’s create tutorial.controller.js with these CRUD functions:
- create
- findAll
- findOne
- update
- delete
- deleteAll
- findAllPublished
const db = require("../models");
const Tutorial = db.tutorials;
// Create and Save a new Tutorial
exports.create = (req, res) => {

};
// Retrieve all Tutorials from the database.
exports.findAll = (req, res) => {

};
// Find a single Tutorial with an id
exports.findOne = (req, res) => {

};
// Update a Tutorial by the id in the request
exports.update = (req, res) => {

};
// Delete a Tutorial with the specified id in the request
exports.delete = (req, res) => {

};
// Delete all Tutorials from the database.
exports.deleteAll = (req, res) => {

};
// Find all published Tutorials
exports.findAllPublished = (req, res) => {

};
You can continue with step by step to implement this Node.js Express App in the post:
Node.js, Express & MongoDb: Build a CRUD Rest Api example
Run the MEAN stack Server
Run our Node.js Express MongoDB application with command: node server.js.
Angular 13 Front-end
Overview

– The App component is a container with router-outlet. It has navbar that links to routes paths via routerLink.
– TutorialsList component gets and displays Tutorials.
– TutorialDetails component has form for editing Tutorial’s details based on :id.
– AddTutorial component has form for submission new Tutorial.
– These Components call TutorialService methods which use Angular HTTPClient to make HTTP requests and receive responses.
Technology
- Angular 13
- Angular HttpClient
- Angular Router
- Bootstrap 4
Project Structure
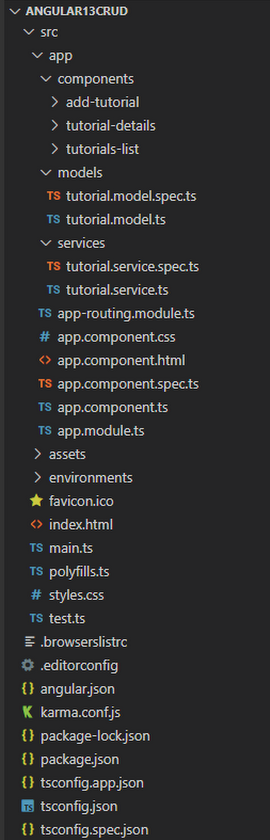
– tutorial.model.ts exports the main class model: Tutorial.
– There are 3 components: tutorials-list, tutorial-details, add-tutorial.
– tutorial.service has methods for sending HTTP requests to the Apis.
– app-routing.module.ts defines routes for each component.
– app component contains router view and navigation bar.
– app.module.ts declares Angular components and import necessary modules.
Setup Angular 13 Project
Let’s open cmd and use Angular CLI to create a new Angular Project as following command:
ng new Angular13Crud
? Would you like to add Angular routing? Yes
? Which stylesheet format would you like to use? CSS
We also need to generate some Components and Services:
ng g s services/tutorial
ng g c components/add-tutorial
ng g c components/tutorial-details
ng g c components/tutorials-list
ng g class models/tutorial --type=model
Set up App Module
Open app.module.ts and import FormsModule, HttpClientModule:
...
import { FormsModule } from '@angular/forms';
import { HttpClientModule } from '@angular/common/http';
@NgModule({
  declarations: [ ... ],
  imports: [
    ...
    FormsModule,
    HttpClientModule
  ],
  providers: [],
  bootstrap: [AppComponent]
})
export class AppModule { }
Define Routes for Angular AppRoutingModule
There are 3 main routes:
– /tutorials for tutorials-list component
– /tutorials/:id for tutorial-details component
– /add for add-tutorial component
app-routing.module.ts
import { NgModule } from '@angular/core';
import { RouterModule, Routes } from '@angular/router';
import { TutorialsListComponent } from './components/tutorials-list/tutorials-list.component';
import { TutorialDetailsComponent } from './components/tutorial-details/tutorial-details.component';
import { AddTutorialComponent } from './components/add-tutorial/add-tutorial.component';
const routes: Routes = [
  { path: '', redirectTo: 'tutorials', pathMatch: 'full' },
  { path: 'tutorials', component: TutorialsListComponent },
  { path: 'tutorials/:id', component: TutorialDetailsComponent },
  { path: 'add', component: AddTutorialComponent }
];
@NgModule({
  imports: [RouterModule.forRoot(routes)],
  exports: [RouterModule]
})
export class AppRoutingModule { }
Define Model Class
Our main model class Tutorial will be exported in tutorial.model.ts with 4 fields:
idtitledescriptionpublished
models/tutorial.model.ts
export class Tutorial {
  id?: any;
  title?: string;
  description?: string;
  published?: boolean;
}
Create Data Service
This service will use Angular HttpClient to send HTTP requests.
You can see that its functions includes CRUD operations and finder method.
services/tutorial.service.ts
import { Injectable } from '@angular/core';
import { HttpClient } from '@angular/common/http';
import { Observable } from 'rxjs';
import { Tutorial } from '../models/tutorial.model';
const baseUrl = 'http://localhost:8080/api/tutorials';
@Injectable({
  providedIn: 'root'
})
export class TutorialService {
  constructor(private http: HttpClient) { }
  getAll(): Observable<Tutorial[]> {
    return this.http.get<Tutorial[]>(baseUrl);
  }
  get(id: any): Observable<Tutorial> {
    return this.http.get(`${baseUrl}/${id}`);
  }
  create(data: any): Observable<any> {
    return this.http.post(baseUrl, data);
  }
  update(id: any, data: any): Observable<any> {
    return this.http.put(`${baseUrl}/${id}`, data);
  }
  delete(id: any): Observable<any> {
    return this.http.delete(`${baseUrl}/${id}`);
  }
  deleteAll(): Observable<any> {
    return this.http.delete(baseUrl);
  }
  findByTitle(title: any): Observable<Tutorial[]> {
    return this.http.get<Tutorial[]>(`${baseUrl}?title=${title}`);
  }
}
Create Angular Components
As you’ve known before, there are 3 components corresponding to 3 routes defined in AppRoutingModule.
- Add new Item Component
- List of items Component
- Item details Component
Run the Angular 13 App
You can run this App with command: ng serve --port 8081.
If the process is successful, open Browser with Url: http://localhost:8081/ and check it.
Further Reading
- Express.js Routing
- https://www.npmjs.com/package/express
- https://www.npmjs.com/package/mongoose
- https://mongoosejs.com/docs/guide.html
- Angular HttpClient
- Angular Template Syntax
Source Code
You can find Github source code for this tutorial at: Angular + Express Github
Conclusion
Now we have an overview of how to make Angular 13 connect to MongoDB with Node.js Express when building a MEAN stack CRUD example.
We also take a look at client-server architecture for REST API using Express & Mongoose ODM, as well as Angular 13 project structure for building a front-end app to make HTTP requests and consume responses.


0 comments:
Post a Comment
Note: only a member of this blog may post a comment.