Introduction
In this article we will create a Blazor application using MongoDB as our database provider. We will create a Single Page Application (SPA) and perform CRUD operations on it. A modal popup will display the form to handle the user inputs and the form also has a dropdown list, which will bind to a DB collection.
We will use Visual Studio 2017 and MongoDB 4.0.
Take a look at the final application.

Prerequisites
- Install the .NET Core 2.1 or above SDK from here
- Install Visual Studio 2017 v15.7 or above from here
- Install ASP.NET Core Blazor Language Services extension from here
- Download and install MongoDB community edition. You can find the installation guide here.
Visual Studio 2017 versions below v15.7 do not support Blazor framework.
Source Code
The source code has been updated to .NET Core 3.2 Preview-1. Get the source code from Github.
Configuring MongoDB
After installing the MongoDB, we need to add the path of MongoDB binaries to the System PATH variable. The default installation path in a Windows machine is
C:\Program Files\MongoDB. Hence you need to include C:\Program Files\MongoDB\Server\4.0\bin in the System PATH variable. If you are not using Windows then you can find the process of configuring the MongoDB binaries at the installation guide link provided in the prerequisites section above.Working With MongoDB
We need to set up the path where the data will be stored in our machine. Open command prompt as administrator and run the following command to set the data storage path in your machine.
You can provide the path of any folder where you want to store the data. This command will connect to MongoDB on port 27017, which is the default port for MongoDB connection. Refer to the image below:

Important Note
It is advisable to use command prompt over PowerShell while executing MongoDB commands as all MongoDB commands do not work in PowerShell.
Open a new command prompt window and execute the command
mongo to start the mongo server. Refer to the image below.
Run the following command to create the database
This will create our database
EmployeeDB. Execute the following command to create a new collection inside the database.
This will create a collection
EmployeeRecord in our database. MongoDB stores data in JSON-like documents. Let us insert a sample document in our EmployeeRecord collection. Run the following command.
You can observe that we have provided the data in a JSON format as a key-value pair. Run the following command to list all the documents from EmployeeRecord collection.
The database schema will add _id property to each document in the collection. This property is of type ObjectId and it will be generated automatically. We will use this _id property to uniquely identify a document in the collection. Refer to the image below:

If you want to remove all the documents from the EmployeeRecord collection then you need to run the following command.
We will create another collection to store a list of city names which is used to populate the City field of
EmployeeRecord collection. We will also bind this collection to a dropdown list in our web application from which the user will select the desired city.
Run the following command to create the
Cities collection.
We will insert five sample city names in this collection. To insert the documents in bulk in the
Cities collection, run the following command.
Refer to the image below

Create Blazor Web Application
Open Visual Studio and select File >> New >> Project.
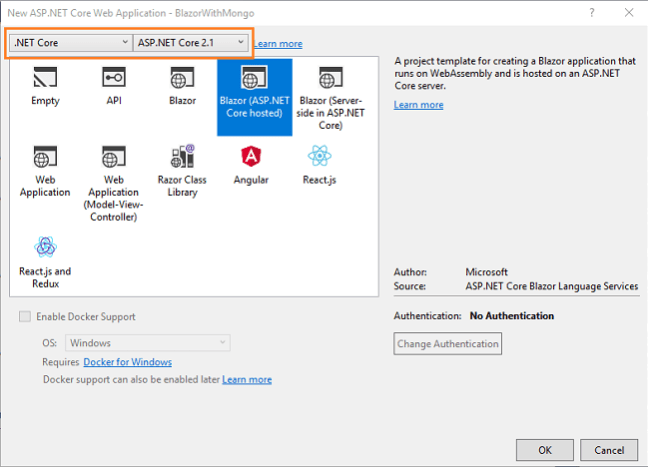
After selecting the project, a “New Project” dialog will open. Select .NET Core inside Visual C# menu from the left panel. Then, select “ASP.NET Core Web Application” from available project types. Put the name of the project as
BlazorWithMongo and press OK.
After clicking on OK, a new dialog will open asking you to select the project template. You can observe two drop-down menus at the top left of the template window. Select “.NET Core” and “ASP.NET Core 2.0” from these dropdowns. Then, select “Blazor (ASP .NET Core hosted)” template and press OK.
Now, our Blazor solution will be created. You can observe that we have three project files created in this solution
- BlazorWithMongo.Client – It has the client side code and contains the pages that will be rendered on the browser.
- BlazorWithMongo.Server – It has the server side codes such as data access layer and web API.
- BlazorWithMongo.Shared – It contains the shared code that can be accessed by both client and server. It contains our Model class and DB context class.
Installing MongoDB driver
To access the MongoDB from our application we need to install the MongoDB driver using package manager console. We will install it in BlazorWithMongo.Shared project so that it can be accessible to Server project also.
Navigate to Tools >> NuGet Package Manager >> Package Manager Console. Select
BlazorWithMongo.Shared from Default project drop-down and run the following command:
Refer to the image below,

Creating the Model
We will create our model class in
BlazorWithMongo.Shared project. Right click on BlazorWithMongo.Shared and select Add >> New Folder. Name the folder as Models. Again, right click on Models folder and select Add >> Class to add a new class file. Put the name of you class as Employee.cs and click Add.
Open the Employee.cs class and put the following code into it.
We have included the Id property of the type ObjectId in our class definition and decorated it with
[BsonId] attribute. This property is required to map the model objects to the MongoDB collection.
Similarly, create another class file
Cities.cs and put the following code into it.Creating the DB context class
Add a new class file to Models folder and name it
EmployeeDBContext.cs. Put the following code into it.
Here we have defined a
MongoClient which will connect to the MongoDB server instance using the default connection string for MongoDB. We are using GetDatabase method to fetch the database instance. The method EmployeeRecord is used to fetch the EmployeeRecord collection from our database and map it to the Employee model class. Similarly, the method CityRecord will fetch the Cities collection from database and map it to Cities model class.Creating Data Access Layer for the Application
Right-click on
BlazorWithMongo.Server project and then select Add >> New Folder and name the folder as DataAccess. We will be adding our class to handle database related operations inside this folder only.
Right click on DataAccess folder and select Add >> Class. Name your class
EmployeeDataAccessLayer.cs. Open EmployeeDataAccessLayer.cs and put the following code into it.
Here we have defined the methods to perform CRUD operation on the EmployeeDB database.
Adding the web API Controller to the Application
Right-click on
BlazorWithMongo.Server/Controllers folder and select Add >> New Item. An “Add New Item” dialog box will open. Select Web from the left panel, then select “API Controller Class” from templates panel and put the name as EmployeeController.cs. Click Add.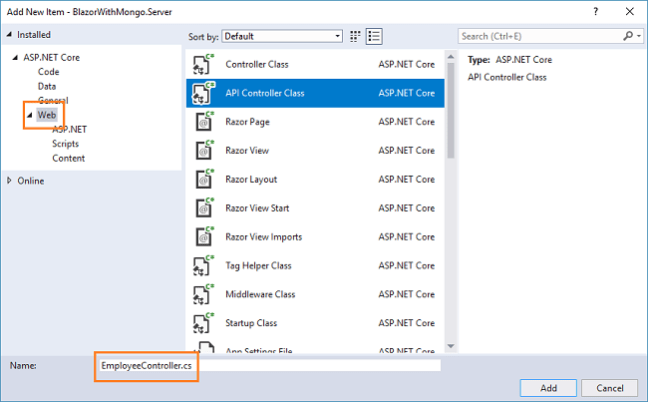
This will create our API EmployeeController class. We will call the methods of EmployeeDataAccessLayer class to fetch data and pass on the data to the client side
Open
EmployeeController.cs file and put the following code into it.
We finished the coding for our backend logic. Therefore, we will now proceed to code our client side.
Creating the View Component
We will add the view page in
BlazorWithMongo.Client/Pages folder. By default, we have “Counter” and “Fetch Data” pages provided in our application. These default pages will not affect our application but for the sake of this tutorial, we will delete fetchdata and counter pages from this folder.
Right-click on
BlazorWithMongo.Client/Pages folder and then select Add >> New Item. An “Add New Item” dialog box will open, select “ASP.NET Core” from the left panel, then select “Razor Page” from templates panel and name it EmployeeData.cshtml. Click Add. Refer to the image below:
This will add an
EmployeeData.cshtml page to our BlazorSPA.Client/Pages folder. This razor page will have two files – EmployeeData.cshtml and EmployeeData.cshtml.cs.
Now, we will add codes to these pages.
EmployeeData.cshtml
Open
EmployeeData.cshtml page and put the following code into it.
Let us understand this code. At the top we have defined the route of this page as “/fetchemployee”. This means if we append “/fetchemployee” to the root URL of the app, we will be redirected to this page.
We are also inheriting
EmployeeDataModel class, which is defined in EmployeeData.cshtml.cs file. This will allow us to use the methods defined in EmployeeDataModel class.
After this, we have defined a button to add a new employee record. When clicked, this button will open a modal popup to handle the user inputs.
The list of employee documents returned from the database are stored in the empList variable. If the variable is not null then we will bind the values to a table to display the employee documents in a tabular fashion. Each row in the table has two action links, Edit to edit the employee document and Delete to delete the employee document.
To handle the user inputs we are using a form. We are using a single form for both Add Employee and Edit Employee functionality. The form is defined in a modal popup and the modal popup is displayed on the screen based on the value of a Boolean property isAdd. The value of this Boolean property is set in the code behind (.cshtml.cs) page.
The City dropdown list inside the form is binding to our Cities collection in the database with the help of cityList variable. The cityList will be populated as the application boots up.
The form will have a Save button which will invoke
SaveEmployee method, defined in the code behind file to Add or Update an employee document.
Similar to Add modal popup, we also have a Delete modal popup. It will be a read-only modal and ask for a confirmation to delete an employee document. Upon clicking “Yes”, it will invoke the
DeleteEmployee method to delete the employee document.EmployeeData.cshtml.cs
Open
EmployeeData.cshtml.cs and put the following code into it.
In this file we have defined a class
EmployeeDataModel that will hold all our methods that we will be using in EmployeeData.cshtml page. We are also injecting the HttpClient service to enable web API calls.
The variables empList and cityList is defined to hold the data from the Employee table and Cities table respectively. The variables are getting populated inside the OnInitAsync to make sure that the data is available to us as the page loads.
Clicking on “Add Employee” button will invoke the
AddEmp method. It will initialize an empty instance of Employee model and set the value of isAdd Boolean flag to true. This will open a modal popup with a form, asking the user to enter the value for a new employee document. Similarly, we have defined an EditEmployee method, which will fetch the record of the employee based on the Id for which it is invoked. It will also set the value of isAdd to true to open the modal popup to edit the employee document.
The
SaveEmployee method will check if it is invoked to add a new employee record or to edit an existing employee record. If the Id is not null then it is an “edit” request and we will send a PUT request to the Web API to update the existing employee document.
If the Id is null then it is a “create” request and we will send a POST request to the Web API to create a new employee document.
We will then fetch the updated list of employee documents by calling
GetEmployee method and also set the value of isAdd to false, thus closing the modal popup.
The
DeleteConfirm method is invoked by clicking the Delete button corresponding to an employee record. It will set the value of isDelete Boolean flag to true, which will display a Delete confirmation modal popup. Upon clicking YES inside this popup, DeleteEmployee method is invoked which will send a Delete Web API call to delete the employee document and set the isDelete Boolean flag to false thus closing the modal popup.Adding Link to Navigation menu
The last step is to add the link to our “EmployeeData” page in the navigation menu, open
BlazorWithMongo/Shared/NavMenu.cshtml page and put the following code into it.
Hence, we have successfully created a Single Page Application (SPA) using Blazor with the help of MongoDB as database provider.
Execution Demo
Press F5 to launch the application.
A web page will open as shown in the image below. The navigation menu on the left is showing navigation link for Employee data page.

Click on “Employee data” link, it will redirect to EmployeeData view. Here you can see all the employee data in a tabular fashoin. Notice the URL has “/fetchemployee” appended to it.

Click on Add Employee button to open “Add Employee” modal popup. Enter the data in all the fields and click on Save to create a new employee document.

This will create a new employee document and display the data in the View table. Click on Edit button corresponding to any row in the table, it will again open the modal popup for editing the employee record. Edit the input fields and click on save to update the employee document.

If you click on the Delete button corresponding to the employee record, it will open a delete confirmation popup asking for a confirmation to delete the employee record.

Clicking on YES will delete the employee data and show the updated list of employees by refreshing the view table.
Conclusion
We have created a Single Page Application (SPA) using Blazor with the help of MongoDB as database provider. We created a sample employee record management system and perform CRUD operations on it. To handle the user input we are using a form in a modal popup. We have used Visual Studio 2017 and MongoDB 4.0 for our demo.
Please get the source code from Github and play around to get a better understanding.


0 comments:
Post a Comment
Note: only a member of this blog may post a comment.