we will discuss how to enable SSL in Visual Studio. In our next video, we will discuss how to automatically redirect to HTTPS from HTTP, if a request is made using HTTP to our ASP.NET Web API service.
To enable SSL in Visual Studio 2015
1. In the Solution Explorer click on EmployeeService Web API project and press F4 key on the keyboard. This launches Project Properties window.
2. In the Properties window, set SSL Enabled property to true. As soon as we do this Visual Studio sets SSL URL

3. At this point, when you try to navigate to https://localhost:44330/api/employees in the browser, you will see the following browser security page. Make sure you click "Advanced" link to see "Proceed to localhost" link.

4. Click on "Proceed to localhost" link and you will see a invalid certificate message. Make sure to click on the lock symbol in the URL to see the invalid certificate message. The reason for this is that, the certificate that Visual Studio installed automatically is not trusted.

To resolve this problem we have to place the certificate that visual studio has issued in the Trusted Root Certificates folder
1. In the RUN window, type mmc.exe and click OK

2. On the window that appears, click "File" - "Add/Remove Snap-in"
3. From the "Available snap-ins" list select "Certificates" and click "Add"
4. On the next screen, select "Computer account" radio button
5. On the next screen, select "Local computer" radio button and click "Finish" and then "OK"
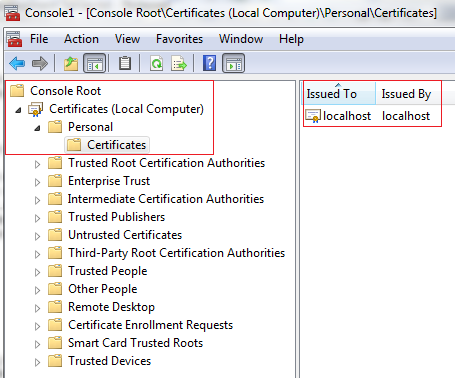
6. Expand Console Root - Certificates (Local Computer) - Personal - Certificates. In this folder you will find a certificate that is Issued To local and Issued By local.
7. Right click on the localhost certificate, and select "All Tasks" and then "Export"
8. Click "Next" on the subsequent screen
9. Select "DER encoded binary X.509 (.CER)" radio button, and then click Next
10. On the next screen, provide a name for the certificate that you are exporting and click "Next". I have placed certificate in my case at c:\Certificates\localhost
11. Click "Finish" on the next screen
12. Expand Console Root - Certificates (Local Computer) - Trusted Root Certification Authorities - Certificates
13. Right click on "Certificates", and select "All Tasks" and then "Import"
14. Click "Next" on the subsequent screen
15. Enter the complete path where you have exported the certificate and click "Next". In my case the certificate is at c:\Certificates\localhost.cer
16. On the next screen, select "Place all certificates in the following store" radio button and click "Next"
17. Finally click "Finish"
At this point closes all instances of the browser. Open a new browser instance and navigate to https://localhost:44330/api/employees. Notice you don't get any certificate error. At the moment we can access our web api service using both http and https.
To enable SSL in Visual Studio 2015
1. In the Solution Explorer click on EmployeeService Web API project and press F4 key on the keyboard. This launches Project Properties window.
2. In the Properties window, set SSL Enabled property to true. As soon as we do this Visual Studio sets SSL URL
3. At this point, when you try to navigate to https://localhost:44330/api/employees in the browser, you will see the following browser security page. Make sure you click "Advanced" link to see "Proceed to localhost" link.
4. Click on "Proceed to localhost" link and you will see a invalid certificate message. Make sure to click on the lock symbol in the URL to see the invalid certificate message. The reason for this is that, the certificate that Visual Studio installed automatically is not trusted.
To resolve this problem we have to place the certificate that visual studio has issued in the Trusted Root Certificates folder
1. In the RUN window, type mmc.exe and click OK
2. On the window that appears, click "File" - "Add/Remove Snap-in"
3. From the "Available snap-ins" list select "Certificates" and click "Add"
4. On the next screen, select "Computer account" radio button
5. On the next screen, select "Local computer" radio button and click "Finish" and then "OK"
6. Expand Console Root - Certificates (Local Computer) - Personal - Certificates. In this folder you will find a certificate that is Issued To local and Issued By local.
7. Right click on the localhost certificate, and select "All Tasks" and then "Export"
8. Click "Next" on the subsequent screen
9. Select "DER encoded binary X.509 (.CER)" radio button, and then click Next
10. On the next screen, provide a name for the certificate that you are exporting and click "Next". I have placed certificate in my case at c:\Certificates\localhost
11. Click "Finish" on the next screen
12. Expand Console Root - Certificates (Local Computer) - Trusted Root Certification Authorities - Certificates
13. Right click on "Certificates", and select "All Tasks" and then "Import"
14. Click "Next" on the subsequent screen
15. Enter the complete path where you have exported the certificate and click "Next". In my case the certificate is at c:\Certificates\localhost.cer
16. On the next screen, select "Place all certificates in the following store" radio button and click "Next"
17. Finally click "Finish"
At this point closes all instances of the browser. Open a new browser instance and navigate to https://localhost:44330/api/employees. Notice you don't get any certificate error. At the moment we can access our web api service using both http and https.


0 comments:
Post a Comment
Note: only a member of this blog may post a comment.