In the previous chapter, you learned about automated migration which automatically updates the database schema when you change domain classes. Here, you will learn about code-based migration.
The code-based migration provides more control on the migration and allows you to configure additional things such as setting a default value of a column, configure a computed column etc.
In order to use code-based migration, you need to execute the following commands in the Package Manager Console in Visual Studio:
- Enable-Migrations: Enables the migration in your project by creating a
Configurationclass. - Add-Migration: Creates a new migration class as per specified name with the
Up()andDown()methods. - Update-Database: Executes the last migration file created by the
Add-Migrationcommand and applies changes to the database schema.
To use code-based migrations, first execute the
enable-migrations command in the Package Manager Console. Open the Package Manager Console from Tools → Library Package Manager → Package Manager Console and then run the enable-migrations command (make sure that the default project is the project where your context class is).
The
Enable-Migrations command will create the Configuration class derived from DbMigrationsConfiguration with AutomaticMigrationsEnabled = false.
Now, you need to set the database initializer
MigrateDatabaseToLatestVersion in your context class, as shown below.public class SchoolContext: DbContext { public SchoolDBContext(): base("SchoolDB") { Database.SetInitializer(new MigrateDatabaseToLatestVersion<SchoolDBContext, EF6Console.Migrations.Configuration>()); } public DbSet<Student> Students { get; set; } protected override void OnModelCreating(DbModelBuilder modelBuilder) { } }
Now, you have to create a migration class using the
Add-Migration command with the name of your migration class, as shown below.
The above command will create a
<timestamp>_SchoolDB-v1.cs file with the Up() and Down() methods, as shown below.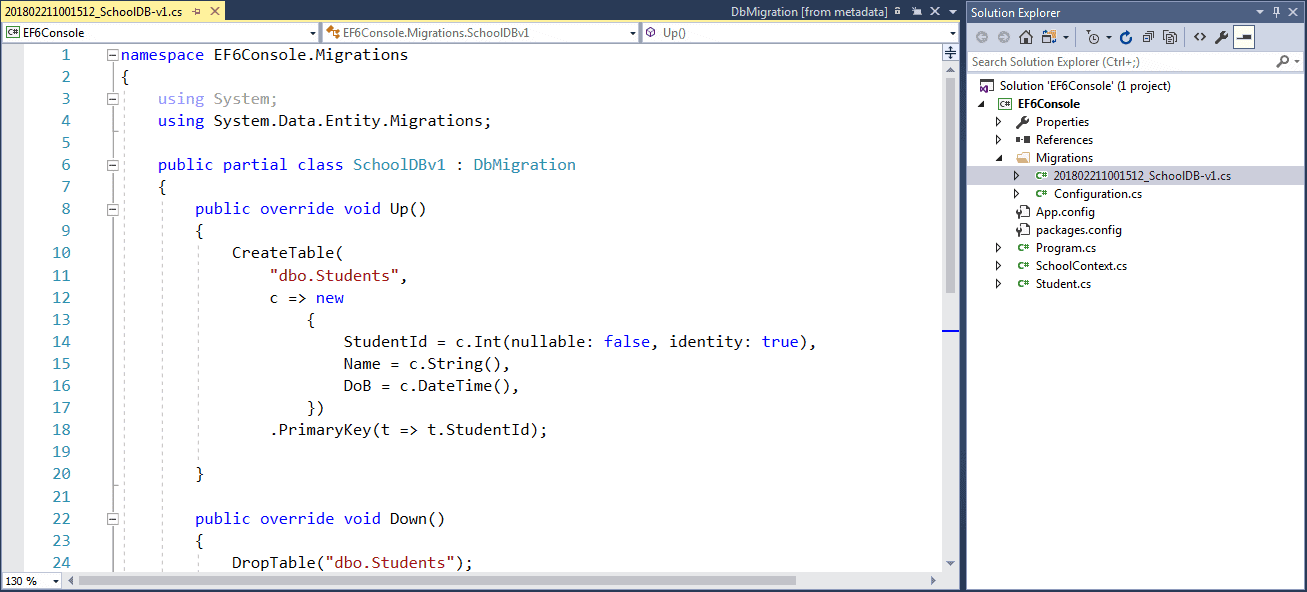
As you can see, the
Up() method contains code for creating database objects and the Down() method contains code for dropping or deleting database objects. You may also write your own custom code for additional configurations. This is the advantage over automated migration.
To know more about
add-migrations command parameters, execute get-help add-migration or get-help add-migration -detailed commands in PMC, as shown below.PM> get-help add-migration
NAME
Add-Migration
SYNOPSIS
Scaffolds a migration script for any pending model changes.
SYNTAX
Add-Migration [-Name] <String> [-Force] [-ProjectName <String>] [-StartUpProjectName <String>]
[-ConfigurationTypeName <String>] [-ConnectionStringName <String>] [-IgnoreChanges]
[-AppDomainBaseDirectory <String>] [<CommonParameters>]
Add-Migration [-Name] <String> [-Force] [-ProjectName <String>] [-StartUpProjectName <String>]
[-ConfigurationTypeName <String>] -ConnectionString <String> -ConnectionProviderName <String>
[-IgnoreChanges] [-AppDomainBaseDirectory <String>] [<CommonParameters>]
DESCRIPTION
Scaffolds a new migration script and adds it to the project.
RELATED LINKS
REMARKS
To see the examples, type: "get-help Add-Migration -examples".
For more information, type: "get-help Add-Migration -detailed".
For technical information, type: "get-help Add-Migration -full".
After creating a migration file using the add-migration command, you have to update the database. Execute the
Update-Database command to create or modify a database schema. Use the –verbose option to view the SQL statements being applied to the target database.
Execute the
get-help update-database or get-help update-database -detailed command in PMC to know more about the command.PM> get-help update-database
NAME
Update-Database
SYNOPSIS
Applies any pending migrations to the database.
SYNTAX
Update-Database [-SourceMigration <String>] [-TargetMigration <String>] [-Script] [-Force]
[-ProjectName <String>] [-StartUpProjectName <String>] [-ConfigurationTypeName <String>]
[-ConnectionStringName <String>] [-AppDomainBaseDirectory <String>] [<CommonParameters>]
Update-Database [-SourceMigration <String>] [-TargetMigration <String>] [-Script] [-Force]
[-ProjectName <String>] [-StartUpProjectName <String>] [-ConfigurationTypeName <String>]
-ConnectionString <String> -ConnectionProviderName <String> [-AppDomainBaseDirectory <String>]
[<CommonParameters>]
DESCRIPTION
Updates the database to the current model by applying pending migrations.
RELATED LINKS
REMARKS
To see the examples, type: "get-help Update-Database -examples".
For more information, type: "get-help Update-Database -detailed".
For technical information, type: "get-help Update-Database -full".
At this point, the database will be created or updated. Now, whenever you change the domain classes, execute
Add-Migration with the name parameter to create a new migration file and then execute the Update-Database command to apply the changes to the database schema.Rollback Migration
Suppose you want to roll back the database schema to any of the previous states, then you can execute the
update-database command with the –TargetMigration parameter to the point which you want to roll back to. For example, suppose there are many migrations applied to the above SchoolDB database but you want to roll back to the first migration. Then execute the following command.PM> update-database -TargetMigration:SchoolDB-v1


0 comments:
Post a Comment
Note: only a member of this blog may post a comment.