we will discuss using Facebook authentication with ASP.NET Web API.

When the user clicks "Login with Facebook" button, he will be redirected to Facebook login page. The user will then provide his Facebook credentials. Once the login is successful, the user will be redirected to our application with an access token, which is a proof that the user is successfully authenticated and our web application grants access to the protected resources.
To use Facebook account for authentication, we will have to first register our application with Facebook. Here are the steps to register your application with Facebook. Once we successfully register our application, we will be given a Client ID and Client Secret. We need both of these for using Facebook authentication with our Web API service.
Step 1 : To register your application go to
https://developers.facebook.com/
Step 2 : Login with your Facebook account.

Step 3 : Next we need to make the App that we just created public. To make the App, public, Click on "App Review" menu item on the left and then click the Yes|No button.

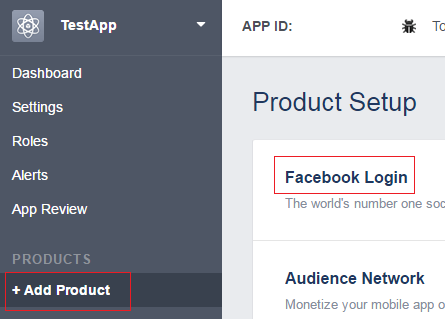
Step 4 : Next we need to add "Facebook Login" product to our App. To do this click "Add Product" menu item on the left and click "Get Started" button against "Facebook Login"
Step 5 : In "Valid OAuth redirect URIs" textbox, include the URI of your application. I have my web api application running at http://localhost:61358
In the same textbox we also need to include the redirect URI i.e the path in our application that users are redirected to after they have authenticated with Facebook. I have set it to http://localhost:61358/signin-facebook

Click "Save Changes"
Step 6 : Click "Dashboard" menu item on the left and you will see App ID and App Secret.
Enable Facebook OAuth authentication in ASP.NET Web API service
Step 1 : Facebook has made a breaking change to it's API in version 2.4. The change is, in addition to the access token we also have to send the fields that we want in URI. In version 2.3 and earlier, the URI used to be as shown below. The access token is appended to the URI using a ?
https://graph.facebook.com/v2.3/me?access_token=ABC
With version 2.4, they have changed it to as shown below. Instead of using ? we have to use & to attach the access token to the URI
https://graph.facebook.com/v2.4/me?fields=id,email&access_token=ABC
The defualt implementation for the Facebook Client, that is provided by Microsoft attaches the access token to the URI using a ?, so we have to change it to &. To do that,
Step 2 : In Startup.Auth.cs file in App_Start folder include the following code block. Use the AppID and AppSecret that we got after registering our application with Facebook.
Step 3 : On Login.html page, include the HTML for "Login with Facebook" button.
Step 4 : Wire up the click event handler for "Login with Facebook" button
Step 5 : In GoogleAuthentication.js file, modify isUserRegistered() and signupExternalUser() functions as shown below. I have included comments where the code is modified, so you know what has changed.
When the user clicks "Login with Facebook" button, he will be redirected to Facebook login page. The user will then provide his Facebook credentials. Once the login is successful, the user will be redirected to our application with an access token, which is a proof that the user is successfully authenticated and our web application grants access to the protected resources.
To use Facebook account for authentication, we will have to first register our application with Facebook. Here are the steps to register your application with Facebook. Once we successfully register our application, we will be given a Client ID and Client Secret. We need both of these for using Facebook authentication with our Web API service.
Step 1 : To register your application go to
https://developers.facebook.com/
Step 2 : Login with your Facebook account.
- Click "Create App" button
- Provide a name for the App in the "Display Name" textbox. I named it TestApp
- Provide yor email in the "Contact Email" textbox
- Select a Category. I selected "Education"
- Finally, click "Create App ID" button
Step 3 : Next we need to make the App that we just created public. To make the App, public, Click on "App Review" menu item on the left and then click the Yes|No button.
Step 4 : Next we need to add "Facebook Login" product to our App. To do this click "Add Product" menu item on the left and click "Get Started" button against "Facebook Login"
Step 5 : In "Valid OAuth redirect URIs" textbox, include the URI of your application. I have my web api application running at http://localhost:61358
In the same textbox we also need to include the redirect URI i.e the path in our application that users are redirected to after they have authenticated with Facebook. I have set it to http://localhost:61358/signin-facebook
Click "Save Changes"
Step 6 : Click "Dashboard" menu item on the left and you will see App ID and App Secret.
Enable Facebook OAuth authentication in ASP.NET Web API service
Step 1 : Facebook has made a breaking change to it's API in version 2.4. The change is, in addition to the access token we also have to send the fields that we want in URI. In version 2.3 and earlier, the URI used to be as shown below. The access token is appended to the URI using a ?
https://graph.facebook.com/v2.3/me?access_token=ABC
With version 2.4, they have changed it to as shown below. Instead of using ? we have to use & to attach the access token to the URI
https://graph.facebook.com/v2.4/me?fields=id,email&access_token=ABC
The defualt implementation for the Facebook Client, that is provided by Microsoft attaches the access token to the URI using a ?, so we have to change it to &. To do that,
- Add a folder to the project. Name it "Facebook"
- Add a class file to the folder. Name it FacebookBackChannelHandler.cs
- Copy and paste the following code.
using System;
using System.Net.Http;
using System.Threading;
using System.Threading.Tasks;
namespace EmployeeService.Facebook
{
public class FacebookBackChannelHandler : HttpClientHandler
{
protected override async Task<HttpResponseMessage>
SendAsync(HttpRequestMessage request,
CancellationToken cancellationToken)
{
if (!request.RequestUri.AbsolutePath.Contains("/oauth"))
{
request.RequestUri = new Uri(
request.RequestUri.AbsoluteUri.Replace("?access_token", "&access_token"));
}
return await base.SendAsync(request, cancellationToken);
}
}
}
Step 2 : In Startup.Auth.cs file in App_Start folder include the following code block. Use the AppID and AppSecret that we got after registering our application with Facebook.
var facebookOptions = new FacebookAuthenticationOptions()
{
AppId = "160811734413146",
AppSecret = "21f2665e0aed11867fcd8d35e67d6068",
BackchannelHttpHandler = new FacebookBackChannelHandler(),
UserInformationEndpoint = "https://graph.facebook.com/v2.4/me?fields=id,email"
};
facebookOptions.Scope.Add("email");
app.UseFacebookAuthentication(facebookOptions);
Step 3 : On Login.html page, include the HTML for "Login with Facebook" button.
<tr>
<td>
<input type="button" id="btnFacebookLogin"
value="Login with Facebook" class="btn btn-success" />
</td>
</tr>
Step 4 : Wire up the click event handler for "Login with Facebook" button
$('#btnFacebookLogin').click(function () {
window.location.href = "/api/Account/ExternalLogin?provider=Facebook&response_type=token&client_id=self&redirect_uri=http%3a%2f%2flocalhost%3a61358%2fLogin.html&state=GerGr5JlYx4t_KpsK57GFSxVueteyBunu02xJTak5m01";
});
Step 5 : In GoogleAuthentication.js file, modify isUserRegistered() and signupExternalUser() functions as shown below. I have included comments where the code is modified, so you know what has changed.
function isUserRegistered(accessToken) {
$.ajax({
url: '/api/Account/UserInfo',
method: 'GET',
headers: {
'content-type': 'application/json',
'Authorization': 'Bearer ' + accessToken
},
success: function (response) {
if (response.HasRegistered) {
localStorage.setItem("accessToken", accessToken);
localStorage.setItem("userName", response.Email);
window.location.href = "Data.html";
}
else {
// Pass the login provider (Facebook or Google)
signupExternalUser(accessToken, response.LoginProvider);
}
}
});
}
// Include provider parameter
function signupExternalUser(accessToken, provider) {
$.ajax({
url: '/api/Account/RegisterExternal',
method: 'POST',
headers: {
'content-type': 'application/json',
'Authorization': 'Bearer ' + accessToken
},
success: function () {
// Use the provider parameter value instead of
// hardcoding the provider name
window.location.href = "/api/Account/ExternalLogin?provider=" + provider + "&response_type=token&client_id=self&redirect_uri=http%3a%2f%2flocalhost%3a61358%2fLogin.html&state=GerGr5JlYx4t_KpsK57GFSxVueteyBunu02xJTak5m01";
}
});
}


0 comments:
Post a Comment
Note: only a member of this blog may post a comment.