In this video we will discuss how to set up Angular 2 in Visual Studio.
Step 1 : The first step is to install Node.js and npm. It is recommended that you have node version 4.6.x or greater and npm 3.x.x or greater. To check the versions that you have on your machine type the following commands in a command window.
node -v
npm -v
You can get the latest version of Node.js from the following website. Click on the correct download link depending on the Operating System you have.
https://nodejs.org/en/download/
I have Windows 64 bit Operating system, so I have downloaded 64 - bit windows installer.
To find out if you have 32 - bit or 64 - bit operating system
Visual Studio Enterprise 2015 - Update 3
Visual Studio Professional 2015 - Update 3
Visual Studio Community 2015 - Update 3
Step 3 : Configure environment settings for node and npm in Visual Studio
Step 4 : Install TypeScript for Visual Studio 2015
https://github.com/angular/quickstart
Step 7 : Copy the required "Starter files" to the web application project
We do not need all the starter files that we downloaded. As you can see from the image below, we need 4 folders/files

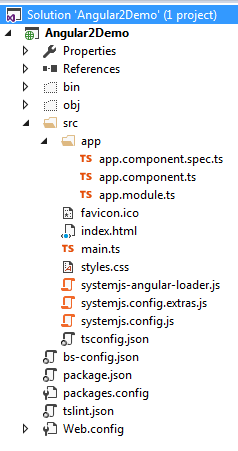
Copy the above files/folders and paste them in the root directory of "Angular2Demo" web application project. Now click "Show All File" icon in "Solution Explorer" and include all the copied files/folders in the project. At this stage your project structure in Visual Studio should be as shown below.
When including the files in the project if you get a prompt to "Search for Typescript Typings" click "No"

Step 8 : Restore the required packages.
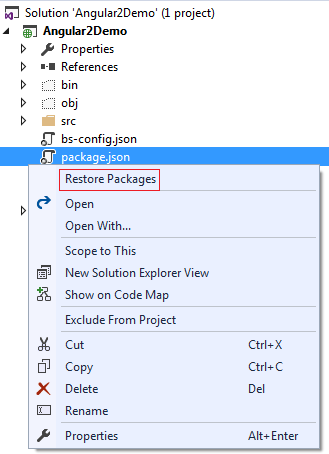
In the "Solution Explorer" right click on "package.json" file and select "Restore Packages" from the context menu. This takes a few minutes to load all the modules. You can see the status in "Visual Studio Output" window. After the restoration is complete, you will see a message "Installing Packages Complete". To see all the installed node modules, click on "Show all Files" icon in Solution Explorer. DO NOT include "node_modules" folder in the project.
Step 9 : Run the project
Step 1 : The first step is to install Node.js and npm. It is recommended that you have node version 4.6.x or greater and npm 3.x.x or greater. To check the versions that you have on your machine type the following commands in a command window.
node -v
npm -v
You can get the latest version of Node.js from the following website. Click on the correct download link depending on the Operating System you have.
https://nodejs.org/en/download/
I have Windows 64 bit Operating system, so I have downloaded 64 - bit windows installer.
To find out if you have 32 - bit or 64 - bit operating system
- Click the Start icon ,
- Type "System" in the Start Search box, and then click System Information in the Programs list.
- Select "System Summary"
- In the right pane if
- System type is x64-based PC, then you have 64-bit operating system
- System type is x86-based PC, then you have 32-bit operating system
Visual Studio Enterprise 2015 - Update 3
Visual Studio Professional 2015 - Update 3
Visual Studio Community 2015 - Update 3
Step 3 : Configure environment settings for node and npm in Visual Studio
- In Visual Studio click on Tools - Options.
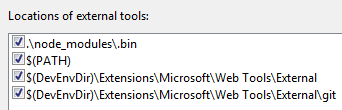
- In the "Options" window, expand "Projects and Solutions" and select "External Web Tools"
- In the right pane, move the global $(PATH) entry to be above the internal path $(DevEnvDir) entries. This tells Visual Studio to look for external tools (like npm) in the global path before the internal path.
- Click "OK" to close the "Options" window and then restart Visual Stduio for the changes to take effect
Step 4 : Install TypeScript for Visual Studio 2015
- To develop Angular applications you need TypeScript 2.2.0 or later
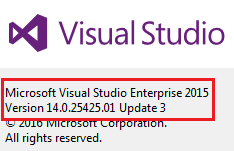
- To check the version of TypeScript, clik on the "Help" menu in Visual Studio and select "About Microsoft Visual Studio"

- Download and install the latest version of TypeScript for Visual Studio 2015 from the following URLhttps://www.microsoft.com/en-us/download/details.aspx?id=48593
- After installing TypeScript, the installation wizard prompts you to restart Visual Studio. So, please restart Visual Studio for the changes to take effect.
- Run Visual Studio as Administrator
- Click on File - New Project
- Select "Web" under "Visual C#". From the right pane select "ASP.NET Web Application"
- Name the project "Angular2Demo"
- On the next screen, select "Empty" template and click "OK"
https://github.com/angular/quickstart
Step 7 : Copy the required "Starter files" to the web application project
We do not need all the starter files that we downloaded. As you can see from the image below, we need 4 folders/files
- src folder and it's contents
- bs-config.json
- package.json
- tslint.json
Copy the above files/folders and paste them in the root directory of "Angular2Demo" web application project. Now click "Show All File" icon in "Solution Explorer" and include all the copied files/folders in the project. At this stage your project structure in Visual Studio should be as shown below.
When including the files in the project if you get a prompt to "Search for Typescript Typings" click "No"
Step 8 : Restore the required packages.
In the "Solution Explorer" right click on "package.json" file and select "Restore Packages" from the context menu. This takes a few minutes to load all the modules. You can see the status in "Visual Studio Output" window. After the restoration is complete, you will see a message "Installing Packages Complete". To see all the installed node modules, click on "Show all Files" icon in Solution Explorer. DO NOT include "node_modules" folder in the project.
Step 9 : Run the project
- In the "RUN" window type "cmd" and press enter
- Change the directory in the command prompt to the directory where you have the web application project. I have my web application project in "C:\Angular2Demo\Angular2Demo". So I have typed CD C:\Angular2Demo\Angular2Demo and upon pressing the enter key I am in the root folder.
- Type "npm start" and press "Enter" key

- This launches the TypeScript compiler (tsc) which compile the application and wait for changes. It also starts the lite-server and launches the browser where you will see the output - Hello Angular.
- At this point, open "app.component.ts" file from "Solution Explorer". This file is present in "app" folder in "src" folder.
- Change "name" value from "Angular" to "Angular 2!" and you will see the changes reflected on the web page automatically.


0 comments:
Post a Comment
Note: only a member of this blog may post a comment.