As we already know Angular 2 is all about components. A component in Angular allows us to create a reusable UI widget. A component can be used by any other component. Let's look at a simple example of nesting a component inside another component.
Here is what we want to do. Create a page that displays Employee details as shown below.
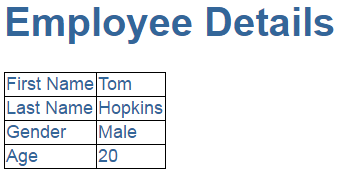
As you can see from the image below we want to create 2 components
- AppComponent - This component is the root component and displays just the page header
- EmployeeComponent - This component is the child component and displays the Employee details table. This child component will be nested inside the root AppComponent

Step 1 : Right click on the "App" folder and add a new folder. Name it "employee". We will create our EmployeeComponent in this folder.
Step 2 : Right click on the "employee" folder and add a new HTML page. Name it employee.component.html. Copy and paste the following HTML.
<table>
<tr>
<td>First Name</td>
<td>{{firstName}}</td>
</tr>
<tr>
<td>Last Name</td>
<td>{{lastName}}</td>
</tr>
<tr>
<td>Gender</td>
<td>{{gender}}</td>
</tr>
<tr>
<td>Age</td>
<td>{{age}}</td>
</tr>
</table>
Step 3 : Right click on the "employee" folder and add a new TypeScript file. Name it employee.component.ts. Copy and paste the following code in it. At this point we have our child component EmployeeComponent created. Next let's create the root component - AppComponent.
import { Component } from '@angular/core';
@Component({
selector: 'my-employee',
templateUrl: 'app/employee/employee.component.html'
})
export class EmployeeComponent {
firstName: string = 'Tom';
lastName: string = 'Hopkins';
gender: string = 'Male';
age: number = 20;
}
Step 4 : We are going to use the root component to just display the page header. So in "app.component.ts" file, include the following code. Notice, since the View Template HTML is just 3 lines we have used an inline template instead of an external template. Angular2 recommends to extract templates into a separate file, if the view template is longer than 3 lines.
import { Component } from '@angular/core';
@Component({
selector: 'my-app',
template: `<div>
<h1>{{pageHeader}}</h1>
</div>`
})
export class AppComponent {
pageHeader: string = 'Employee Details';
}
At this point if we run the application, we only see the page header - "Employee Details", but not the table which has the employee details. To be able to display employee details table along with the page header, we will have to nest EmployeeComponent inside AppComponent. There are 2 simple steps to achieve this.
Step 1 : In "app.module.ts" file we need to do 2 things as shown below.
- Import EmployeeComponent
- Add EmployeeComponent to the declarations array
import { NgModule } from '@angular/core';
import { BrowserModule } from '@angular/platform-browser';
import { AppComponent } from './app.component';
import { EmployeeComponent } from './employee/employee.component';
@NgModule({
imports: [BrowserModule],
declarations: [AppComponent, EmployeeComponent],
bootstrap: [AppComponent]
})
export class AppModule { }
What is AppModule
AppModule is the root module which bootstraps and launches the angular application. You can name it anything you want, but by convention it is named AppModule.
It imports 2 system modules - BrowserModule and NgModule
- BrowserModule - Every application that runs in a browser needs this module. In a later video in this course we will discuss NgIf and NgFor directives which are also provided by this module.
- NgModule - @component decorator adds metadata to an angular component class, similarly @NgModule decorator adds metadata to the angular module class.
Properties of the @NgModule decorator
- imports - Imports the BrowserModule required for an angular application to run in a web browser
- declarations - Contains the components registered with this module. In our case we have two - AppComponent and EmployeeComponent
- bootstrap - Contains the root component that Angular creates and inserts into the index.html host web page
import { Component } from '@angular/core';
@Component({
selector: 'my-app',
template: `<div>
<h1>{{pageHeader}}</h1>
<my-employee></my-employee>
</div>`
})
export class AppComponent {
pageHeader: string = 'Employee Details';
}
Run the application and you will see both page header and the employee details table. The employee details table is not styled very well. To style the table, include the following styles for <td> and <table> elements in styles.css file.
table {
color: #369;
font-family: Arial, Helvetica, sans-serif;
font-size:large;
border-collapse: collapse;
}
td {
border: 1px solid black;
}
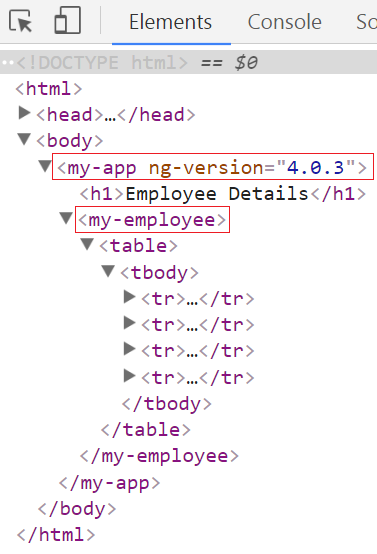
Run the application and you will now see the employee details table with the specified styles applied. At this point, launch browser developers tools and click on the "Elements" tab and notice <my-app> and <my-employee> directives in the rendered HTML.


0 comments:
Post a Comment
Note: only a member of this blog may post a comment.