Hello, Web Developers. In today’s kansiris Tutorial, I have briefly described Beginner’s Guide To Setup React Environment in our local machine.
React.js is an open-source JavaScript framework for building user interfaces developed atFacebook.
Airbnb, Instagram, Flipkart are using React.js for the frontend.
So Let’s Get Started!!
If you want to learn more about React and Redux then check out this React 16.6 – The Complete Guide (incl. React Router & Redux) course.
I am assuming that you have already install node.js in your machines.
Content Overview [hide]
- 1 Setup React Environment
- 1.1 Step 1: Create a project folder in your directory.
- 1.2 Step 2: Create a package.json file to manage all the node dependencies.
- 1.3 Step 3: Install webpack and webpack-dev-server.
- 1.4 Step 4: Create index.html file.
- 1.5 Step 5: Configure webpack.config.js file in a root directory.
- 1.6 Step 6: Install and set Babel dependencies.
- 1.7 Step 7: Install And Configure React and ReactDOM.
- 1.8 Step 8: Create a component file App.js inside components folder.
- 1.9 Step 9: Import App.js file into main.js file.
Setup React Environment
Step 1: Create a project folder in your directory.
mkdir react-environment
Navigate to that folder.
cd react-envStep 2: Create a package.json file to manage all the node dependencies.
For initialization of this file, type following command in your terminal.
npm init
So, your package.json file looks like this.
{
  "name": "react-environment",
  "version": "1.0.0",
  "description": "",
  "main": "index.js",
  "scripts": {},
  "author": "Sireesh Kantamaneni",
  "license": "ISC"
}
Step 3: Install webpack and webpack-dev-server.
We need two things
- Webpack: to bundle all of our javascript files into one file and host that file on the server.
- Webpack Development Server: We need this server to recompile our main javascript file every time we change and provide us one server.
Install locally for our project type
npm install webpack webpack-dev-server --save-devStep 4: Create index.html file.
Create a new file in root folder called index.html
<!-- index.html -->

<!DOCTYPE html>
<html lang="en">
<head>
    <meta charset="UTF-8">
    <title>React v15.4.2 ES6 Environment</title>
</head>
<body>
    <script type="text/javascript"  data-src="bundle.js"></script>
</body>
</html>
Here we have included only one javascript file called bundle.js in our HTML page, which is bundled by Webpack.
Create a directory called app in the root folder.
Create a directory called app in the root folder.
In the app directory, create a new javascript file called app.js.
Write only one line of code in the main.js file.
// main.js

console.log('Inside app folder');
Step 5: Configure webpack.config.js file in a root directory.
In the webpack.config.js file, we need to export all the webpack settings by exportingjavascript object.
//webpack.config.js

module.exports = {
    entry: ['./app/main.js'],
    output: {
        filename: 'bundle.js'
    }
};
Here we need some explanations right?
Basically, module.exports export an object, which describes our webpack configuration for our object.
The object contains two properties.
entry: – which represents our entry javascript file for the project. In our case It is js6 > app > main.js
output: – the output bundled file, which we have to include in our main HTML file calledbundle.js
Go to the package.json file and edit the following JSON property.
"scripts": {}
We add a new property called “build” and value called “webpack-dev-server.”
{
  "name": "react-environment",
  "version": "1.0.0",
  "description": "",
  "main": "index.js",
  "scripts": {
    "build": "webpack-dev-server"
  },
  "author": "Sireesh Kantamaneni",
  "license": "ISC"
}
Go to the terminal in your root project folder and type following command.
npm run build
It will create a bundled javascript file called “bundle.js.”
Next, we need to configure Babel.js in our webpack environment.
Step 6: Install and set Babel dependencies.
npm install babel-core babel-loader babel-preset-es2015 --save-dev
It will update our package.json file.
{
  "name": "react-environment",
  "version": "1.0.0",
  "description": "",
  "main": "index.js",
  "scripts": {
    "build": "webpack-dev-server"
  },
  "author": "Sireesh Kantamaneni",
  "license": "ISC",
  "devDependencies": {
    "babel-core": "^6.24.0",
    "babel-loader": "^6.4.1",
    "babel-preset-es2015": "^6.24.0",
    "webpack": "^2.3.2",
    "webpack-dev-server": "^2.4.2"
  }
}
babel-core and babel-loader is the dependency, which transpile the ES6 code to ES5
babel-preset-es2015 let us use some advanced feature of ECMAScript in our web applications.
Update our webpack.config.js file.
webpack.config.js file looks like this.
//webpack.config.js

module.exports = {
    entry: './app/main.js',
    output: {
        filename: 'bundle.js'
    },
    module: {
        loaders: [
            {
                loader: 'babel-loader',
                test: /\.js$/,
                exclude: /node_modules/
            }
        ]
    },
    devServer: {
        port: 3000
    }
};
Here we have added module object, which has loaders property.
It will accept an array of loader configuration, like which loader we want to use and which file we have to test with the extension .js and which file we need to exclude fromtranspiling from es6 to es5 like “node_modules” folder.
Also, I have added one optional attribute called devServer.
It includes the port number on which we need to host our app. by default webpack-dev-serverprovides port 8080.
But we can change it and put port 3000.
So now when you run again command
npm run buid
App will be running on http://localhost:3000/
Step 7: Install And Configure React and ReactDOM.
npm install --save react react-dom
We also need to use the package called “babel-preset-react” and “babel-preset-stage-3” to use latest ES6 features as well as we can write react code in ES6 syntax.
npm install --save-dev babel-preset-react babel-preset-stage-3
Your package.json file is updated and will look like this.
{
  "name": "react-environment",
  "version": "1.0.0",
  "description": "",
  "main": "index.js",
  "scripts": {
    "build": "webpack-dev-server"
  },
  "author": "Sireesh Kantamaneni",
  "license": "ISC",
  "devDependencies": {
    "babel-core": "^6.24.0",
    "babel-loader": "^6.4.1",
    "babel-preset-es2015": "^6.24.0",
    "babel-preset-react": "^6.23.0",
    "babel-preset-stage-3": "^6.22.0",
    "webpack": "^2.3.2",
    "webpack-dev-server": "^2.4.2"
  },
  "dependencies": {
    "react": "^15.4.2",
    "react-dom": "^15.4.2"
  }
}
We need to create one file in root directory called .babelrc
This file contains one object configuration which includes which Babel configuration of the array we are using.
{
  "presets": ["es2015", "react", "stage-3"]
}
Step 8: Create a component file App.js inside components folder.
Create one directory inside an app folder called components
In that create one file called App.js (react-environment > app > components > App.js)
//App.js

import React, { Component } from 'react';
export default class App extends Component {
    render(){
        return (
            <div>
                Hello From React v15.4.2
            </div>
        );
    }
}
Step 9: Import App.js file into main.js file.
We need to import this file into our main.js file.
//main.js

import React from 'react';
import ReactDOM from 'react-dom';
import App from './components/App';

ReactDOM.render(<App />, document.getElementById('app'));
Our final application directory structure looks like this.
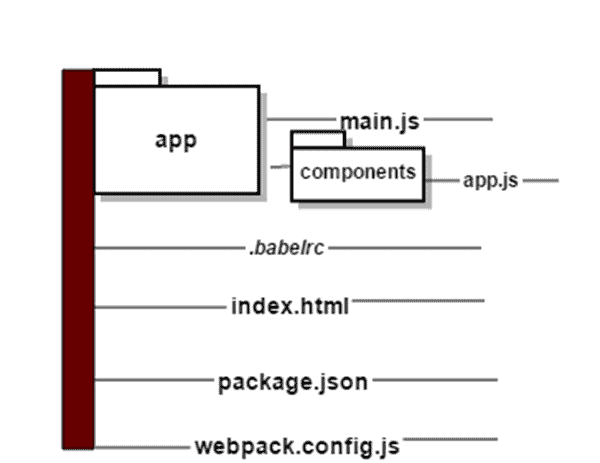
main.js is the file, which will be transpile by Babel and bundled by webpack.
You can restart your server and type
npm run build
Open the browser and go to this URL: http://localhost:3000/
“Hello From React v15.4.2.”
This code you can find in Github URL: https://github.com/KrunalLathiya/react-v15.2.4-environment
Now your React Application is running on your port 3000 with all ECMAScript’s Latest features.
Note: If you find any error during this small setup,
- First, check your Node and NPM versions
- Check off your dependencies version by comparing package.json file with yours because you might end up with downloading another version of that particular dependencies.
If you have any questions, please ask in a comment below. I am happy to help you out.


0 comments:
Post a Comment
Note: only a member of this blog may post a comment.