upload files to the server via the Angular 5 application. I thought it’s a good idea to share the solution as maybe it will save you some time. This post talks about how to upload a file from Angular 5 to ASP.NET Core 2.1 Web API.
Upload a file from Angular 5 to ASP.NET Core 2.1 Web API
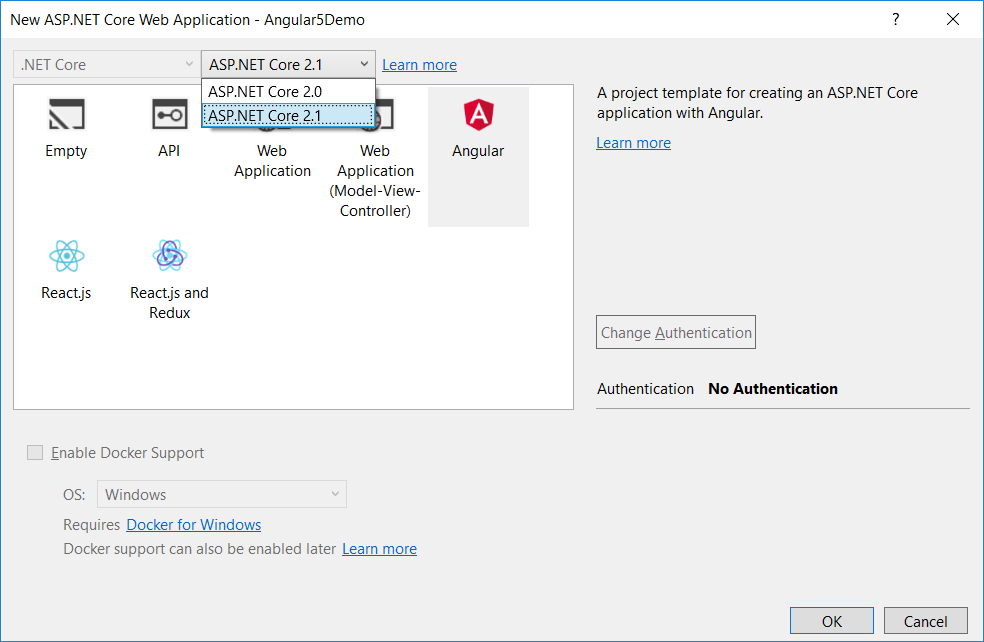
First thing first, let’s create an Angular 5 app with Visual Studio 2017. To do that, open Visual Studio 2017 “Preview” version, hit Ctrl+Shift+N and select the ASP.NET Core Web Application (.NET Core) project type from the templates. When you click Ok, you will get the following prompt,
Make sure to select “ASP.NET Core 2.1” from the version dropdown and choose Angular. The Visual Studio will create an ASP.NET Core 2.1 based project with Angular 5 configured. This should create an Angular 5 app. You should run the app to make sure that there are no errors.
Create Upload API in ASP.NET Core
To support uploading on the server, add a Web API controller named UploadController in the Controller folder. This controller has the API to upload the file and store it at a location. Add the controller with the following code.
| using Microsoft.AspNetCore.Hosting; |
| using Microsoft.AspNetCore.Mvc; |
| using System.IO; |
| using System.Net.Http.Headers; |
|
|
| namespace Angular5FileUpload.Controllers |
| { |
| [Produces("application/json")] |
| [Route("api/[controller]")] |
| public class UploadController : Controller |
| { |
| private IHostingEnvironment _hostingEnvironment; |
|
|
| public UploadController(IHostingEnvironment hostingEnvironment) |
| { |
| _hostingEnvironment = hostingEnvironment; |
| } |
|
|
| [HttpPost, DisableRequestSizeLimit] |
| public ActionResult UploadFile() |
| { |
| try |
| { |
| var file = Request.Form.Files[0]; |
| string folderName = "Upload"; |
| string webRootPath = _hostingEnvironment.WebRootPath; |
| string newPath = Path.Combine(webRootPath, folderName); |
| if (!Directory.Exists(newPath)) |
| { |
| Directory.CreateDirectory(newPath); |
| } |
| if (file.Length > 0) |
| { |
| string fileName = ContentDispositionHeaderValue.Parse(file.ContentDisposition).FileName.Trim('"'); |
| string fullPath = Path.Combine(newPath, fileName); |
| using (var stream = new FileStream(fullPath, FileMode.Create)) |
| { |
| file.CopyTo(stream); |
| } |
| } |
| return Json("Upload Successful."); |
| } |
| catch (System.Exception ex) |
| { |
| return Json("Upload Failed: " + ex.Message); |
| } |
| } |
| } |
| } |
Angular Code
Next, add the required HTML and component. To do that, create a new folder named “upload” inside the ClientApp->src->app directory. We need to add 2 files in this folder. First is, upload.component.html with the following code,
| <h1>File Upload Using Angular 5 and ASP.NET Core 2.1</h1> |
| <input #file type="file" multiple (change)="upload(file.files)" /> |
| <br/> |
| <span style="font-weight:bold;color:green;" *ngIf="progress > 0 && progress < 100"> |
| {{progress}}% |
| </span> |
|
|
| <span style="font-weight:bold;color:green;" *ngIf="message"> |
| {{message}} |
| </span> |
Here, we are also showing the upload progress in percentage. Thanks to Angular
HTTPClient events.
The second file is the Angular component to handle the upload and call the server-side web API. Add the Angular component named upload.component.ts with the following code,
| import { Component } from '@angular/core'; |
| import { HttpClient, HttpRequest, HttpEventType, HttpResponse } from '@angular/common/http' |
|
|
| @Component({ |
| selector: 'upload-component', |
| templateUrl: './upload.component.html' |
| }) |
| export class UploadComponent { |
| public progress: number; |
| public message: string; |
| constructor(private http: HttpClient) { } |
|
|
| upload(files) { |
| if (files.length === 0) |
| return; |
|
|
| const formData = new FormData(); |
|
|
| for (let file of files) |
| formData.append(file.name, file); |
|
|
| const uploadReq = new HttpRequest('POST', `api/upload`, formData, { |
| reportProgress: true, |
| }); |
|
|
| this.http.request(uploadReq).subscribe(event => { |
| if (event.type === HttpEventType.UploadProgress) |
| this.progress = Math.round(100 * event.loaded / event.total); |
| else if (event.type === HttpEventType.Response) |
| this.message = event.body.toString(); |
| }); |
| } |
| } |
Next, we need to add the “Upload” link in the navigation bar. To do that, open the nav-menu.component.html file located inside the nav-menu folder and add the following code just after the “Fetch Data” link.
Lastly, we need to add the newly created component to the Angular app module. We need to include the Upload component in the app.module.ts file. After including, the app.module.ts file should look like:
| import { BrowserModule } from '@angular/platform-browser'; |
| import { NgModule } from '@angular/core'; |
| import { FormsModule } from '@angular/forms'; |
| import { HttpClientModule } from '@angular/common/http'; |
| import { RouterModule } from '@angular/router'; |
|
|
| import { AppComponent } from './app.component'; |
| import { NavMenuComponent } from './nav-menu/nav-menu.component'; |
| import { HomeComponent } from './home/home.component'; |
| import { CounterComponent } from './counter/counter.component'; |
| import { FetchDataComponent } from './fetch-data/fetch-data.component'; |
| import { UploadComponent } from './upload/upload.component'; |
|
|
| @NgModule({ |
| declarations: [ |
| AppComponent, |
| NavMenuComponent, |
| HomeComponent, |
| CounterComponent, |
| FetchDataComponent, |
| UploadComponent |
| ], |
| imports: [ |
| BrowserModule.withServerTransition({ appId: 'ng-cli-universal' }), |
| HttpClientModule, |
| FormsModule, |
| RouterModule.forRoot([ |
| { path: '', component: HomeComponent, pathMatch: 'full' }, |
| { path: 'counter', component: CounterComponent }, |
| { path: 'fetch-data', component: FetchDataComponent }, |
| { path: 'upload', component: UploadComponent }, |
| ]) |
| ], |
| providers: [], |
| bootstrap: [AppComponent] |
| }) |
| export class AppModule { } |
That’s it. Run the application and you should see the following.
Thank you for reading. Keep visiting this blog and share this in your network. Please put your thoughts and feedback in the comments section.
 by
by 


0 comments:
Post a Comment
Note: only a member of this blog may post a comment.