HI WELCOME TO KANSIRIS

nativescript-chatview

Leave a Comment

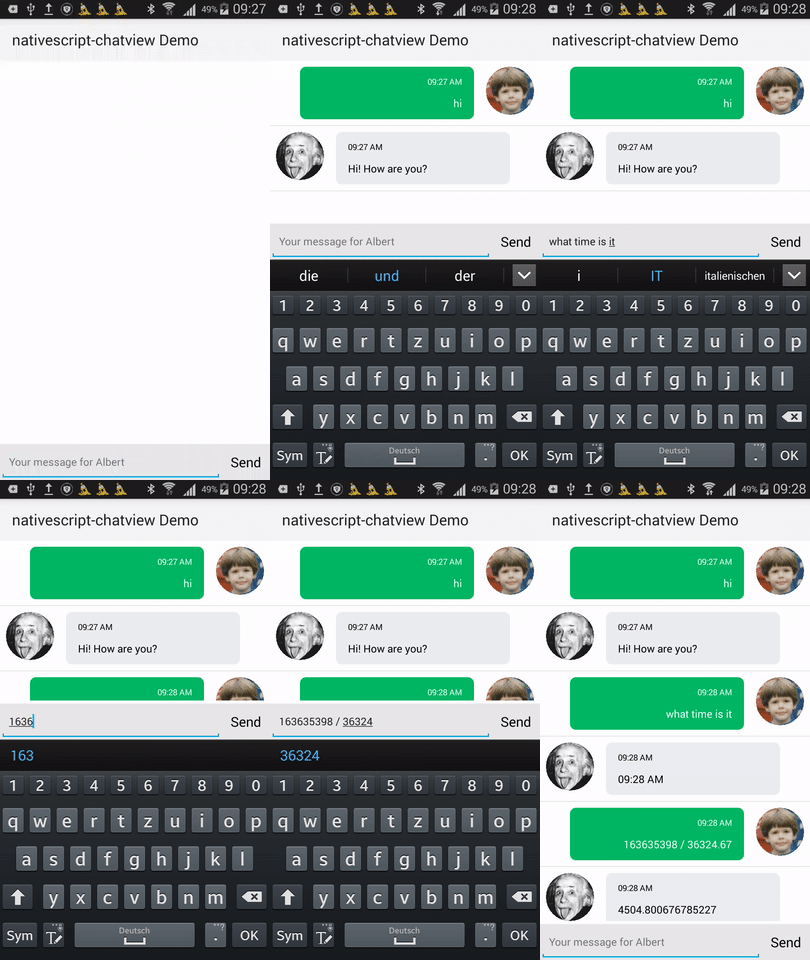
NativeScript UI module for implementing WhatsApp like chat applications.


 
NativeScript UI module for implementing WhatsApp like chat applications.
  • Android
  • iOS
Run

tns plugin add nativescript-chatview

inside your app project to install the module.
The demo app can be found here.

import ChatView = require("nativescript-chatview");


<Page xmlns="http://schemas.nativescript.org/tns.xsd"


      navigatingTo="onNavigatingTo">


</Page>


import ChatView = require("nativescript-chatview");


function getTime() : string {


    var now = new Date();


    var hours = now.getHours();


    return numberToString(hours == 12 ? 12 : (hours % 12)) + ":" + numberToString(now.getMinutes()) + " " + 


           (hours < 13 ? "AM" : "PM");


}


export function onNavigatingTo(args) {


    var page = args.object;


    // create view


    var chatView = new ChatView.ChatView();


    // register event when user taps


    // on SEND button


    chatView.notifyOnSendMessageTap((eventData: ChatView.SendMessageTappedEventData) => {


        // add a chat message


        eventData.object.appendMessages({            


            date: getTime(),


            isRight: true,


            image: "~/img/avatar.jpg",


            message: eventData.message,    


        });


    });


    // focus text field


    chatView.focusMessageField();


    page.content = chatView;


}


<Page xmlns="http://schemas.nativescript.org/tns.xsd"


      xmlns:chatView="nativescript-chatview"


      navigatingTo="onNavigatingTo">


  <chatView:ChatView id="myChatView" />


</Page>

Add the following CSS to your code:

.nsChatView-view .nsChatView-sendMessageArea {


    margin: 4,0,0,0;


    background-color: #e8e8e8;


}


.nsChatView-view .nsChatView-sendMessageArea Button {


    background-color: transparent;


    margin: 0;


}


.nsChatView-view .nsChatView-messageList {


    background-color: transparent;


    border-color: transparent;


    border-width: 0;


    margin: 0;


}


.nsChatView-view .nsChatView-messageList .nsChatView-item-left .nsChatView-avatar,


.nsChatView-view .nsChatView-messageList .nsChatView-item-right .nsChatView-avatar {


    margin: 8;


    border-radius: 32;


    width: 64;


}


.nsChatView-view .nsChatView-messageList .nsChatView-item-left .nsChatView-separator,


.nsChatView-view .nsChatView-messageList .nsChatView-item-right .nsChatView-separator {


    border-color: transparent;


    border-width: 0;


    width: 32;


}


.nsChatView-view .nsChatView-messageList .nsChatView-item-left .nsChatView-message,


.nsChatView-view .nsChatView-messageList .nsChatView-item-right .nsChatView-message {


    margin: 8;


}


.nsChatView-view .nsChatView-messageList .nsChatView-item-left .nsChatView-messageArea,


.nsChatView-view .nsChatView-messageList .nsChatView-item-right .nsChatView-messageArea {


    border-radius: 8;


}


.nsChatView-view .nsChatView-messageList .nsChatView-item-left .nsChatView-messageArea {


    background-color: #edeef2;


}


.nsChatView-view .nsChatView-messageList .nsChatView-item-right .nsChatView-messageArea {


    background-color: #00b863;


}


.nsChatView-view .nsChatView-messageList .nsChatView-item-left .nsChatView-messageArea .nsChatView-content,


.nsChatView-view .nsChatView-messageList .nsChatView-item-right .nsChatView-messageArea .nsChatView-content {


    margin: 12,16,12,16;


}


.nsChatView-view .nsChatView-messageList .nsChatView-item-left .nsChatView-messageArea Label,


.nsChatView-view .nsChatView-messageList .nsChatView-item-right .nsChatView-messageArea Label {


    margin: 0;


}


.nsChatView-view .nsChatView-messageList .nsChatView-item-left .nsChatView-messageArea .nsChatView-content Label {


    color: black;


}


.nsChatView-view .nsChatView-messageList .nsChatView-item-right .nsChatView-messageArea .nsChatView-content Label {


    color: white;


}


.nsChatView-view .nsChatView-messageList .nsChatView-item-left .nsChatView-messageArea .nsChatView-content .nsChatView-date,


.nsChatView-view .nsChatView-messageList .nsChatView-item-right .nsChatView-messageArea .nsChatView-content .nsChatView-date {


    font-size: 11;


    margin-bottom: 12;


}


.nsChatView-view .nsChatView-messageField {


    font-size: 14;


}

To understand how a ChatView is defined, you can have a look at the following XML definition:

<ChatView className="nsChatView-view"


          rows="*,auto">


  <!-- list of messages -->


  <ListView className="nsChatView-messageList"


            row="0"


            items="{{ messages }}"


            horizontalAlignment="stretch"


            verticalAlignment="stretch">


    <!-- template for an IChatMessage item -->


    <ListView.itemTemplate>


      <!-- chat message item -->


      <GridLayout className="{{ 'nsChatView-item-' + (isRight ? 'right' : 'left') }}"


                  rows="auto" columns="auto,*,auto">


        <!-- avatar -->


        <Image row="0" col="{{ isRight ? '2' : '0' }}"


               className="nsChatView-avatar"


               verticalAlignment="top"


               src="{{ image }}"


               visibility="{{ image ? 'visible' : 'collapsed' }}" />


        <!-- the message -->


        <StackLayout row="0" col="1"


                     className="nsChatView-message">


          <!-- the message area -->


          <Border className="nsChatView-messageArea">


            <StackLayout className="nsChatView-content"


                         verticalAlignment="top" horizontalAlignment="{{ isRight ? 'right' : 'left' }}">


              <!-- the date / time -->              


              <Label className="nsChatView-date"


                     horizontalAlignment="{{ isRight ? 'right' : 'left' }}"


                     text="{{ date }}"


                     visibility="{{ date ? 'visible' : 'collapsed' }}" />


              <!-- the message text -->


              <Label className="nsChatView-messageText"


                     horizontalAlignment="{{ isRight ? 'right' : 'left' }}"


                     text="{{ message }}" textWrap="true" />


            </StackLayout>


          </Border>


        </StackLayout>


        <!-- The invisible separator -->


        <Border row="0" col="{{ isRight ? '0' : '2' }}"


                className="nsChatView-separator" />


      </GridLayout>


    </ListView.itemTemplate>


  </ListView>


  <!-- message input field and SEND button -->


  <GridLayout className="nsChatView-sendMessageArea"


              row="1"


              rows="*,auto">


    <!-- chat message field -->


    <TextField className="nsChatView-messageField"


               col="0" row="0"


               hint="{{ typeMessageHint }}" />


    <!-- SEND button -->


    <Button className="nsChatView-sendMessageButton"


            col="1" row="0"


            text="{{ sendMessageButtonCaption }}" />


  </GridLayout>


</ChatView>

The following properties of a ChatView can be used to access the controls defined in the XML:
namecss class
messageFieldnsChatView-messageField
messageListnsChatView-messageList
sendMessageAreansChatView-sendMessageArea
sendMessageButtonnsChatView-sendMessageButton
Chat messages are wrapped into an IChatMessage object:

export interface IChatMessage {


    /**


     * The date.


     */


    date?: any;


    /**


     * The image source.


     */


    image?: any;


    /**


     * Defines if the displayed item is aligned on the right side or not.


     */


    isRight?: boolean;


    /**


     * The message value.


     */


    message?: any;


}

Use appendMessages() method to add one or more chat messages:

object.appendMessages({            


    date: getTime(),


    isRight: true,


    image: "~/img/me.jpg",


    message: "My message",    


}, {            


    date: getTime(),


    isRight: false,


    image: "~/img/friend.jpg",


    message: "Friend's message",    


});

Use insertMessages() method to insert one or more chat messages at a specific position:

object.insertMessages(1, {            


    date: getTime(),


    isRight: true,


    image: "~/img/me.jpg",


    message: "My message",    


}, {            


    date: getTime(),


    isRight: false,


    image: "~/img/friend.jpg",


    message: "Friend's message",    


});

Use insertMessages() method to prepend one or more chat messages:

object.prependMessages({


    date: getTime(),


    isRight: true,


    image: "~/img/me.jpg",


    message: "My message",    


}, {            


    date: getTime(),


    isRight: false,


    image: "~/img/friend.jpg",


    message: "Friend's message",    


});

Use the notifyOnSendMessageTap() method to register for a "click" event:

chatView.notifyOnSendMessageTap((eventData: ChatView.SendMessageTappedEventData) => {


    // handle the event


});

The eventData object has the following structure:

import Observable = require("data/observable");


export class SendMessageTappedEventData implements Observable.EventData {


    /** @inheritdoc */


    public eventName: string;


    /**


     * Focuses the chat message field.


     * 


     * @return {Boolean} Operation was successful or not.


     */


    public focusTextField(): boolean;


    /**


     * Gets the message to send.


     */


    public message: string;


    /** @inheritdoc */


    public object: ChatView;


    /**


     * Resets the message value.


     */


    public resetMessage();


    /**


     * Scrolls to bottom.


     */


    public scrollToBottom();


}

0 comments:

Post a Comment

Note: only a member of this blog may post a comment.