In this post, we will add Tabs bar navigation in Ionic Angular application using the ion-tabs component directive. In a Tabbed navigation, each tab acts like a page which is navigated by tapping on tab panels.
This Angular post is compatible with Angular 4 upto latest versions, Angular 7, Angular 8, Angular 9, Angular 10, Angular 11 & Angular 12
Tab navigation proves very useful where we need to show a clean UI with some basic layout with easy accessibility. Tabs can be linked to some important pages which makes navigation system remains always visible to the user giving an idea about the current location.
We’ll be adding tab-based navigation in the Ionic application using the ion-tabs component. We will discuss an easy way to implement tabs bar on the bottom of the application layout.

Let’s get started!
Update Ionic CLI
Install the latest version of Ionic CLI by running the following npm command.
$ npm install -g ionic
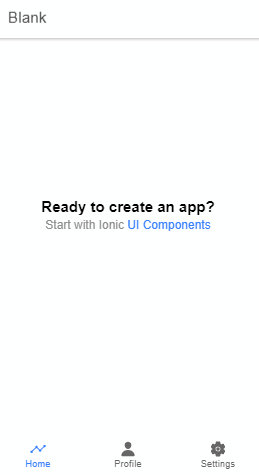
Now create a new Ionic 5 Angular Application with a blank template by running the following command
$ ionic start ionic-tabs-navigation blank --type=angular
Move to the application directory
$ cd ionic-tabs-navigation
Setup Application for Tabs
Now we will create some new tab pages linked with tab navigation and a tab bar page to keep routes for a navigation bar.
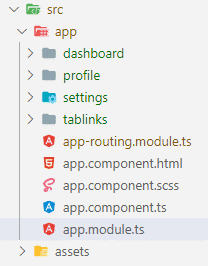
First, we’ll delete the Home page and run following generate command to create four new pages profile, dashboard, settings and tablinks
$ ionic generate page profile
$ ionic generate page dashboard
$ ionic generate page settings
$ ionic generate page tablinks
After removing the Home page and creating new pages for tabs the application structure will look like this.
Update App Routing Module
In the app-routing.module.ts file, remove the existing paths defined in the routesarray and update it with the TablinksPageModule as shown below
// app-routing.module.ts
import { NgModule } from '@angular/core';
import { PreloadAllModules, RouterModule, Routes } from '@angular/router';
const routes: Routes = [
{
path: '',
loadChildren: () => import('./tablinks/tablinks.module').then(m => m.TablinksPageModule)
}
];
@NgModule({
imports: [
RouterModule.forRoot(routes, { preloadingStrategy: PreloadAllModules })
],
exports: [RouterModule]
})
export class AppRoutingModule {}
Update Children Routes for Tabs
Now we’ll set up child routes in the tablinks-routing.module.ts file, with nested routing using children property to import modules of tabs pages profile, dashboard and settings.
// tablinks-routing.module.ts
import { NgModule } from '@angular/core';
import { Routes, RouterModule } from '@angular/router';
import { TablinksPage } from './tablinks.page';
const routes: Routes = [
{
path: 'tablinks',
component: TablinksPage,
children: [
{
path: 'profile',
loadChildren: () => import('../profile/profile.module').then(m => m.ProfilePageModule)
},
{
path: 'dashboard',
loadChildren: () => import('../dashboard/dashboard.module').then(m => m.DashboardPageModule)
},
{
path: 'settings',
loadChildren: () => import('../settings/settings.module').then(m => m.SettingsPageModule)
},
{
path: '',
redirectTo: '/tablinks/profile',
pathMatch: 'full'
}
]
},
{
path: '',
redirectTo: '/tablinks/profile',
pathMatch: 'full'
}
];
@NgModule({
imports: [RouterModule.forChild(routes)],
exports: [RouterModule],
})
export class TablinksPageRoutingModule { }
In the above code, we have defined children array for nested Routing for pages which will act like tabs.
Also defined an empty path with redirectTo property set to ‘/tablinks/profile’ so that profile component will be loaded by default when the app is started.
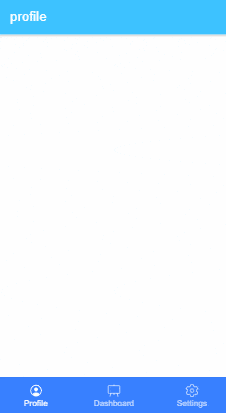
Adding Tabs Bar in Ionic Application
The tab navigation is created by adding the ion-tabs having ion-tab-bar inside it which creates a tab bar on position defined in the slot property.
Each tab button is created using the ion-tab-button with tab property which is the path of tab page resulting navigation.
We have set the navigation link in the tab property of the ion-tab-button element for the profile, dashboard and settings pages with icons using the ion-icon and label in ion-label tag.
In the tablinks.page.html file replace the following code
<ion-tabs>
<ion-tab-bar slot="bottom">
<ion-tab-button tab="profile">
<ion-icon name="person-circle-outline"></ion-icon>
<ion-label>Profile</ion-label>
</ion-tab-button>
<ion-tab-button tab="dashboard">
<ion-icon name="easel-outline"></ion-icon>
<ion-label>Dashboard</ion-label>
</ion-tab-button>
<ion-tab-button tab="settings">
<ion-icon name="settings-outline"></ion-icon>
<ion-label>Settings</ion-label>
</ion-tab-button>
</ion-tab-bar>
</ion-tabs>
Position the tabs on top
We can define the position of Navigation tabs bar by changing the property value of slot in the ion-tab-bar. By changing its value to ‘top’ will switch tabs bar on top of the application as shown in the image below:
<ion-tabs>
<ion-tab-bar slot="top" color="primary">
...
...
</ion-tab-bar>
</ion-tabs>

That’s now we have implemented tabbed navigation on the bottom of the application to navigate using Angular lazy-loaded routing for each tab button
Now run the application by hitting $ ionic serve --o and you will see the application as shown in the image below.
Find source code in GitHub repo here.
Conclusion: During the implementation of tabbed navigation the tab navigation page which we created in the tablinks plays an important role. Using the nested navigation helps to create a tabs bar on bottom which will have its child routing.