HI WELCOME TO KANSIRIS

Ionic 5 Alert, Confirm and Prompt Component Tutorial with Example Application

Leave a Comment

 In this Ionic 5/4 tutorial, we’ll learn how to show Alerts, Confirm and Prompt message overlays in an Ionic application by using the AlertController available in UI components of Ionic Framework.  

What are Alerts?

To quickly draw the attention of a user, we generally show an Alert message which can display a text message or allow a user to select an option. An Alert is shown over the content of the page which can be closed only by some user actions.

In Ionic, we can create Alerts or Confirm overlays by using the AlertController class provided by Ionic Framework UI components.  

Here we will learn three types of Alerts that can be easily implemented and used for different purposes:

Alert messages with an OK button.

Confirm alerts of taking and input from users. Mainly used to Delete actions where we confirm if the user really wants to delete.

Prompt message which will take date inputs from user and display on the page. We’ll also learn how to customize the CSS style of Ionic Alert UI components.

  Let’s start the implementation…  

Install or Update Ionic CLI

To create Ionic applications, you need to install @ionic/cli package. If already have updated it to the latest version

$ npm install -g @ionic/cli


Create new Ionic Angular Application

We’ll create a new Ionic 5 application using Angular framework with a starter blank template.

$ ionic start ionic-alert-app blank --type=angular

The --type option property is used to select the framework we want to use for our Ionic application   Move to the application directory  

$ cd ionic-alert-app

Now you can run the Ionic application by hitting  

$ ionic serve --lab

The--lab option is used to open the application in the browser into a lab viewer where you can concurrently see how it will look on multiple platforms including Android, iOS, and Windows.    


Implementing Alerts in Page

To create Alerts, we need to import the AlertController class from '@ionic/angular' then add in the class constructor() method to use its functions.

// home.page.ts
import { Component } from '@angular/core';
import { AlertController } from '@ionic/angular';

@Component({
  selector: 'app-home',
  templateUrl: 'home.page.html',
  styleUrls: ['home.page.scss'],
})
export class HomePage {

  constructor(
    public alertController: AlertController
  ) { }

  ....
  ....

}


The AlertController provides three methods:

create(): It is used to create a new Alert component instance and returns a promise.  The create method takes option properties for the Alert component.

dismiss(): This is used to close the visible Alert message programmatically by using the instance of create() method.  

getTop(): This method fetches the ID of the opened Alert component so that we can close using the dismiss() method.


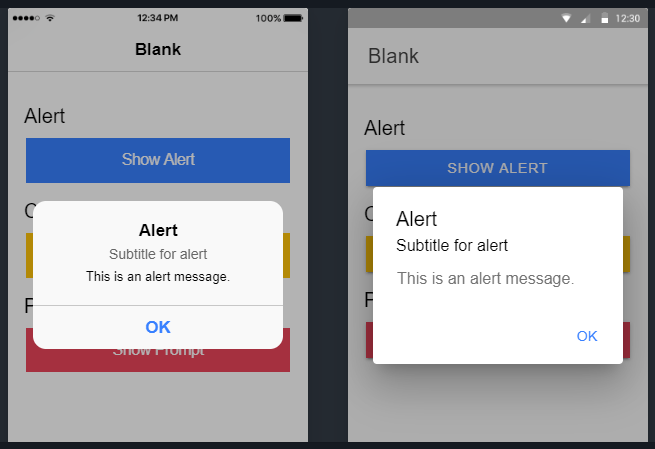
Showing Alert Message

The create() method is used to create an Alert component, which is then shown by calling present()

showAlert() {

    this.alertController.create({
      header: 'Alert',
      subHeader: 'Subtitle for alert',
      message: 'This is an alert message.',
      buttons: ['OK']
    }).then(res => {

      res.present();

    });

  }

We used promise above, but async;await can also be used to deal with methods who returns a promise in the following way:

async showAlert() {
    const alert = await this.alertController.create({
      header: 'Alert',
      subHeader: 'Subtitle for alert',
      message: 'This is an alert message.',
      buttons: ['OK']
    });

    await alert.present();
  }

The create() method takes option properties to define Title, message, and buttons to show for action. 
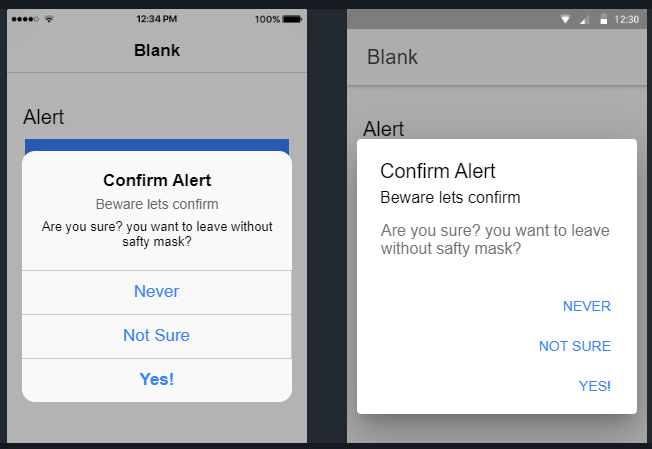


Show Confirm Alert

A confirm Alert is different as it can take multiple action inputs from the user through action buttons.

showConfirm() {
    this.alertController.create({
      header: 'Confirm Alert',
      subHeader: 'Beware lets confirm',
      message: 'Are you sure? you want to leave without safty mask?',
      buttons: [
        {
          text: 'Never',
          handler: () => {
            console.log('I care about humanity');
          }
        },
        {
          text: 'Not Sure',
          handler: () => {
            console.log('Let me think');
          }
        },
        {
          text: 'Yes!',
          handler: () => {
            console.log('Whatever');
          }
        }
      ]
    }).then(res => {
      res.present();
    });
  }

We can define any number of action buttons in the buttons property array with their own handler callback.
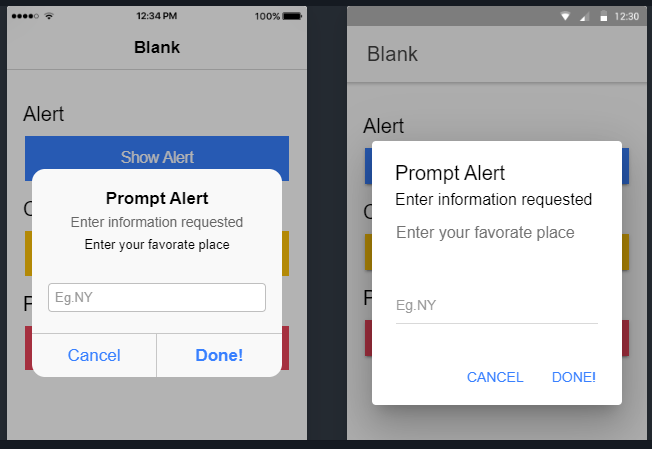


Show a Prompt Alert

The default Ionic Prompt Alert can be created to take a textual value from uses in a textbox control by adding below method:

showPrompt() {
    this.alertController.create({
      header: 'Prompt Alert',
      subHeader: 'Enter information requested',
      message: 'Enter your favorate place',
      inputs: [
        {
          name: 'Place',
          placeholder: 'Eg.NY',
          
        },
      ],
      buttons: [
        {
          text: 'Cancel',
          handler: (data: any) => {
            console.log('Canceled', data);
          }
        },
        {
          text: 'Done!',
          handler: (data: any) => {
            console.log('Saved Information', data);
          }
        }
      ]
    }).then(res => {
      res.present();
    });
  }


Types of Form Controls in Prompt Alert

A property alert can take any type of information using form controls types including ‘date‘, ‘email‘, ‘number‘, ‘password‘, ‘search‘, ‘tel‘, ‘text‘, ‘url‘, ‘time


Properties For Each Form Control

The inputs property takes an array of form control types with the following properties:

  • type: Type of form control
  • name: Define the name of the form control.
  • placeholder: Define placeholder of the form control.
  • value: Define the default value of the form control.
  • label: Define the label of the form control.
  • checked: Used for Checkbox or Radio control.
  • disabled: Control disabled state.
  • id: Specific ID for control.
  • handler: Bind a handler callback for each control.
  • min: Set min value.
  • max: Set max value.
  • cssClass: Adds a custom CSS class.


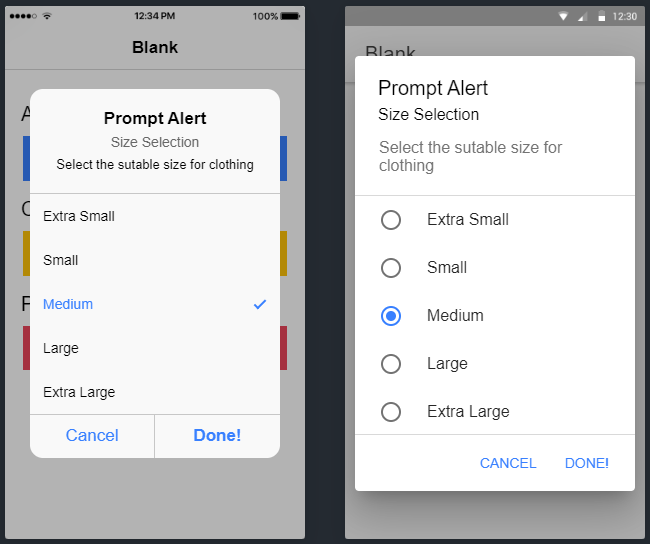
Prompt Alert with Radio List 

Prompt alert with a list of Radio controls to choose a value.

showPrompt() {
    this.alertController.create({
      header: 'Prompt Alert',
      subHeader: 'Size Selection',
      message: 'Select the sutable size for clothing',
      inputs: [
        {
          type: 'radio',
          label: 'Extra Small',
          value: 'xs'
        },
        {
          type: 'radio',
          label: 'Small',
          value: 's'
        },
        {
          type: 'radio',
          label: 'Medium',
          value: 'm'
        },
        {
          type: 'radio',
          label: 'Large',
          value: 'l'
        },
        {
          type: 'radio',
          label: 'Extra Large',
          value: 'xl'
        }
      ],
      buttons: [
        {
          text: 'Cancel',
          handler: (data: any) => {
            console.log('Canceled', data);
          }
        },
        {
          text: 'Done!',
          handler: (data: any) => {
            console.log('Selected Information', data);
          }
        }
      ]
    }).then(res => {
      res.present();
    });
  }


Prompt Alert with Checkbox List

Similarly, we can add a list of Checkboxes to select single or multiple values available 

showPrompt() {
    this.alertController.create({
      header: 'Prompt Alert',
      subHeader: 'Member Selection',
      message: 'Select family members',
      inputs: [
        {
          type: 'checkbox',
          label: 'Self',
          value: 'self',
          checked: true,
          disabled: true
        },
        {
          type: 'checkbox',
          label: 'Mother',
          value: 'mother'
        },
        {
          type: 'checkbox',
          label: 'Father',
          value: 'father'
        },
        {
          type: 'checkbox',
          label: 'Son',
          value: 'son'
        },
        {
          type: 'checkbox',
          label: 'Daughter',
          value: 'daughter'
        }
      ],
      buttons: [
        {
          text: 'Cancel',
          handler: (data: any) => {
            console.log('Canceled', data);
          }
        },
        {
          text: 'Done!',
          handler: (data: any) => {
            console.log('Selected Information', data);
          }
        }
      ]
    }).then(res => {
      res.present();
    });
  }


Customize CSS Style of Alert Component

The cssClass property takes a class name that can be added to the Alert overlay modal, using which we can easily customize the style.

async showAlert() {
    const alert = await this.alertController.create({
      header: 'Alert',
      cssClass:'my-custom-class',
      subHeader: 'Subtitle for alert',
      message: 'This is an alert message.',
      buttons: ['OK']
    });

    await alert.present();
  }

Now add the custom style to global.scss file at application root.

.my-custom-class {
    --backdrop-opacity: 0.2;
    --background: linear-gradient(90deg, rgba(165, 255, 192, 1) 1%, rgba(0, 212, 255, 1) 100%);
}


Following CSS properties are available:

  • --backdrop-opacity: Opacity of the backdrop
  • --background: Background of the alert
  • --height: Height of the alert
  • --max-height: Maximum height of the alert
  • --max-width: Maximum width of the alert
  • --min-height: Minimum height of the alert
  • --min-width: Minimum width of the alert
  • --width: Width of the alert


Update Home Template 

In the Home template, we have three buttons to call the methods we discussed above.

<ion-header [translucent]="true">
  <ion-toolbar>
    <ion-title>
      Ionic Alerts
    </ion-title>
  </ion-toolbar>
</ion-header>

<ion-content [fullscreen]="true" class="ion-padding">

  <h4>Alert</h4>
  <ion-button color="primary" expand="full" (click)="showAlert()">Show Alert</ion-button>

  <h4>Confirm</h4>
  <ion-button color="warning" expand="full" (click)="showConfirm()">Show Confirm</ion-button>

  <h4>Prompt</h4>
  <ion-button color="danger" expand="full" (click)="showPrompt()">Show Prompt</ion-button>  <code>{{selectedData | json }}</code>

</ion-content>


Final Component Class

After adding all methods the home.page.ts file will look like this:

// home.page.ts
import { Component } from '@angular/core';
import { AlertController } from '@ionic/angular';

@Component({
  selector: 'app-home',
  templateUrl: 'home.page.html',
  styleUrls: ['home.page.scss'],
})
export class HomePage {

  selectedData: any;

  constructor(
    public alertController: AlertController
  ) { }


  showAlert() {

    this.alertController.create({
      header: 'Alert',
      subHeader: 'Subtitle for alert',
      message: 'This is an alert message.',
      buttons: ['OK']
    }).then(res => {

      res.present();

    });

  }

  showConfirm() {
    this.alertController.create({
      header: 'Confirm Alert',
      subHeader: 'Beware lets confirm',
      message: 'Are you sure? you want to leave without safty mask?',
      buttons: [
        {
          text: 'Never',
          handler: () => {
            console.log('I care about humanity');
          }
        },
        {
          text: 'Not Sure',
          handler: () => {
            console.log('Let me think');
          }
        },
        {
          text: 'Yes!',
          handler: () => {
            console.log('Whatever');
          }
        }
      ]
    }).then(res => {
      res.present();
    });
  }

  showPrompt() {
    this.alertController.create({
      header: 'Prompt Alert',
      subHeader: 'Enter information requested',
      message: 'Enter your favorate place',
      inputs: [
        {
          name: 'Place',
          placeholder: 'Eg.NY',

        },
      ],
      buttons: [
        {
          text: 'Cancel',
          handler: (data: any) => {
            console.log('Canceled', data);
          }
        },
        {
          text: 'Done!',
          handler: (data: any) => {
            console.log('Saved Information', data);
            this.selectedData = data;
          }
        }
      ]
    }).then(res => {
      res.present();
    });
  }


}


Source Code

Find source code in my GitHub repository here.


Conclusion

Finally, we are done with Ionic Alerts tutorial, We discussed how to add Alerts, Confirm Alerts and Prompt Alerts in the Ionic application by using the methods available in AlertController class. We can easily customize the Alert box and have multiple form controls as well in prompt type alerts.

Hope this was helpful, do share your comments and feedback.

Thanks for reading…

In Blazor how to call a function at Page Load (event name)?

Leave a Comment

 There are two main ways you can do this, and either will work. I tend to prefer the first, but the second also gets the job done.

The first way, is in your @code block, you can override the OnInitialized method. I use the async version as you can kick off your task and let the page basics load, and then it will refresh when it gets set up.

@code {

void SomeStartupMethod()
{
    // Do Some Work
}

Task SomeStartupTask()
{
    // Do some task based work
    return Task.CompletedTask;
}

protected override async Task OnInitializedAsync()
{
    SomeStartupMethod();
    await SomeStartupTask();
}

This will do work on the page load, like an initial service call to populate data, filling in lists conditionally, whatever you need to do. BTW, a trick I found is that if you put await Task.Delay(1); as the first line of the OnInitializedAsync method body, it will break the remaining execution free from the page render, so you can get an initial and responsive page while the initial load is still processing in the background. Just something to get your page responsive faster.

The second way is to override the OnAfterRender method, which allows the page 1 full render and then executes. It also has a default input of bool firstRender that you can use as a condition for data loads and other things.

protected override void OnAfterRender(bool firstRender)
{
    // execute conditionally for loading data, otherwise this will load
    // every time the page refreshes
    if(firstRender)
    {
        // Do work to load page data and set properties
    }
}

The important thing to remember for this method is that it will execute any time the Blazor engine detects the need to refresh the UI, so use that firstRender parameter wisely.

Depending on what you need to do, different lifecycle methods can be useful at different times, and there are a few more I haven't touched on. For further info, take a look at the official docs. I've been able to get very far on my own just using what the docs have supplied, and this link will get you started at lifecycle methods.

Hope this helps!

Split function equivalent in T-SQL?

Leave a Comment

I’m looking to split '1,2,3,4,5,6,7,8,9,10,11,12,13,14,15...' (comma delimited) into a table or table variable.

Does anyone have a function that returns each one in a row?


 Try this

DECLARE @xml xml, @str varchar(100), @delimiter varchar(10)
SET @str = '1,2,3,4,5,6,7,8,9,10,11,12,13,14,15'
SET @delimiter = ','
SET @xml = cast(('<X>'+replace(@str, @delimiter, '</X><X>')+'</X>') as xml)
SELECT C.value('.', 'varchar(10)') as value FROM @xml.nodes('X') as X(C)

OR

DECLARE @str varchar(100), @delimiter varchar(10)
SET @str = '1,2,3,4,5,6,7,8,9,10,11,12,13,14,15'
SET @delimiter = ','
;WITH cte AS
(
    SELECT 0 a, 1 b
    UNION ALL
    SELECT b, CHARINDEX(@delimiter, @str, b) + LEN(@delimiter)
    FROM CTE
    WHERE b > a
)
SELECT SUBSTRING(@str, a,
CASE WHEN b > LEN(@delimiter) 
    THEN b - a - LEN(@delimiter) 
    ELSE LEN(@str) - a + 1 END) value      
FROM cte WHERE a > 0

How to use .Net MAUI Secure storage in your Mobile application ( iOS, Android and Windows )

Leave a Comment

.NET MAUI provides different techniques for local storage, in my previous article, explain preferences. This article will explain how to use secure storage in your mobile iOS, Android, and windows applications.


Secure storage is like a shared preference. It stores data in key and value pairs. The data is encrypted and users a key made from a unique device key to encrypt and decrypt the data stored. The data is stored in a secure storage directory where only the OS can access it.

  Secure storage - .NET MAUI - Microsoft Docs
You must keep in mind Do and Don’t Do things about Secure Storage.
  1. There are no storage limitations for secure storage, best practices, and performance, secure storage may be impacted if you store large amounts of text, as the API was designed to store small amounts of text.
  2. You can store an unlimited number of keys inside
  3. The data gets deleted once the app is uninstalled.
  4. Best practice, you can choose to disable Auto Backup for your entire application, or You can create a custom rule set to exclude Secure Store items from being backed up.

Don’t Do in Secure Storage

  1. Secure storage to store data that should be encrypted and hidden from the user. That data should store only store users' sensitive data such as their API keys and not your server private keys and server connection string. Although data stored in secure storage are encrypted, it isn't entirely secure. Users can root/jailbreak their devices which gives them full control of the OS. There are tools that can intercept keys as they are provided and use them to decrypt the data. The only way to prevent that is to never save the server details and non-user-related data to the user device. You should store it on a server that you can control.
  2. When you try to save the max length string into the Preferences and secure storage to your device, it throws a Memory Exception when Preferences and secure storage data exceed 1.42 MB so don’t try to save a large amount of text, so if you have more than 1.42 MB data size to save it’s better to save use File storage or SQLite database.

Secure Storage VS. preferences

You probably already know about preferences, which is very useful when you want to save non-private information, but where you need to use secure storage, the following key difference will help you to understand.
Local Settings: Preferences and Secure Storage

Getting started with MAUI Secure Storage

The following steps are to create/get / Clear secure storage using.Net MAUI application. The .Net MAUI Secure Storage and ISecureStorage types are available in Microsoft.Maui.Storage namespace.

Secure storage will work on all the platforms iOS, macOS, Android, and windows, Only iOS simulator debugging require extra setup will explain in the last section.

Create New project

You can open visual studio 2022 from your Windows / Mac machine. You must follow the below 3 steps to create a new MAUI application.

Step 1: Select Create a new project

Step 2: Search the MAUI project template or choose Project Type > MAUI from the drop-down.

Step 3: Provide the configuration Details as a project name, Location, and Solutions name.
Xamarin.Essentials: Secure Storage

Namespace

Secure storage is storing data in key-value pairs and can be easily managed via the secure storage class from Microsoft.Maui.Storage namespace, so accesses secure storage add the Microsoft.MAUI. storage namespace

Save Secure Storage

SetAsync method, providing the key and value. it supports strings only. If you want to store other types of data, you can encode them as a string. The most convenient way to do that is probably JSON. You can use JSON serialize and deserialize.

await SecureStorage.SetAsync("Key String ", "Value String ");

For Example, while using implementation you can use like below

await SecureStorage.SetAsync("UserPassword", "MSdevBuild@123");

The Mobile Secure storage will work as per the platform-specific; the below section will show how different platforms store the secure storage in the device.

Android Device Secure Storage

Secure Storage uses the preference API and follows the same data persistence with a filename

[YOUR APP Package name ID].microsoft.maui.essential.preferences

However, data is encrypted with the Android EncryptedSharedPreference Class, and the secure storage value is encrypted with AES-256 GCM.

iOS Device Secure Storage

Key Chain is used to store values securely on iOS devices. The SecRecord used to store the value has a Service value set to

[YOUR-APP-BUNDLE-ID].microsoft.maui.essentials.preferences.

Windows Device Secure Storage

DataProtectionProvider is used to encrypt values securely on Windows devices.Encrypted values are stored in ApplicationData.Current.LocalSettings, inside a container with a name of

[YOUR-APP-ID].microsoft.maui.essentials.preferences.

Read Secure Storage

In the above code snippets, you understood the saved the secure storage string value, in the below statement will get the value from existing secure storage.

await SecureStorage.GetAsync("Existing save Key");

Here you don’t have the option to check the key already available or not, but you can check values there or not using strining.IsnullorEmpty.

string securepassword = await SecureStorage.GetAsync("UserPassword");

if(!string.IsNullOrEmpty(securepassword))
{
//Statement
}

Remove Secure Storage

Remove and Remove all will use for dropping the Secure Storage key and value, suppose if you are doing any logout or switching to a different user this will help to clear all the Secure storage from your device.

Remove will give the confirmation with the bool return type, this will help us for navigation after confirmation.

bool isremoved = SecureStorage.Remove("UserPassword");


Suppose, User tries to log out or switch to different users, the best way to use remove all secure storage

SecureStorage.RemoveAll();

IOS Specific Secure Storage Setup

You must follow the below steps for only IOS simulator

Secure Storage Setup for IOS Simulator

I have received this question from many of them, “I want to use Secure Storage on iOS and Android mobile phones and tablets, but I get this error message on iOS simulator but it works well in Android emulator, devices and IOS devices”

SecureStorage requires Entitlements.plist update for iOS

The above issue is common for Xamarin and MAUI, you can follow the below steps will work in IOS simulator.

When developing on the iOS simulator, enable the Keychain entitlement and add a keychain access group for the application's bundle identifier.
Step 1: Create or open the Entitlements.plist in the project and This will automatically add the application's identifier as a group
Step 2: In the project properties, under iOS Bundle Signing set the Custom Entitlements to Entitlements.plist.

Secure Storage plugin not working in ios simulator

Export compliance documentation for encryption, while Uploading AppStore

Complying with Encryption Export Regulations screen when uploading to the apple store, suppose you app makes calls to a web service via HTTPS and MAUI Xamarin Secure Storage to store secure information, in this case, you don’t worry about Encryption export Regulation, as per Apple documentation No documentation required.

Complying with Encryption Export Regulations

If you do the below steps, next time you won’t get the above Dialog wizard.

Add the ITSAppUsesNonExemptEncryption key to your app’s Info.plist file with a Boolean value that indicates whether your app uses encryption. Set the value to NO if your app using only Secure Storage and https API call, next

Is HTTPS exempt from export compliance?

Summary

The Secure Storage class is intended to store small pieces of secure storage information. If you need to locally save and retrieve more complex and structured data, a good option is to use a local database.