HI WELCOME TO SIRIS
Showing posts with label web api. Show all posts

Understanding Model Binding in ASP.NET Web API

Before diving in-depth of Model Binding in Web API 2, I would highly recommend you to go ahead and check “Content Negotiation in Web API 2”. The article will give you glimpse over creating Web API projects and how to use POSTMAN for testing your web APIs. For this article, I will consider the same project I created in Content Negotiation and Postman for testing. The mechanism to map the service request and its input data to the correct action method and its parameters is known as Model Binding aka Parameter Binding.


So now, a very genuine question some of you must be thinking “How does the model binder understands, which method to be linked to with the requested URI?” Hmmmm…. A good question!! Let’s see how this is managed.

HOW DOES WEB API BIND THE HTTP VERBS TO THE ACTION METHOD

This is taken care by the WebAPIConfig and HTTP Verbs. The Route config for WebApi tells us the URL parameter it should accept. Observe the RouteTemplate parameter in the below figure. It says that any URL which is decorated with API followed by the controller name, in our case its Products, and also having a facility to provide Id, not mandatory, is a correct URL.


Similarly, when an Action Method is suffixed with HTTP Verb, GET PUT POST DELETE, along with input parameter (non-mandatory) is mapped to the URL


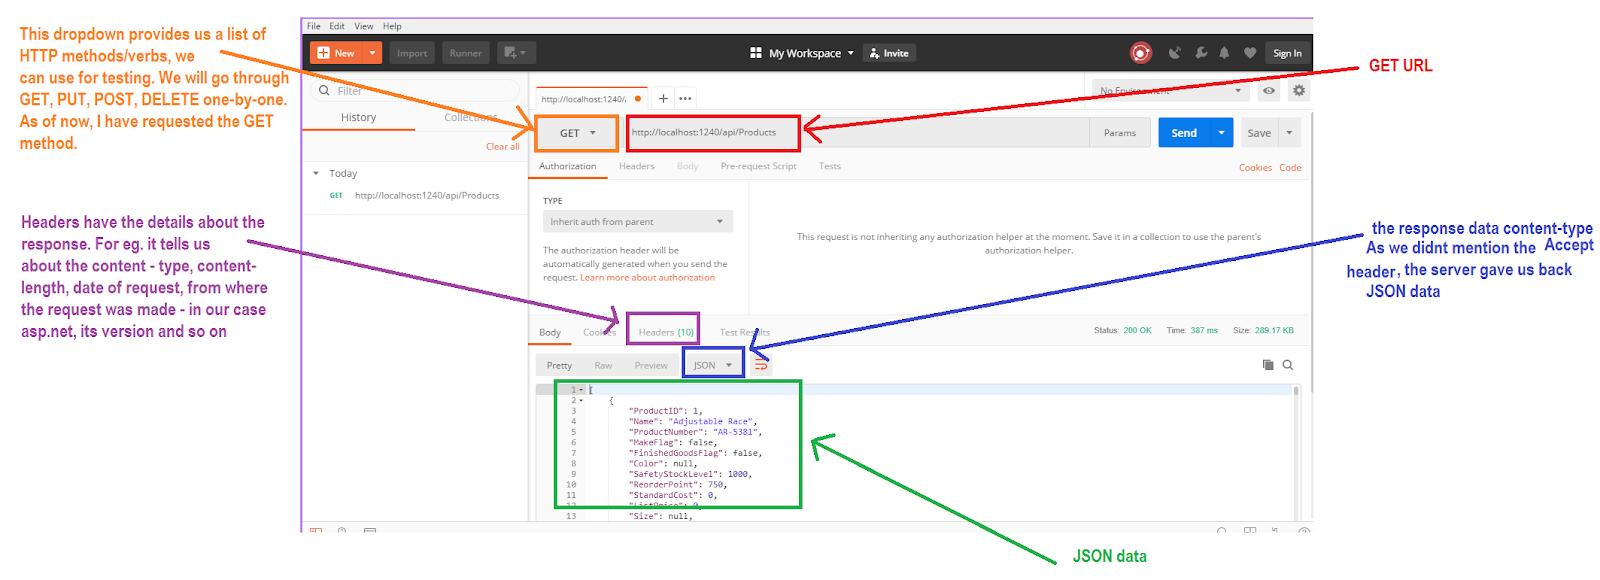
Let us consider the GET method. I requested the URL ‘api/Products’. Ok so now, the model binder first checks if the URL is decorated as required – “Ummm… Yes!! It has an API followed by Controller name. But no ID, ok!! That’s fine. It was anyways optional. I accept the URL. But wait, let me check if there is an input parameter in the request body? No. ok! So there is no input parameter anywhere so this seems to be the GET method. Let me now check in the action method list if I can find any method prefixed with GET and not accepting any input parameter. There it is, the GETPRODUCTS method”. In return, we get back the list of products.


Similarly, it works for other Action methods. But wait, this means I have to always prefix my method name with HTTP Verb? Won’t I be able to ever have a custom name? Let’s see what happens. I changed the GETPRODUCTS to LOADPRODUCTS and called the ‘api/Products’.


We land up getting an error.


So what now? Each HTTP verb is connected to HTTP Method.
HTTP VERB
HTTP METHOD
Get
HttpGet
Post
HttpPost
Put
HttpPut
Delete
HttpDelete
So you simple need to decorate your method with the HTTP Method and rename your method as you desire.


Call the method in Postman and you get the product list back


Similarly, you can decorate your action methods with the desired HTTP Method and get the result.

TYPES OF MODEL BINDER

Model Binders are precisely of two types,
  1. Primitive model binder
  2. Complex model binder
Let’s understand them one-by-one.

Primitive Model Binder

  • If the request is simple, i.e. input parameter are of type int, string, Boolean, GUID, decimal, etc. & is available in the URL, then such kind of request is mapped to primitive model binding.
  • Data is available as Query String


Complex Model Binder

  • If the request is complex, i.e. we pass data in request body as an entity with the desired content-type, then such kind of request is mapped by Complex model binder.
  • Data not available via Query String

DEFAULT MODEL BINDERS

Till now you must have understood what methods use primitive type binding and which methods use complex type binding. I would just note it down though.

Primitive Type Binding

HTTP Methods like GET and DELETE where you are only required to send less quantity of input parameters, uses primitive type binding, by default.

Complex Type Binding

  • HTTP Methods like POST and PUT where you have to send the send model/entity data to the server, uses complex type binding, by default.
  • POST and PUT can also use combination of primitive and complex type. Consider you want to update data. So you can pass the Id in query string and the data to be updated in response body.
But what if I don’t want this default behavior? What if I don’t want to pass my parameter value in query string for GET/Delete methods? What if I want to pass few inputs from query string and few from response body? Can I achieve this? Surely, You can. Let’s see how.

FROMURI AND FROMBODY MODEL BINDER

For explaining the FROMURI and FROMBODY, I will consider the PUT method. As I mentioned above, PUT method accepts Complex type model binding or may be a mix of primitive-complex model binding.


In above image, ‘int id’ is the primitive type which accepts data from the URL or Query String whereas ‘Product product’ is complex type which accepts data from Request Body.


So we can decorate ‘int id’ with [FromUri] and ‘Product product’ as [FromBody]. In both the cases, calling the method and passing parameter would be same, the default behavior. Please Note: For the complex type, you need to pass all the properties mentioned in its entity class in the request body irrespective of ‘int id’ parameter. Now, what if I want to accept the primitive type from the body whereas the complex type from the URI? This can be achieved by decoration our method as follows,


In this case, we need to pass the ‘Id’ parameter through Request Body whereas the ‘Product’ as Query String or Route data.


Let’s see if our action method gets the value when we sent the request.


Ooo yes!! Our action method was successful to receive the input. Similarly, you can choose which input value you want the web API to read from as per your application needs. Also, you can decorate [FromUri] and [FromBody] in other HTTP methods, as per requirement.
SUMMARY
Model Binding is the most powerful mechanism in Web API 2. It enables the response to receive data as per requester choice. i.e. it may be from the URL either form of Query String or Route data OR even from Request Body. It’s just the requester has to decorate the action method with [FromUri] and [FromBody] as desired.

uploading a file and form Data in web Api and angularJS

public string UploadImage()
    {
        HttpRequestMessage request = this.Request;
        if (!request.Content.IsMimeMultipartContent())
        {
            throw new HttpResponseException(new HttpResponseMessage((HttpStatusCode.UnsupportedMediaType)));
        }
        var context = HttpContext.Current.Request;
        if (context.Files.Count > 0)
        {
            var resourcePhoto = new PhotoHelper(HttpContext.Current.Server.MapPath("~"));
            var file = context.Files.AllKeys.FirstOrDefault();
            var result = resourcePhoto.SaveResourceImage(context.Files[file], User.Identity.Name);
            return result;
        }
        else
        {
            return null;
        }
    }
And in the SaveResourceImage I do the following:
 postedFile.SaveAs(resultPath);

Content Negotiation in ASP.NET WebAPI

As the name suggest, Web API, an Application Programming Interface for Web. In other words, it’s a framework which is used to create services aka API’s which can be consumed by clients using browser or tablets or mobile devices. Basically, it is used to create RESTful services. To find more over REST, have a look into Difference between SOAP And REST APIs. Whenever we consume an API, we receive data in either JSON or XML or plain text or your own custom format. I.e. the requester and responder are aware of the format in which they will receive data. This is nothing but Content Negotiation in Web API 2.

How Content Negotiation Works

There are two main headers which hold the responsibility of content negotiation
  • Content-Type
  • Accept
Let’s try to understand them. When a requester send a service request, the CONTENT-TYPE tells responder the format he will receive data whereas the ACCEPT header tells in which format the requester requires the data.

Default Content Negotiator

In the above pictorial view, there are few points which should be noted down,
  • User 2 didn’t mention Content-Type but then received the response in desired format. I.e. XML.
  • Whereas User 4 didn’t mention both Content-Type as well as Accept header. But then received the response. I.e. in JSON format. In short, JSON format is the default content negotiator in web api 2.
  • Also, User 3 requires data in text/html format but receives data in XML format. In short, text/html Accept header sends response in XML format by default.
    Till now, we had lots of theory. Let’s see the above pictorial view in .Net platform.

Creating Web API Application in .NET

Let’s create a Web API 2 application for understanding Content Negotiation. I will be creating the project using.
  • Visual Studio 2017
  • Entity Framework 6
  • SQL Server 2012 – I have used Adventure Works sample Database – Go through https://www.tutorialgateway.org/download-and-install-adventureworks-database/ to download and bind the SQL database
To create the application follow the below steps,
  1. In Visual Studio 2017, select File > New>Project> Asp.Net Web Application (.Net Framework)
  2. Choose the desired path, project name and .Net Framework 4.6.1. As a FYI, .Net Framework 4.5 and above supports Web API2 features. Click OK


  3. In this step, you will get the list of templates supported by .Net framework 4.6.1. For this tutorial, I am selecting Web API. Please note, the MVC and Web API checkboxes are checked by default. Click ok.

  4. In few minutes, your Web API project will be created with a default project structure and a controller to begin with.

  5. Now let us bind our Adventure works database. I will be using Entity Framework Database first approach. For this, right-click on your Models folder> Add > New Item> ADO.Net Entity Data Model. Give name to your .edmx file and click Add.
  6. Now select EF designer from database. Click Next > Select the connection string if existing else click on New connection & create the connection string. Once done click ok and then next.
  7. Here in visual studio 2017, you get an option to select version of EF. I will be selecting Entity Framework 6.x. Click Next


  8. Select the desired Tables, View or Store procedure. I will go ahead only with Product Table. Click Finish. In sometime, your .edmx file will be created with Product Entity.
  9. Now let’s create a web api Products Controller. Right-click on Controllers folder > Add> New Scaffolder item > Web API 2 with actions using Entity Framework > Click Add.
  10. Select the desired Model class, DataContext class and Controller name > Click Add. A controller with pre-written Actions will be created.


  11. Run the application and in your browser, write api/Products after the localhost. You will get your data in XML Format.

Downloading and Installing Postman

For testing the Web API, you can either use fiddler or postman. Here I will be using Postman. You can download and install the same from,https://www.getpostman.com/appsLet’s check if the application is running in POSTMAN. Copy the URL from browser and paste it beside the GET button and click SEND. You will receive the desired data long with repose status code.


Great!! Your application worked!! So now we are ready to deep-dive into understanding Content Negotiation with examples. If you don’t wish to download the POSTMAN application, then chrome provides an add-in for the same. https://chrome.google.com/webstore/detail/postman/fhbjgbiflinjbdggehcddcbncdddomop?hl=enI personally prefer using the application so I have downloaded and installed it.

OVERVIEW OF POSTMAN

After building a web API or service application, we all would like to test them without consuming it. For such purpose, Fiddler and Postman are being used. I will go ahead and give small overview about Postman before testing our application. Postman provides a wide range of features for our use. It has made a developer life quite easy. One of them is we can easily create an account in Postman so that if in case we want to save our test cases for future use. What a relief!!


Above fig is the landing page of postman application. It’s basically divided into 3 portions,
  • Request Panel : where you note down the details you wish to send to the server.
  • Response Panel : where you can see the data you requested for.
  • History Panel : this will list down the entire service request you made each day.
    You can go through https://www.youtube.com/watch?v=FjgYtQK_zLE to understand more functionality postman offers. Now let us see how we can request the service and how we receive response from the server.

Testing Content Negotiation or WebApi with Postman

As we all know, there are 4 types of operation or HTTP verbs we can perform,
  1. GET
  2. PUT
  3. POST
  4. DELETE
I will be explaining them one by one. Let’s get started!!

GET REQUEST

This request is used when we simply want to receive data from server. So for me, I need a list of all the products.


Test Case 1 As we didn’t specify the ACCEPT header, the server gave us back JSON data, which is the default content-type for a response. Let us specify the ACCEPT header. For this,
  • Click on headers tab in request panel
  • Enter ACCEPT under key in first row and value as application/XML.
  • Click Send
    Now we get the response body as XML. Similarly we can request data in other formats like text, json, xml and so on.


Test Case 2 Now if we want to send a parameter along with the GET method, there are two ways,
  • Send the product id value with the URL. For example, http://localhost:1240/api/Products/4
  • Set a parameter and make a call to http://localhost:1240/api/Products
    We will try the second option. For this,
  • click on the Params button beside the send button
  • Enter id as key and 4 as value
  • Specify the Accept header if any and click send


Note that whatever request we are making, it’s getting saved in the History panel. We can anytime double click on the desired URL and check our past test case result.

PUT Method

If we want to update any existing data, we use the PUT method.
Test case 3
  • click on the Params button beside the send button
  • Enter id as key and 4 as value
  • Now as we need to send the data which we need to update, we have to tell server what is the format of the input data. So we specify Content-Type.
  • Specify the Accept header if any
  • Change the HTTP verb to PUT
  • In body tab, enter the JSON input data and click send


    Ooopzz!! We receive no data in our response panel with a status of ‘ 204 No Content’.


    So isn’t our data updated? To check if our data is updated, repeat Test case 2. You can see the changes. But we would like to get the data back immediately after hitting the URL instead of repeating the Testcase 2. For this, we need to update few small line in our PUT action method.
  • Replace
    1. [ResponseType(typeof(void))] with [ResponseType(typeof(Product))]
  • Replace
    1. return StatusCode(HttpStatusCode.NoContent); with
    2. Product product1 = db.Products.Find(id);
    3. return Ok(product1);
    Save and Run your application. Repeat Test Case 4. In PUT as well, we can shuffle around content-type and Accept headers as per our need.

POST Method

Is use to create new data in database. Steps to create the scenario are similar to Testcase 3. Only difference, we are not supposed to send any Id as input.
Test Case 4
  • As we need to send the data which we need to update, we have to tell server what is the format of the input data. So we specify Content-Type.
  • Specify the Accept header if any
  • Change the HTTP verb to POST
  • In body tab, enter the JSON input data and click send


A new product with ProductId = 1001 has been created. To test, we can repeat TestCase 2 and check.


DELETE Method

As the name says, use to delete an existing data.
Test case 5
  • click on the Params button beside the send button
  • Enter id as key and 1001 as value
  • Now as we need to send the data which we need to update, we have to tell server what is the format of the input data. So we specify Content-Type.
  • Specify the Accept header if any
  • Change the HTTP verb to DELETE
  • Click Send.
    As a response we get back the Product details which we delete. So repeat TestCase 2 and now we see no data with a status code ‘Not Found’.

Bounding WebAPI to send only json or xml formatted data

Now there are cases where we want our application to receive only JSON or XML formatted data irrespective of the ACCEPT header value. To achieve this, add a below line in App_Start > WebApiConfig.cs> Register method.
  1. config.Formatters.Remove(config.Formatters.XmlFormatter);
This will remove the XML formatter and always return JSON data. I executed TestCase 1 with Accept header as application/xml.


Similarly to get data in only XML format, below is the code.
  1. config.Formatters.Remove(config.Formatters.JsonFormatter); 

Returning data based upon the accept header

For this purpose, add the below line of code in App_Start> WebApiConfig.cs> Register method
  1. config.Formatters.JsonFormatter.SupportedMediaTypes.Add(new System.Net.Http.Headers.MediaTypeHeaderValue("text/html"));
Summary
Content-Type and Accept header are the important elements while requesting a service. It tells the service in which format he will be receiving the input and in which format he needs to send the data back respectively. If you are making an Ajax call, below is the basic structure
  1. $.ajax({
  2. url: "http://localhost:1240/api/Products",
  3. dataType: "application/xml",
  4. contentType: "application/json; charset=utf-8",
  5. data: JSON.stringify(inputdata),
  6. success: function(result) { },
  7. });
Where, dataType is the ACCEPT header value. Data is the input data you sending to the server.

Passing multiple complex type parameters to ASP.NET Web API

Asp.Net Web API introduces a new powerful REST API which can be consume by a broad range of clients including browsers, mobiles, iphone and tablets. It is focused on resource based solutions and HTTP verbs.
Asp.Net Web API has a limitation while sending data to a Web API controller. In Asp.Net Web API you can pass only single complex type as a parameter. But sometimes you may need to pass multiple complex types as parameters, how to achieve this?
You can also achieve this task by wrapping your Supplier and Product classes into a wrapper class and passing this wrapper class as a parameter, but using this approach you need to make a new wrapper class for each actions which required complex types parameters. In this article, I am going to explain another simple approach using ArrayList.
Let's see how to achieve this task. Suppose you have two classes - Supplier and Product as shown below -
  1. public class Product
  2. {
  3. public int ProductId { get; set; }
  4. public string Name { get; set; }
  5. public string Category { get; set; }
  6. public decimal Price { get; set; }
  7. }
  8.  
  9. public class Supplier
  10. {
  11. public int SupplierId { get; set; }
  12. public string Name { get; set; }
  13. public string Address { get; set; }
  14. }
In your Asp.Net MVC controller you are calling your Web API and you need to pass both the classes objects to your Web API controller.

Method 1 : Using ArrayList

For passing multiple complex types to your Web API controller, add your complex types to ArrayList and pass it to your Web API actions as given below-
  1. public class HomeController : Controller
  2. {
  3. public ActionResult Index()
  4. {
  5. HttpClient client = new HttpClient();
  6. Uri baseAddress = new Uri("http://localhost:2939/");
  7. client.BaseAddress = baseAddress;
  8. ArrayList paramList = new ArrayList();
  9. Product product = new Product { ProductId = 1, Name = "Book", Price = 500, Category = "Soap" };
  10. Supplier supplier = new Supplier { SupplierId = 1, Name = "AK Singh", Address = "Delhi" };
  11. paramList.Add(product);
  12. paramList.Add(supplier);
  13. HttpResponseMessage response = client.PostAsJsonAsync("api/product/SupplierAndProduct", paramList).Result;
  14. if (response.IsSuccessStatusCode)
  15. {
  16. return View();
  17. }
  18. else
  19. {
  20. return RedirectToAction("About");
  21. }
  22. }
  23. public ActionResult About()
  24. {
  25. return View();
  26. }
  27. }
Now, on Web API controller side, you will get your complex types as shown below.


Now deserialize your complex types one by one from ArrayList as given below-
  1. public class ProductController : ApiController
  2. {
  3. [ActionName("SupplierAndProduct")]
  4. [HttpPost]
  5. public HttpResponseMessage SuppProduct(ArrayList paramList)
  6. {
  7. if (paramList.Count > 0)
  8. {
  9. Product product = Newtonsoft.Json.JsonConvert.DeserializeObject(paramList[0].ToString());
  10. Supplier supplier = Newtonsoft.Json.JsonConvert.DeserializeObject(paramList[1].ToString());
  11. //TO DO: Your implementation code
  12. HttpResponseMessage response = new HttpResponseMessage { StatusCode = HttpStatusCode.Created };
  13. return response;
  14. }
  15. else
  16. {
  17. HttpResponseMessage response = new HttpResponseMessage { StatusCode = HttpStatusCode.InternalServerError };
  18. return response;
  19. }
  20. }
  21. }

Method 2 : Using Newtonsoft JArray

For passing multiple complex types to your Web API controller, you can also add your complex types to JArray and pass it to your Web API actions as given below-
  1. public class HomeController : Controller
  2. {
  3. public ActionResult Index()
  4. {
  5. HttpClient client = new HttpClient();
  6. Uri baseAddress = new Uri("http://localhost:2939/");
  7. client.BaseAddress = baseAddress;
  8. JArray paramList = new JArray();
  9. Product product = new Product { ProductId = 1, Name = "Book", Price = 500, Category = "Soap" };
  10. Supplier supplier = new Supplier { SupplierId = 1, Name = "AK Singh", Address = "Delhi" };
  11. paramList.Add(JsonConvert.SerializeObject(product));
  12. paramList.Add(JsonConvert.SerializeObject(supplier));
  13. HttpResponseMessage response = client.PostAsJsonAsync("api/product/SupplierAndProduct", paramList).Result;
  14. if (response.IsSuccessStatusCode)
  15. {
  16. return View();
  17. }
  18. else
  19. {
  20. return RedirectToAction("About");
  21. }
  22. }
  23. public ActionResult About()
  24. {
  25. return View();
  26. }
  27. }

Note

Don't forget to add reference of Newtonsoft.Json.dll to your ASP.NET MVC project and WebAPI as well.
Now, on Web API controller side, you will get your complex types within JArray as shown below.


Now deserialize your complex types one by one from JArray as given below-
  1. public class ProductController : ApiController
  2. {
  3. [ActionName("SupplierAndProduct")]
  4. [HttpPost]
  5. public HttpResponseMessage SuppProduct(JArray paramList)
  6. {
  7. if (paramList.Count > 0)
  8. {
  9. Product product = JsonConvert.DeserializeObject(paramList[0].ToString());
  10. Supplier supplier = JsonConvert.DeserializeObject(paramList[1].ToString());
  11. //TO DO: Your implementation code
  12. HttpResponseMessage response = new HttpResponseMessage { StatusCode = HttpStatusCode.Created };
  13. return response;
  14. }
  15. else
  16. {
  17. HttpResponseMessage response = new HttpResponseMessage { StatusCode = HttpStatusCode.InternalServerError };
  18. return response;
  19. }
  20. }
  21. }
In this way, you can easily pass your complex types to your Web API. There are two solution, there may be another one as well.
What do you think?
I hope you will enjoy the tips while programming with Asp.Net Web API. I would like to have feedback from my blog readers. Your valuable feedback, question, or comments about this article are always welcome.