HI WELCOME TO SIRIS
Showing posts with label Powerapps. Show all posts

Create business rules and recommendations to apply logic in a model-driven app form

Leave a Comment

 This topic shows you how to create business rules and recommendations to apply form logic in a model-driven app without writing JavaScript code or creating plug-ins. Business rules provide a simple interface to implement and maintain fast-changing and commonly used rules. They can be applied to Main and Quick Create forms, and they work in model-driven apps, legacy web apps, Dynamics 365 for tablets, and Dynamics 365 for Outlook (online or offline mode).

By combining conditions and actions, you can do any of the following with business rules:

  • Set column values

  • Clear column values

  • Set column requirement levels

  • Show or hide columns

  • Enable or disable columns

  • Validate data and show error messages

  • Create business recommendations based on business intelligence.

 Note

To define a business rule for a table so that it applies to all forms, see Create a business rule for a table.

Business rules don’t work with multi-select choices.

Create a business rule or business recommendation

  1. Sign in to Power Apps.

  2. Expand Data, select Tables, select the table you want, and then select the Business rules tab.

  3. On the command bar, select Add business rule.

    The Business Rule designer window opens with a single condition already created for you. Every rule starts with a condition. The business rule takes one or more actions based on that condition.
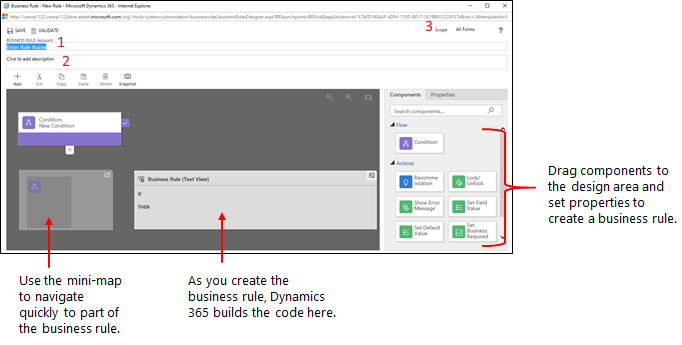
    Business Rules design window.

 Tip

If you want to modify an existing business rule, you must deactivate it before you can modify it.

  1. Add a description, if you want, in the description box in the upper-left corner of the window.

  2. Set the scope, according to the following:

    If you select this item...

    The scope is set to...

    Entity

    All forms and server

    All Forms

    All forms

    Specific form (Account form, for example)

    Just that form

  3. Add conditions. To add more conditions to your business rule:

    1. Drag the Condition component from the Components tab to a plus sign in the designer.
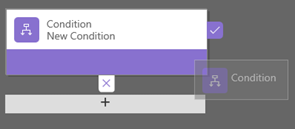
      Add a condition in a business rule.

    2. To set properties for the condition, select the Condition component in the designer window, and then set the properties in the Properties tab on the right side of the screen. As you set properties, an expression is created at the bottom of the Properties tab.

    3. To add an additional clause (an AND or OR) to the condition, select New in the Properties tab to create a new rule, and then set the properties for that rule. In the Rule Logic column, you can specify whether to add the new rule as an AND or an OR.

      Add a new rule to a condition.

    4. When you're done setting properties for the condition, select Apply.

  4. Add actions. To add an action:

    1. Drag one of the action components from the Components tab to a plus sign next to Condition component. Drag the action to a plus sign next to a check mark if you want the business rule to take that action when the condition is met, or to a plus sign next to an x if you want the business rule to take that action if the condition is not met.

      Drag an action to a business rule.

    2. To set properties for the action, select the Action component in the designer window, and then set the properties in the Properties tab.

    3. When you're done setting properties, select Apply.

  5. Add a business recommendation. To add a business recommendation:

    1. Drag the Recommendation component from the Components tab to a plus sign next to a Condition component. Drag the Recommendation component to a plus sign next to a check mark if you want the business rule to take that action when the condition is met, or to a plus sign next to an x if you want the business rule to take that action if the condition is not met.

    2. To set properties for the recommendation, select the Recommendation component in the designer window, and then set the properties in the Properties tab.

    3. To add more actions to the recommendation, drag them from the Components tab, and then set properties for each action in the Properties tab.

       Note

      When you create a recommendation, a single action is added by default. To see all the actions in a recommendation, select Details on the Recommendation component.

    4. When you're done setting properties, select Apply.

  6. To validate the business rule, select Validate on the action bar.

  7. To save the business rule, select Save on the action bar.

  8. To activate the business rule, select it in the Solution Explorer window, and then select Activate. You can't activate the business rule from the designer window.

 Tip

Here are a few tips to keep in mind as you work on business rules in the designer window:

  • To take a snapshot of everything in the Business Rule window, select Snapshot on the action bar. This is useful, for example, if you want to share and get comments on the business rule from a team member.
  • Use the mini-map to navigate quickly to different parts of the process. This is useful when you have a complicated process that scrolls off the screen.
  • As you add conditions, Actions, and business recommendations to your business rule, code for the business rule is built and appears at the bottom of the designer window. This code is read-only.

Localize error messages used in business rules

If you have more than one language provisioned for your organization, you will want to localize any error messages that you have set. Each time you set a message, a label is generated by the system. If you export the translations in your organization, you can add localized versions of your messages and then import those labels back into the system, so that people using languages other than your base language can view the translated messages.

Common issues

This section describes common issues that may occur when you use business rules.

Full Name column and Address column not supported with Unified Interface apps

Actions or conditions that use a composite column like the Full Name (fullname) column or an Address column aren't supported in apps based on Unified Interface. Alternatively, you can use actions or conditions with the constituent columns. For example, for the Full Name column, you can use actions or conditions on the First Name (firstname) and Last Name (lastname) columns.

Business rules don't execute for some users

Make sure that users have a security role that includes, at a minimum, user scope read privileges on the Process table. By default, the Basic User security role has this privilege.

Business rules don't fire on editable grid on a dashboard

Entity scoped business rules will not fire on an editable grid when the editable grid is configured on a dashboard page.

Is your business rule not firing for a form?

A business rule may not execute because the column referenced in the business rule isn't included with the form.

  1. Open solution explorer. Expand the table that you want and then select Forms.

  2. Open the form that you want and then on the form designer ribbon select Business Rules.

  3. In the form designer, open the business rule.

  4. In the business rule designer select each condition and action to verify all the columns referenced in each condition and action.
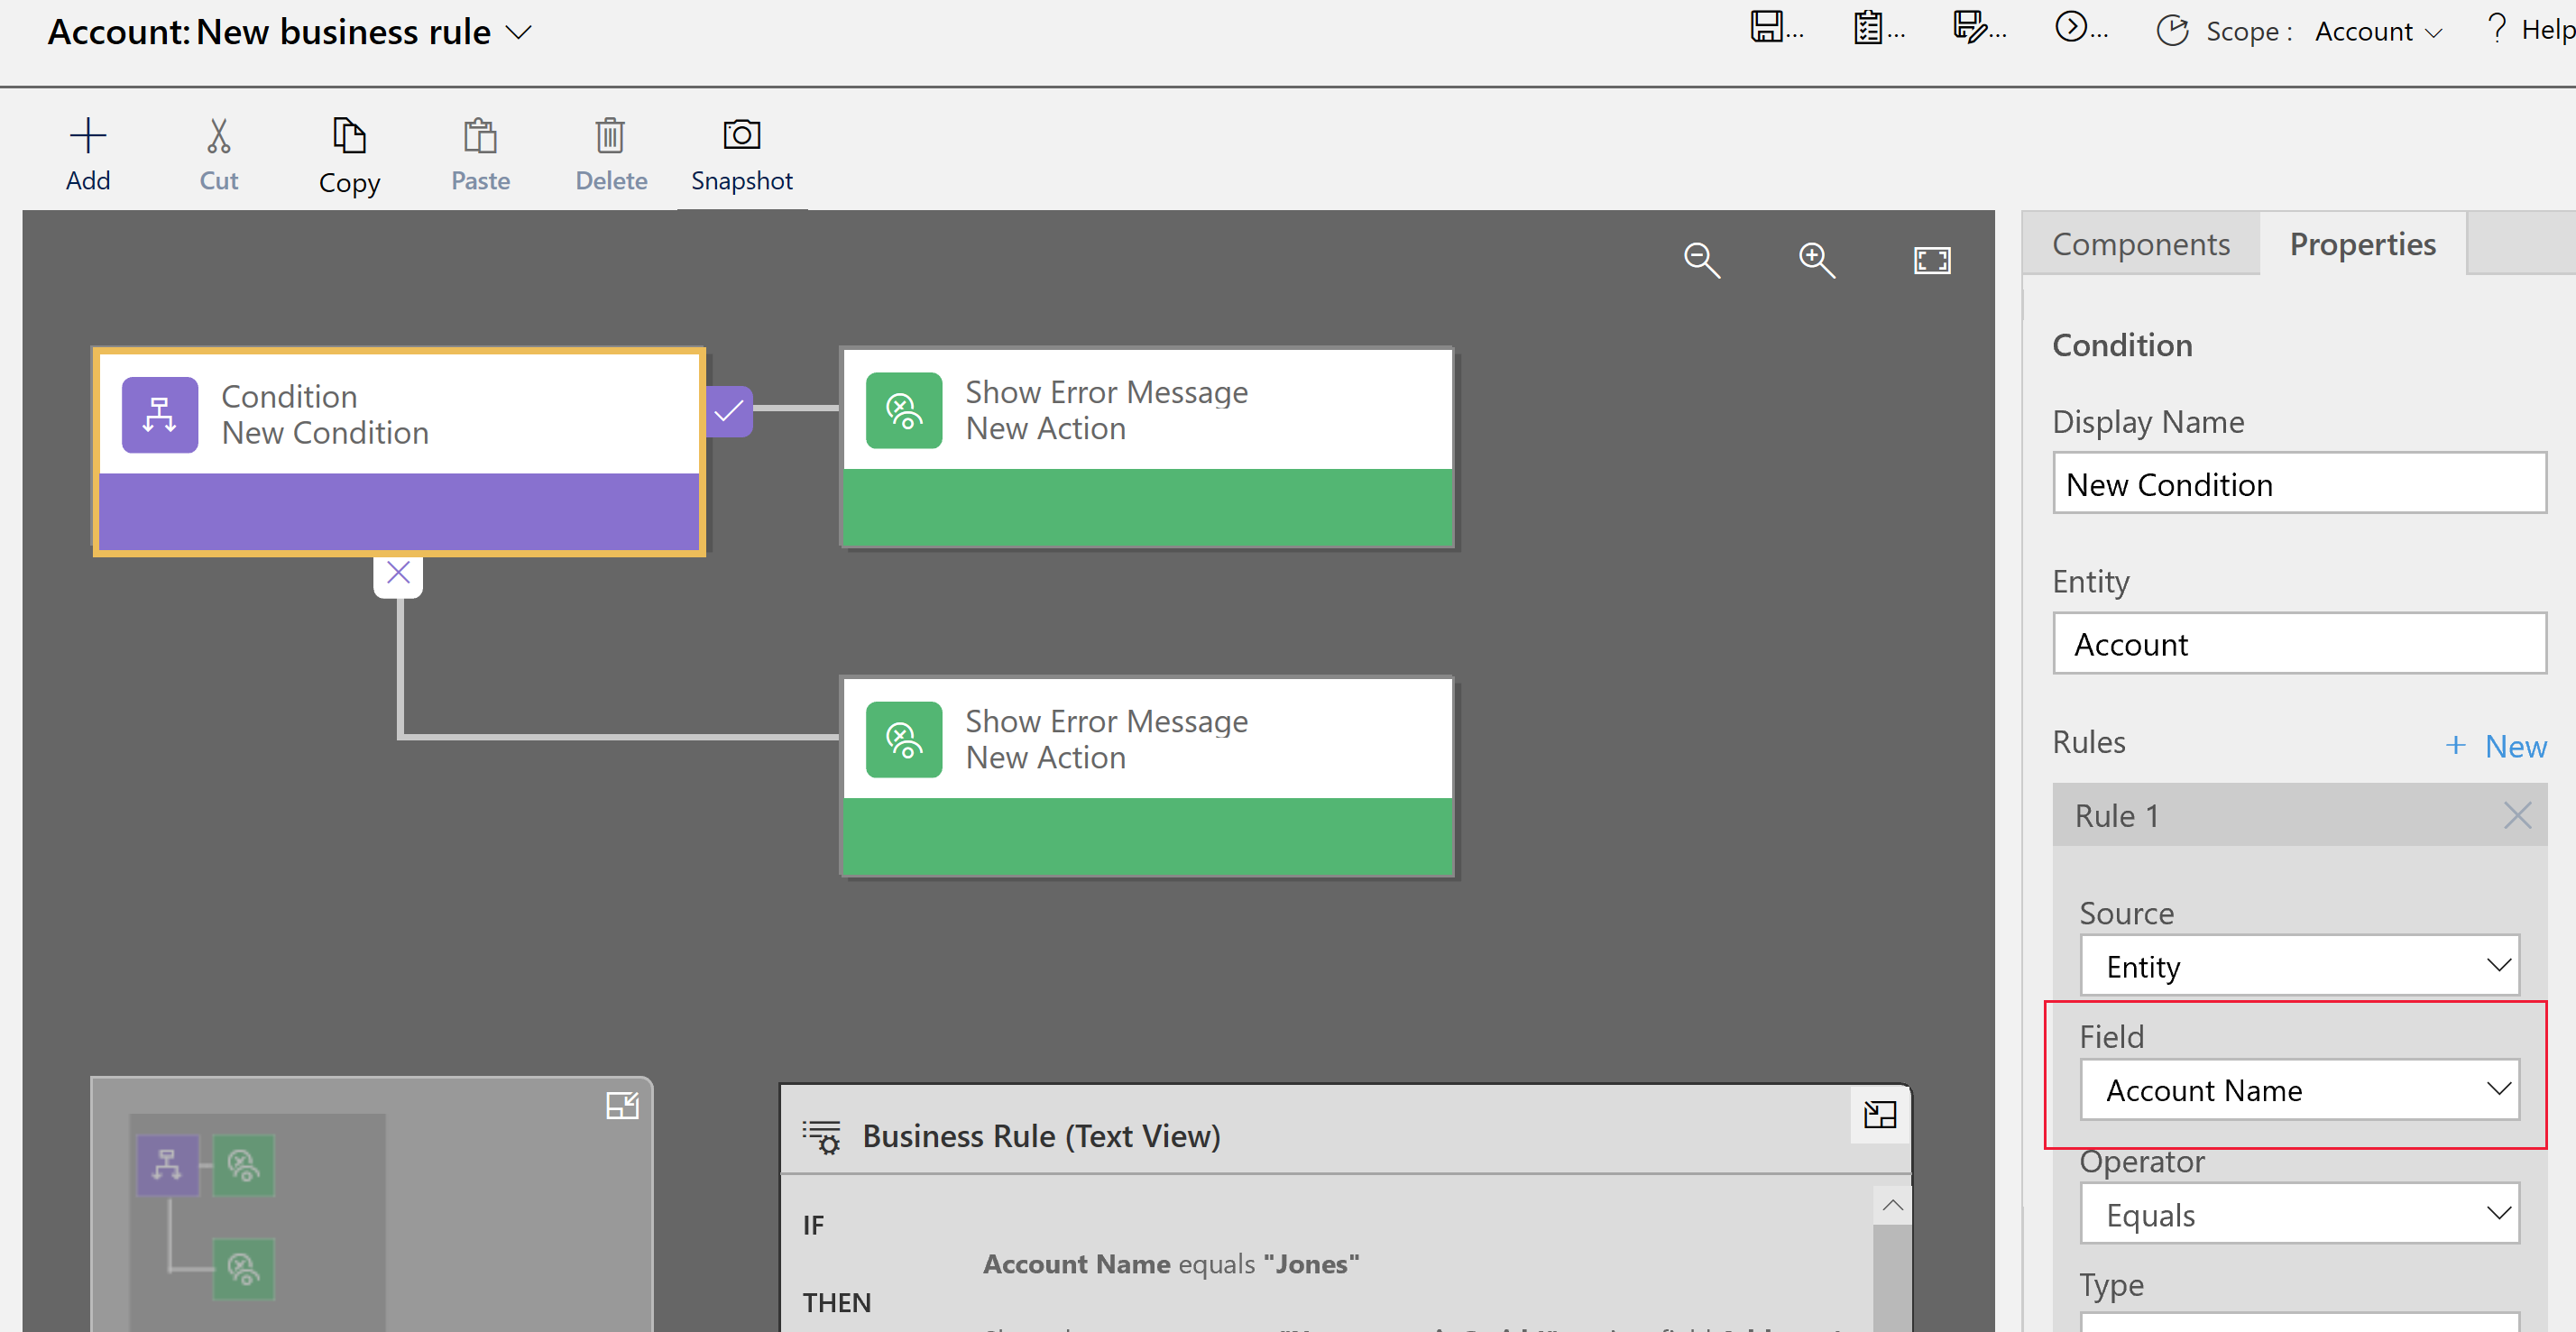
    Field referenced in business rule exists in table.

  5. Verify that each column referenced in the business rule is also included on the form. If not, add the missing column to the form.
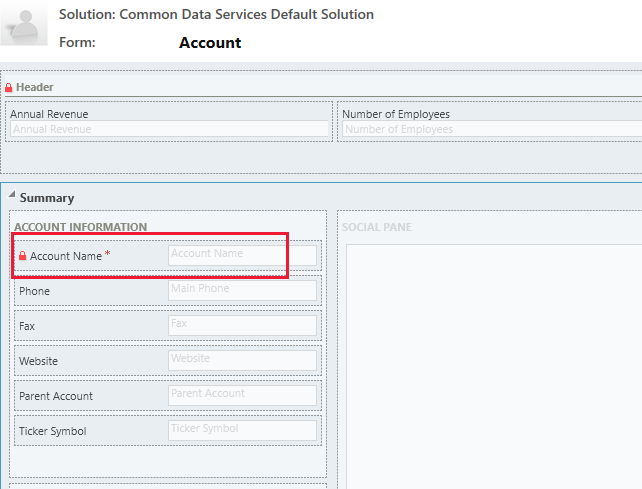
    Account name column on form.

A business rule may also not execute because a column referenced in the business rule is a composite column. You can use the constituent columns of the composite column instead.

Frequently asked questions (FAQ)

Can business rules unlock columns on a read-only form?

  • Yes, a business rule can unlock columns and edit actions on a read-only form.

How do I troubleshoot a business rule that isn't working?

What do recommendations look like within a form?

Recommendations show a lightbulb next to the column label.

  • Business rule collapsed.

Select the lightbulb to expand the view and show the recommendation.

  • Business rule expanded.

Unit Test Cases With ASP.NET MVC

Leave a Comment

 As you know ASP.NET MVC fully supports Test Driven Development approach where you can write your test cases first and on the basis of output or result you can write your actual code for development. Any Software which has their Data Access Layer or Business Layer, they should be tested before going to production. If these layers are tested it means you are going in right direction.


unit test

You can write test cases for all Public Methods, which needs to be tested.

First you just need to create an ASP.NET MVC application. To create a new ASP.NET MVC application with Test Project, Open Visual Studio choose File, New, then Project.

It will open a New Project window, from where you need to choose node as Visual C# and then Web and from the right pane you need to choose ASP.NET Web Application. Name the application.

Web application

It will open a new window from where you can choose different type of the ASP.NET MVC project template. You need to choose MVC and also be sure you have checked on Add Unit tests and click OK.

mvc

It will add both projects for you. One is your actual project and another one is your test project. In the test project, you can write your actual test cases to test the action method. See the following image which will describe the actual structure of your solution.

test case

Now open your HomeController.cs which is already created at the time of project creation with some default action method. You can see inside the HomeController.cs, there is a simple Index method, which return nothing but only a view.

controller

Now you need to go inside your Test project and you will find a default created Controller “HomeControllerTest” with test cases which is already defined in Index action method.

Test

There are some attributes and objects, used to create the test cases.

  • TestClass: This attribute defines that this class is being used for test cases and this must be defined with Test Cases Class.
  • TestMethod: It describes that the particular method which uses TestMethod attribute, is participating in Test Cases.

If you are going to test any of the method then you need to use the following steps.

  1. Arrange –You need to assign the value into the variable to test the functionality.
  2. Act – It is used to execute and capture result of the Method to take parameter value from Arrange Section.
  3. Assert – It is actual test object to compare the actual result data with your expected data.

Assert

Example

Now add a new ActionResult Method in ASP.NET MVC application and later we will make the test cases for it.

HomeController.cs

  1. public ActionResult CheckCountValue(int i)  
  2. {  
  3.    if(i<20)  
  4.    {  
  5.       //business logic goes here  
  6.    }  
  7.    else  
  8.    {  
  9.       throw (new Exception("Out of the Range"));  
  10.    }  
  11.   
  12.    return View();  
  13. }  
HomeControllerTest.cs
  1. [TestMethod]  
  2. public void CheckCountValueTest()  
  3. {  
  4.    int count = 400;  
  5.    HomeController controller = new HomeController();  
  6.    ViewResult result = controller.CheckCountValue(count) as ViewResult;  
  7.    Assert.IsNotNull(result);  
  8. }  
So, now it is time to run the test cases. Go to Test Menu and choose Run and then choose All Tests.

Note:
 Please select your test project as Set startup project before running the test cases.

All test

It will go to find out all the test cases and run.

output

Error

In the above image you can see the test case is going to fail because we are passing invalid value. So, change the value from 400 to less than 20. Let’s see what happened.

Code

You will find that your test case is running successfully. So, this is the way to write your own unit test cases in ASP.NET MVC.

Thanks for reading this article, hope you enjoyed it.

Unit Testing Controllers In Web API

Leave a Comment

 Introduction


TDD (Test-driven development) is a developmental approach in which TFD (Test-First Development) is there, and where we write a test before writing a code for the production. TDD is also supported by both MVC and Web API. In this article, we will learn how to write unit test case for Web API controller.

Following is a very common pattern in Unit Testing.

common pattern in Unit Testing

In the first step, we will have to create test data for testing, using a mock or stub object. This approach will minimize the number of dependencies.

Set up Unit test project

We have an option to create a Unit test project when we create a Web API project. When we create a unit test project with a web API project, Visual Studio IDE automatically adds Web API project reference to the unit test project.

web API project

Unit test project

Apart from this, we need to install the following packages to the Unit test project, because our unit test is dependent on these.

  • Microsoft.AspNet.WebApi
  • EntityFramework (if applicable)

If we want to inject any dependency to the controller, we can use the mock object. Using the following NuGet command, we can download a mock library.


Unit Test which returns HttpResponseMessage

In this following example, I have GET method in the controller and want to write a Unit test for this API method.

Controller Code

  1. namespace WebAPI.Controllers  
  2. {  
  3.     using System.Linq;  
  4.     using System.Net;  
  5.     using System.Net.Http;  
  6.     using System.Web.Http;  
  7.     using WebAPI.Models;  
  8.     publicclassEmployeeController: ApiController  
  9.     {  
  10.         EntityModel context = newEntityModel();  
  11.         publicHttpResponseMessage Get(int id)  
  12.         {  
  13.             var employee = context.Employees.Where(p => p.Id == id)  
  14.                 .FirstOrDefault();  
  15.             if (employee == null)  
  16.             {  
  17.                 return Request.CreateResponse(HttpStatusCode.NotFound);  
  18.             }  
  19.             return Request.CreateResponse(HttpStatusCode.OK, employee);  
  20.         }  
  21.         ///<summary>  
  22.         /// Dispose  
  23.         ///</summary>  
  24.         ///<param name="disposing"></param>  
  25.         protectedoverridevoid Dispose(bool disposing)  
  26.         {  
  27.             context.Dispose();  
  28.             base.Dispose(disposing);  
  29.         }  
  30.     }  
  31. }  
Unit Test
  1. namespace WebAPI.Tests  
  2. {  
  3.     using Microsoft.VisualStudio.TestTools.UnitTesting;  
  4.     using System.Net.Http;  
  5.     using System.Web.Http;  
  6.     using WebAPI.Controllers;  
  7.     using WebAPI.Models;  
  8.     [TestClass]  
  9.     publicclassEmployeeUnitTest  
  10.     {  
  11.         [TestMethod]  
  12.         publicvoid EmployeeGetById()  
  13.         {  
  14.             // Set up Prerequisites   
  15.             var controller = newEmployeeController();  
  16.             controller.Request = newHttpRequestMessage();  
  17.             controller.Configuration = newHttpConfiguration();  
  18.             // Act on Test  
  19.             var response = controller.Get(1);  
  20.             // Assert the result  
  21.             Employee employee;  
  22.             Assert.IsTrue(response.TryGetContentValue < Employee > (out employee));  
  23.             Assert.AreEqual("Jignesh", employee.Name);  
  24.         }  
  25.     }  
  26. }  
Here we set "Request" and "Configuration" on the controller. It is very important otherwise the Unit test will throw ArgumentNullException or InvalidOperationException.


Unit Test which returns IHttpActionResult

Web API also supports IHttpActionResult as a return type. This interface has a pre-defined command pattern to create HTTP responses. This approach is quite easy because IHttpActionResult creates the response. It is very easy to write a Unit test case with this approach because we can skip many things which are required for the setup HttpResponseMessage.

Example

In the following example, I created the controller called "DepartmentController" and GET method in the controller class. This method returns OK (department) when department is found in the database.

Controller Code
  1. namespace WebAPI.Controllers  
  2. {  
  3.     using System.Linq;  
  4.     using System.Web.Http;  
  5.     using WebAPI.Models;  
  6.     publicclassDepartmentController: ApiController  
  7.     {  
  8.         EntityModel context = newEntityModel();  
  9.         publicIHttpActionResult Get(int id)  
  10.         {  
  11.             Department department = context.Departments.Where(p => p.DepartmentId == id)  
  12.                 .FirstOrDefault();  
  13.             if (department == null)  
  14.             {  
  15.                 return NotFound();  
  16.             }  
  17.             return Ok(department);  
  18.         }  
  19.         publicIHttpActionResult Post(Department department)  
  20.         {  
  21.             if (department != null)  
  22.             {  
  23.                 context.Departments.Add(department);  
  24.                 context.SaveChanges();  
  25.                 return CreatedAtRoute("DefaultApi"new  
  26.                 {  
  27.                     id = department.DepartmentId  
  28.                 }, department);  
  29.             }  
  30.             return BadRequest();  
  31.         }  
  32.     }  
  33. }  
Unit Test

I have written the Unit test case, which returns 200 with the response body. In this Unit test, I have GET content result, using OkNegotiatedContentResult and I check whether the return object has the same departmentId.
  1. namespace WebAPI.Tests  
  2. {  
  3.     using Microsoft.VisualStudio.TestTools.UnitTesting;  
  4.     using System.Web.Http.Results;  
  5.     using WebAPI.Controllers;  
  6.     using WebAPI.Models;  
  7.     [TestClass]  
  8.     publicclassDepartmentUnitTest  
  9.     {  
  10.         [TestMethod]  
  11.         publicvoid DepartmentGetByIdSuccess()  
  12.         {  
  13.             // Set up Prerequisites   
  14.             var controller = newDepartmentController();  
  15.             // Act on Test  
  16.             var response = controller.Get(1);  
  17.             var contentResult = response asOkNegotiatedContentResult < Department > ;  
  18.             // Assert the result  
  19.             Assert.IsNotNull(contentResult);  
  20.             Assert.IsNotNull(contentResult.Content);  
  21.             Assert.AreEqual(1, contentResult.Content.DepartmentId);  
  22.         }  
  23.     }  
  24. }  
The following unit test is written to test the response of the action method, when the department is not found in the database.
  1. [TestMethod]  
  2. publicvoid GetDepartmentNotFound()  
  3. {  
  4.     // Set up Prerequisites   
  5.     var controller = newDepartmentController();  
  6.     // Act  
  7.     IHttpActionResult actionResult = controller.Get(100);  
  8.     // Assert  
  9.     Assert.IsInstanceOfType(actionResult, typeof(NotFoundResult));  
  10. }  
In the example given above, the Post method calls CreatedAtRoute for returning a Status code 201. In the following Unit test, I have verified that the action sets the correct routing value.
  1. [TestMethod]  
  2. publicvoid AddDepartmentTest()  
  3. {  
  4.     // Arrange  
  5.     var controller = newDepartmentController();  
  6.     Department department = newDepartment  
  7.     {  
  8.         DepartmentName = "Test Department",  
  9.     };  
  10.     // Act  
  11.     IHttpActionResult actionResult = controller.Post(department);  
  12.     var createdResult = actionResult asCreatedAtRouteNegotiatedContentResult < Department > ;  
  13.     // Assert  
  14.     Assert.IsNotNull(createdResult);  
  15.     Assert.AreEqual("DefaultApi", createdResult.RouteName);  
  16.     Assert.IsNotNull(createdResult.RouteValues["id"]);  
  17. }  
We can also verify the status code of the action methods.
 
For example, Put method return status is code 202 (Accepted), OK (200) etc.
 

Controller Method
  1. publicIHttpActionResult Put(Department department)  
  2. {  
  3.     if (department != null)  
  4.     {  
  5.         // Do some work .  
  6.         return Content(HttpStatusCode.Accepted, department);  
  7.     }  
  8.     return BadRequest();  
  9. }  
Unit test
  1. [TestMethod]  
  2. publicvoid UpdateDepartmentTest()  
  3. {  
  4.     // Arrange  
  5.     var controller = newDepartmentController();  
  6.     Department department = newDepartment  
  7.     {  
  8.         DepartmentId = 4,  
  9.             DepartmentName = "Test Department",  
  10.     };  
  11.     // Act  
  12.     IHttpActionResult actionResult = controller.Put(department);  
  13.     var contentResult = actionResult asNegotiatedContentResult < Department > ;  
  14.     Assert.IsNotNull(contentResult);  
  15.     Assert.AreEqual(HttpStatusCode.Accepted, contentResult.StatusCode);  
  16.     Assert.IsNotNull(contentResult.Content);  
  17. }  
Summary

Unit test is a code that helps us in verifying the expected behavior of the other code in isolation. Here “In isolation" means there is no dependency between the tests. This is a better idea to test the Application code, before it goes for quality assurance (QA).